Slack Huddle Bots Integration Guide
This guide walks you through integrating a Slack bot and app with Recall.ai to capture Slack Huddle data. You’ll set up a bot, configure webhooks, and activate it to join a Slack workspace and listen to huddles.
Prerequisites
- Slack Workspace: A workspace where you have permission to invite participants
- Domain: A custom domain or subdomain which will be added to Recall for us to read incoming emails to your Slack bot’s email (e.g.,
[email protected])
Overview - How It Works
At a high level, the Slack integration flow can be broken down into 5 parts:
- Your customer invites your Slack bot to their workspace using a dedicated bot email
- Recall receives the slack email invite and sends a webhook to your endpoint notifying you of the invite
- You activate the bot which gets it to joins your customer's Slack workspace
- Users in their workspace authorize your Slack app
- Bot watches for huddles and joins automatically/by invite
In practice, there is some setup required to enable this flow to work seamlessly. The full integration process is described below.
Integration Steps
Step 1: Configure your webhook in your app
Add a webhook to your app to listen for events related to our new Slack integration. You can either:
- Create a new webhook endpoint specifically for these events, or
- Modify an existing webhook by adding the code snippet below.
Since all webhook events are sent to the endpoints configured in the Recall dashboard, your webhook will automatically receive relevant Slack integration events.
The Slack Team Webhook Event will have the following schema:
type SlackTeamWebhookEventType =
    "slack_team.invited" | // A customer has invited your Slack bot to their workspace
    "slack_team.active" | // Your Slack bot is active and is ready to join huddles
    "slack_team.access_revoked"; // A customer has removed your Slack bot from their Slack workspace

type SlackTeamWebhookEventSubCode =
    "invited" |
    "active" |
    "access_revoked";

interface SlackTeamEvent {
    event: SlackTeamWebhookEventType;
    data: {
        data: {
            code: SlackTeamWebhookEventSubCode;
            sub_code: string | null;
            updated_at: string;
        };
        slack_team: {
            id: string;
            metadata: object;
        };
    };
}
Next is to handle each event type that could be sent:
slack_team.invited- A customer has invited your Slack bot to their workspace. You can activate your Slack team integration by making aPATCHrequest to the Update Slack Team api. Note that you should set the bot name, otherwise the bot will join the slack workspace asNone.slack_team.active- Your Slack bot is active and is ready to join huddles. No action requiredslack_team.access_revoked- A customer has removed your Slack bot from their Slack workspace. You can delete their Slack team integration by calling the Delete Slack Team api
Below is a sample of how your webhook should handle slack-related webhook events:
/**
 * Handles Slack webhook events.
 * @param slackEvent - The Slack event payload.
 */
const handleRecallSlackWebhookEvent = async (slackEvent: SlackTeamEvent) => {
    const { event, data } = slackEvent;
    const slackTeamId = data.slack_team.id;

    const recallApiKey = process.env.RECALL_API_KEY;
    const recallDomain = process.env.RECALL_DOMAIN;

    switch (event) {
        case "slack_team.invited": {
            const response = await fetch(`${recallDomain}/api/v2/slack-teams/${slackTeamId}`, {
                method: 'PATCH',
                headers: {
                    'Authorization': `${recallApiKey}`,
                    'Content-Type': 'application/json',
                },
                body: JSON.stringify({
                    bot_name: 'Slack Bot',
                }),
            });
            if (!response.ok) {
                throw new Error(`Failed to activate Slack team ${slackTeamId}: ${await response.text()}`);
            }
            console.info(`Slack team ${slackTeamId} activated`);
            break;
        }
        case "slack_team.active": {
            console.info(`Slack team ${slackTeamId} is active`);
            break;
        }
        case "slack_team.access_revoked": {
            console.info(`Slack team ${slackTeamId} has had their access revoked`);
            break;
        }
        default: {
            console.info(`Received ${event} event for team ${slackTeamId}`);
            break;
        }
    }
};
Step 2: Register Your Webhook in the Dashboard
Regardless of whether you’re using an existing webhook or a new one, make sure the webhook endpoint URL is registered in the Recall dashboard. This ensures that Slack-related events are properly routed to your webhook
To do this, you can:
- Go to the Recall Dashboard -> Webhooks
- Add your webhook URL endpoint (ex.
https://example.com/api/webhooks/recallai)
Tip for local developmentWhen developing locally, use a service like Ngrok to expose your local server for testing. Then add the Ngrok link to the Recall webhooks dashboard.
Step 3: Give Recall access to manage emails sent to the Slack bot's email domain
Recall needs permission to read emails sent to your bot's domain so that we can receive the Slack workspace invite emails. This requires setting up DNS records for your domain.
Do not configure DNS records on your main domainAdding the DNS records we provide to you will interfere with your ability to receive emails if you use your main domain. You should either use a different domain, or a dedicated subdomain, e.g.
bot.yourdomain.com.
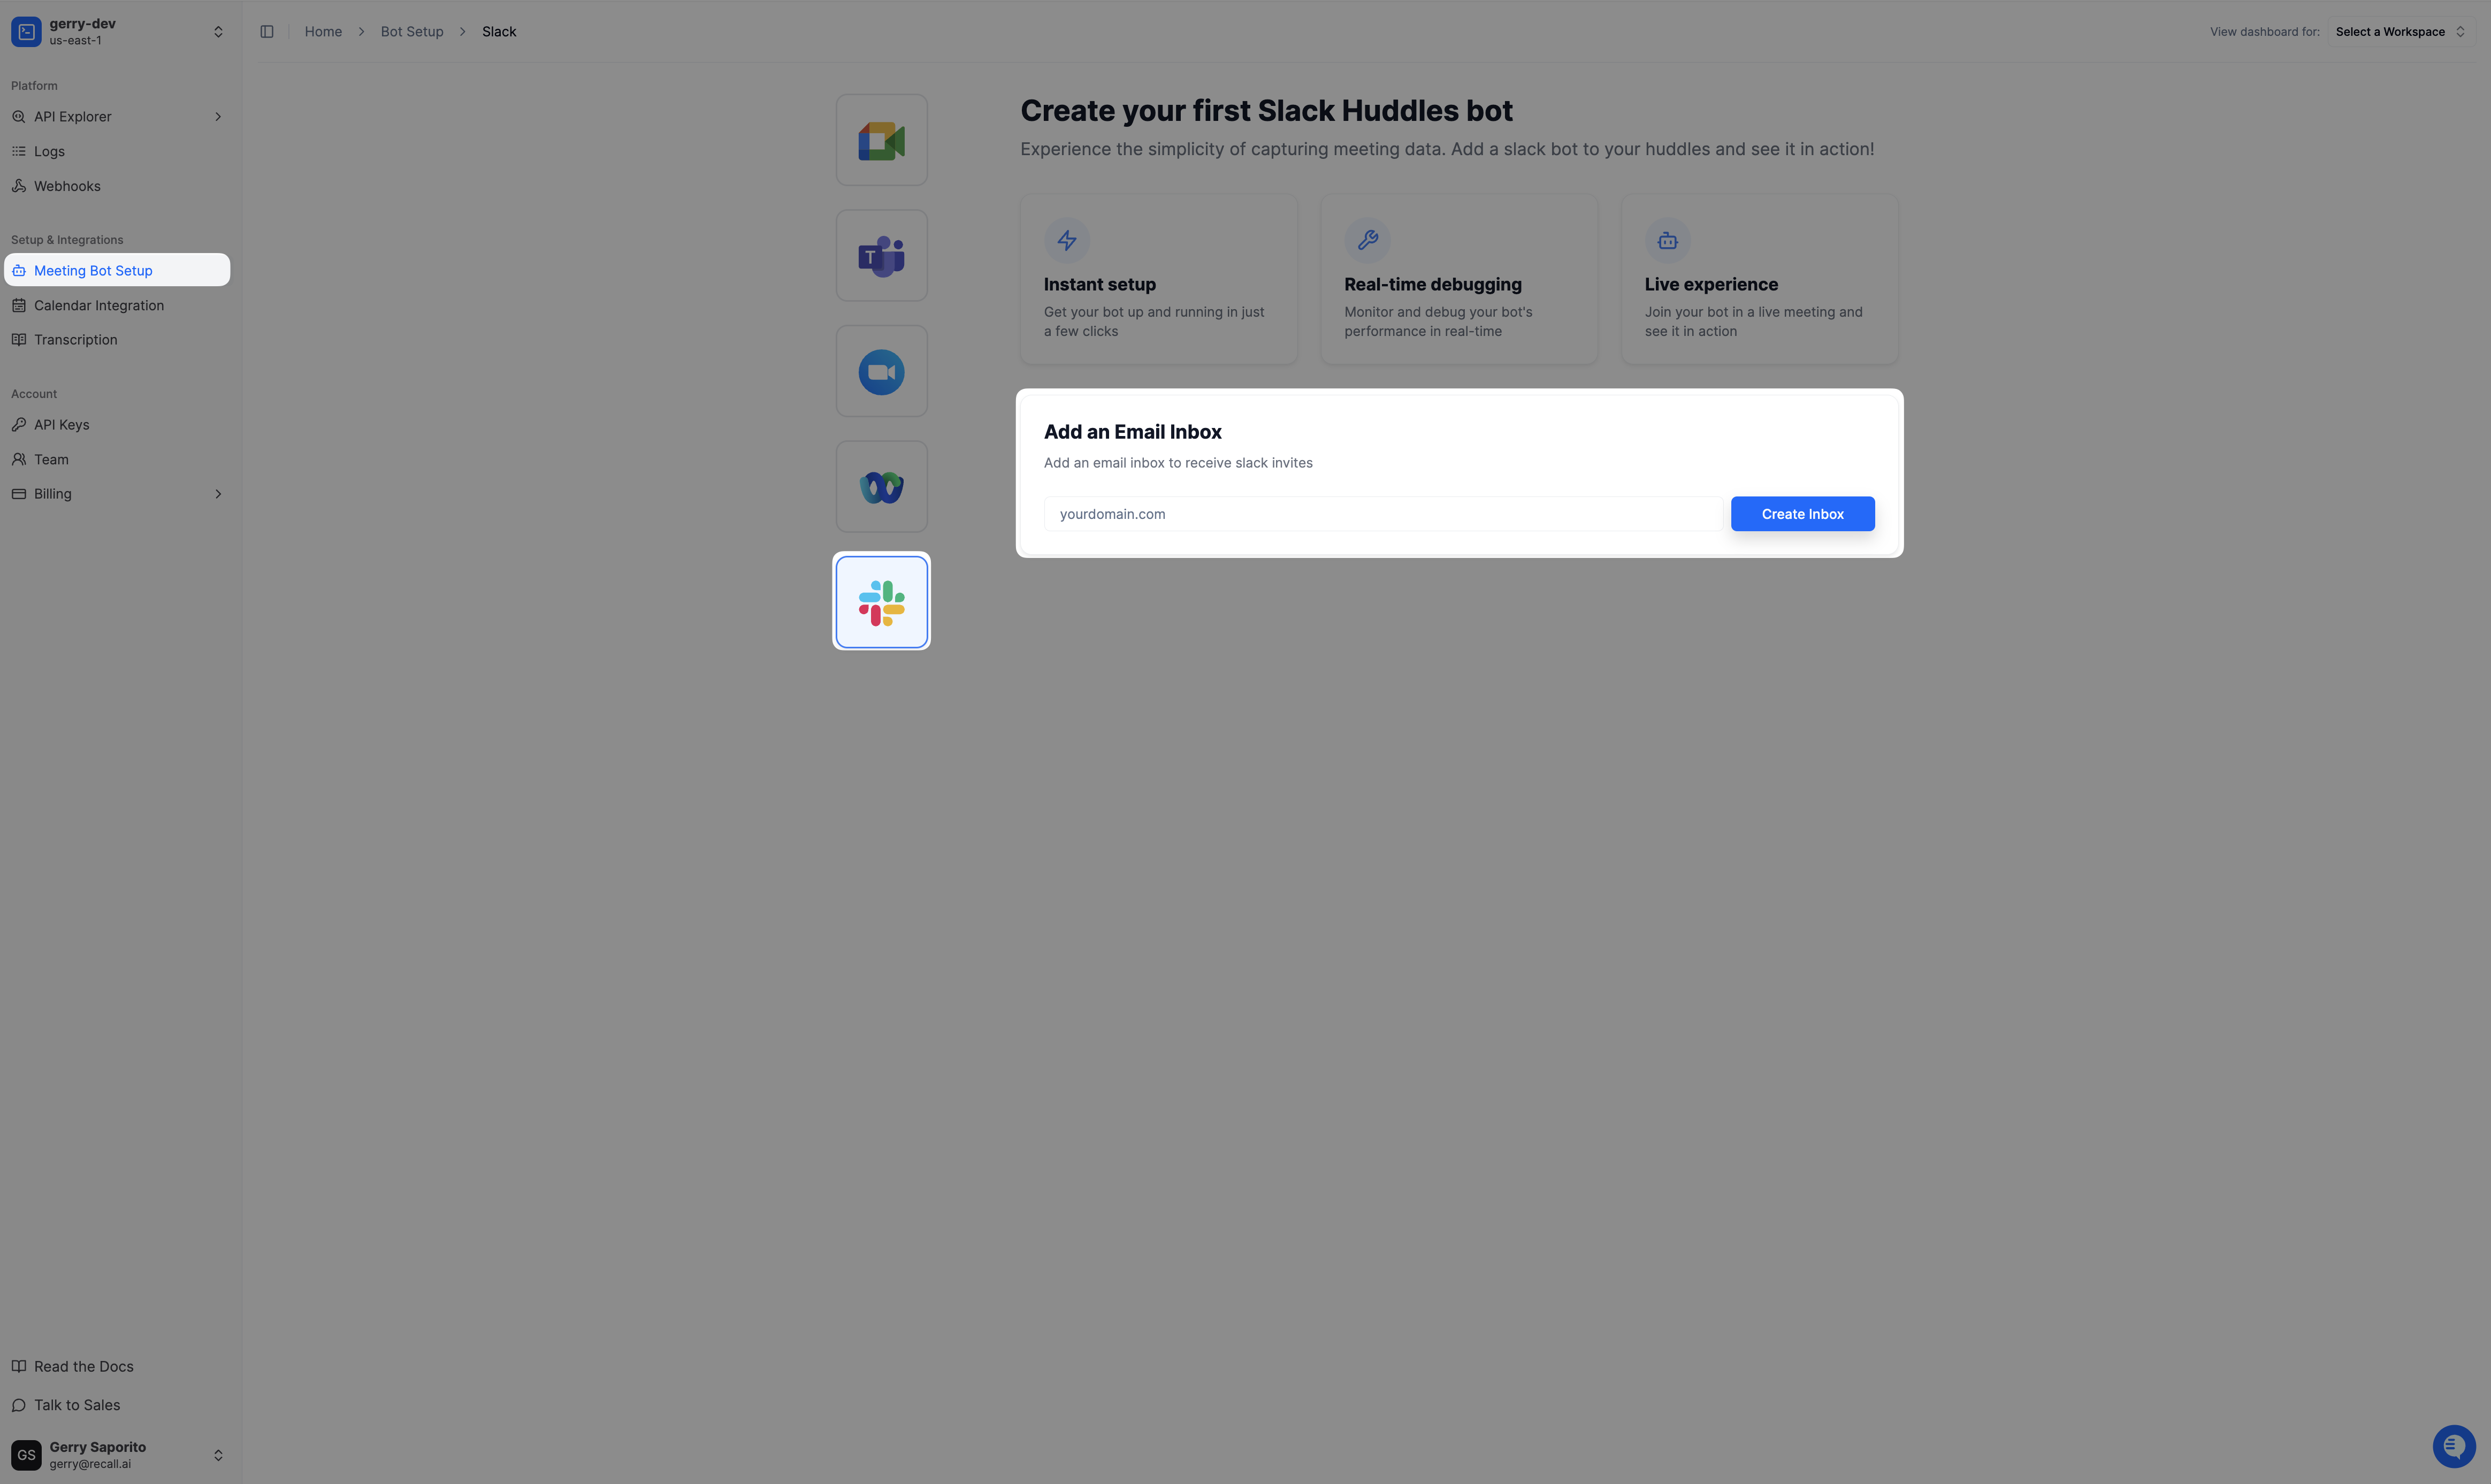
Set Up a Custom Email for Your Slack Bot
-
Add Your Bot's Domain in the Recall.ai Dashboard
- Navigate to the Slack bot setup in the Recall dashboard and enter your domain (e.g., yourdomain.com)
- This allows Recall to generate the necessary DNS records for your domain (~10 minutes to generate the records)
-
Retrieve the Generated DNS Records
- Once the domain is added, Recall.ai will generate several DNS records (MX, TXT, etc.)
-
Add the DNS Records to Your DNS Provider
- Copy the generated records and add them to your DNS provider (e.g., Cloudflare, GoDaddy).
-
Wait for DNS Verification
- Once the records are added, Recall.ai will attempt to verify them (~1 hour for the records to propagate, set a low TTL)
Verification can take up to an hour or two to complete.
Step 4: Invite the Email to Your Slack Workspace
Now that your email inbox is set up, you can invite the bot's email address to join your Slack workspace.
In your Slack workspace, invite [email protected] as a new member. Note that because we're managing your email server for the added domain, you can choose any email username for your bot (i.e. [email protected])
Handling SSO-Enabled WorkspacesIf your Slack workspace uses Single Sign-On (SSO), invite the bot as a guest user with limited channel access to every channel you want it to join. This ensures the bot can join without requiring full SSO authentication.
Once the bot has been invited and joined your workspaces, the bot will be able to participate in Slack huddles.
What Happens Next?
Now that you’ve invited the bot to your Slack workspace, here’s what to expect:
- Bot Activation (~15 Minutes)
- The bot will take up to 15 minutes to join the workspace and come online
- You’ll know it’s ready when you see the green online status on its profile picture
- Inviting the Bot to Huddles
- Once the bot is online, you can invite it to join Slack Huddles just like any other member
- At this point, your Slack bot is fully integrated and ready to handle events within your workspace! 🚀
How to Get Slack Huddle Bot Data
Once the bot is online and joins Slack Huddles, Recall.ai will automatically send webhook events containing meeting data just like it does for other meeting platforms.
When you receive a bot's status change event, query the bot using the Retrieve Bot api
Once you have the response from this endpoint, you can check the meeting_metadata field on which should look something like this:
data = {
  // ... other bot-related fields
  meeting_metadata: {
    slack_channel_id: 'slack_team_id',
    slack_huddle_id: 'slack_huddle_id'
  },
  slack_team: {
    id: 'slack_team_id'
  }
}
At this stage, your integration is fully functional, and your bot can collect meeting data from Slack Huddles seamlessly! 🎯
Troubleshooting your integration
Re-inviting the bot
This flow is triggered when:
- A bot (
[email protected]) has been invited and joined a Slack workspace - The
SlackTeamassociated with the above email and customer's Slack workspace has been deleted. Whether the bot is still in the Slack workspace or not is unrelated to this step. - You try to add the slack bot with the same email back to the same Slack workspace
To re-invite the bot to a slack workspace:
- Ensure that the slack bot in the workspace has been completely removed from the Slack workspace. This will reset the bot's status in Slack
- Note that deleting the Slack Team doesn't make the bot leave the Slack workspace automatically. This step needs to be done manually by an admin in the Slack workspace
- Invite the bot via email through the normal flow
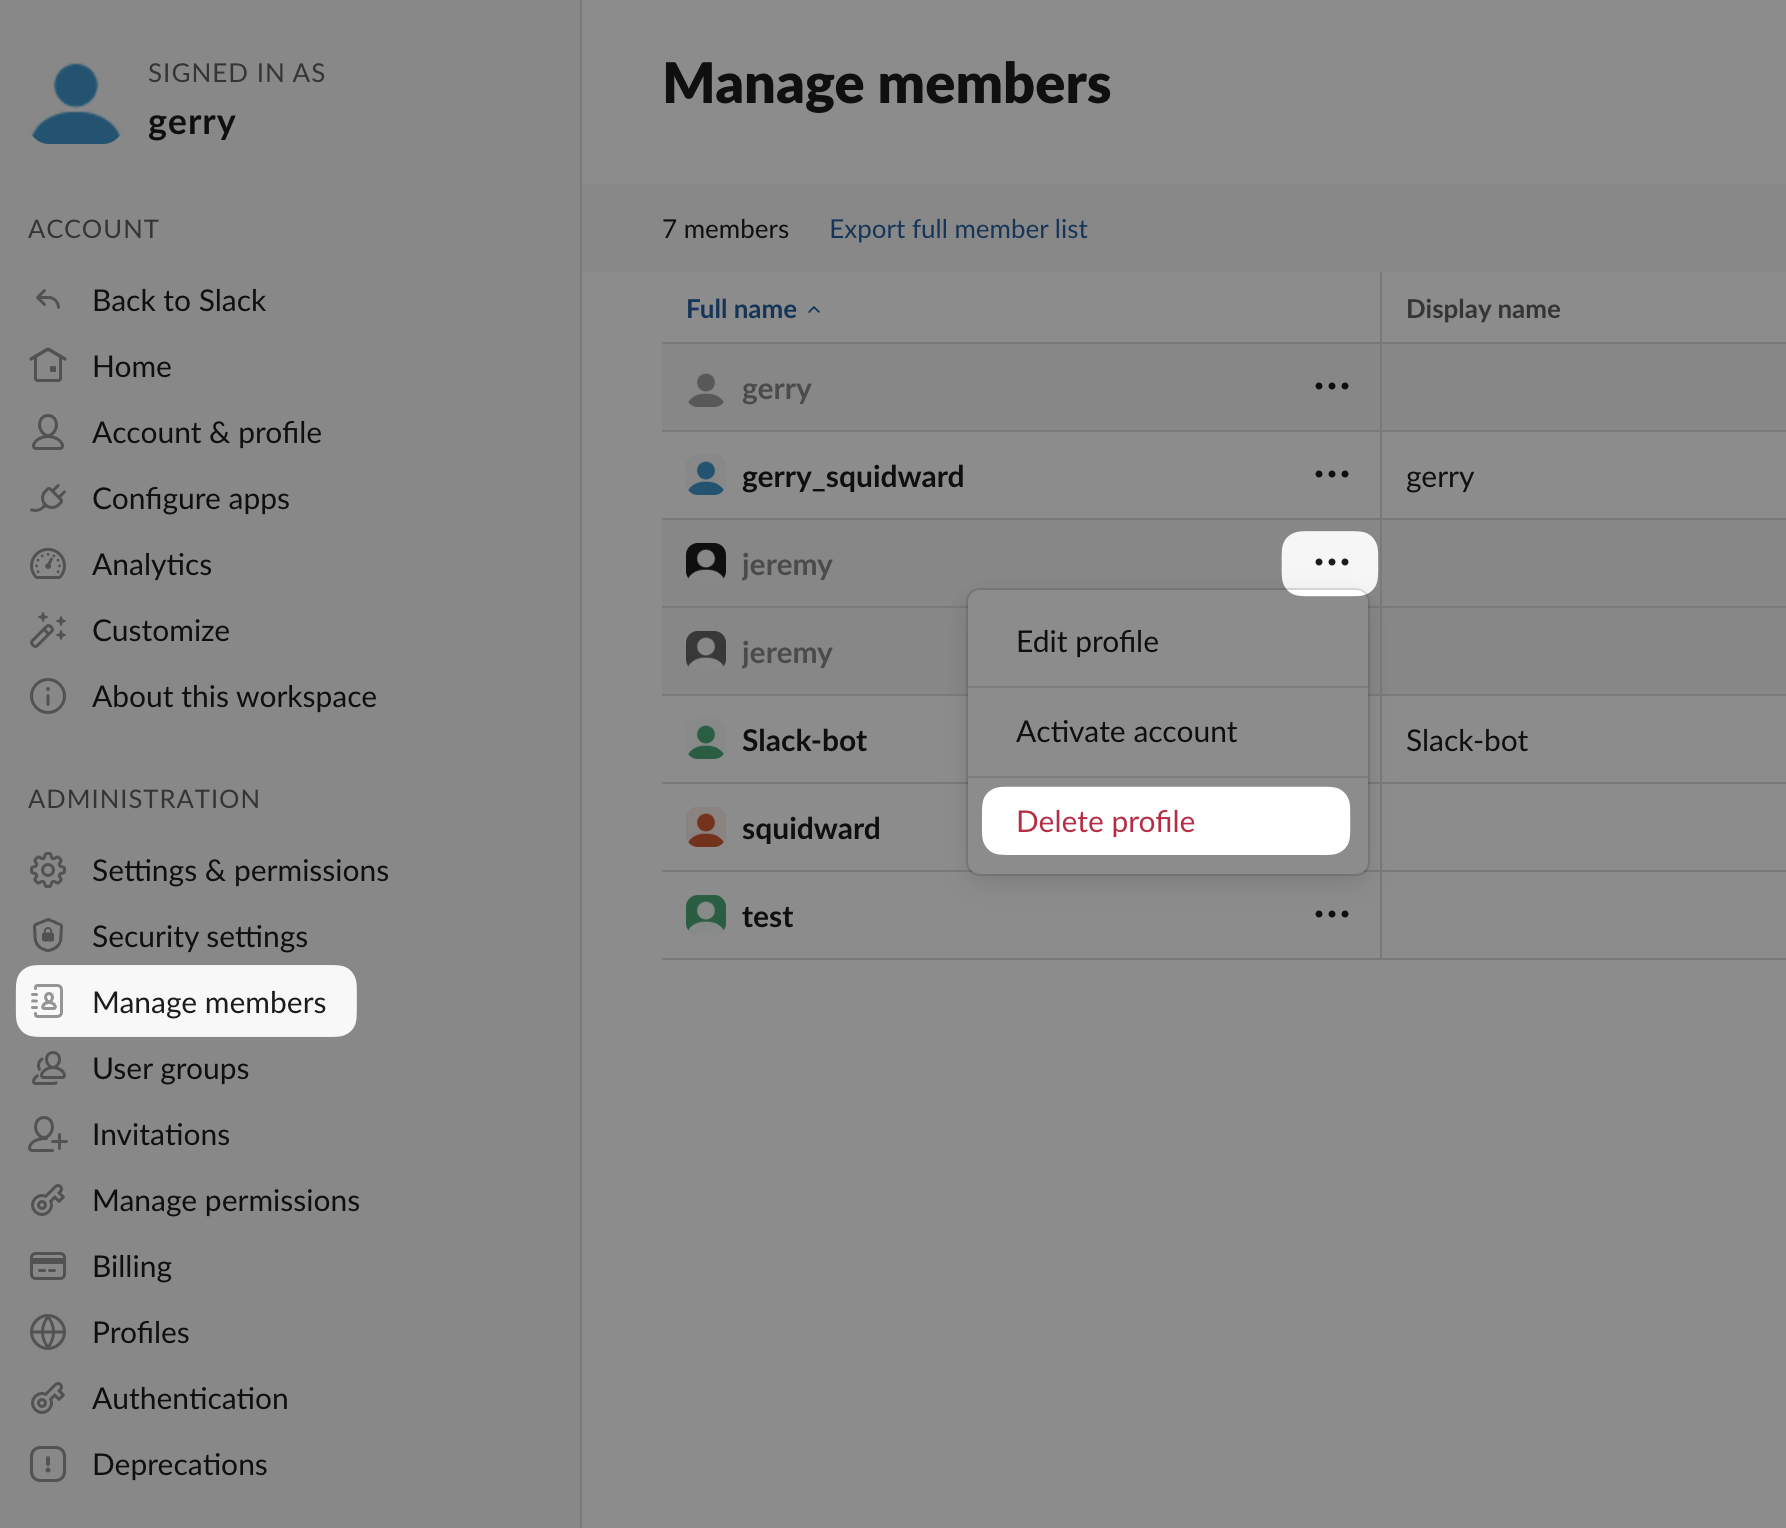
To remove a user (the bot) from your slack workspace:
NOTE: Only the user with the "Primary Workspace Owner" role can perform this action
- First head to your Slack workspace's admin dashboard
- Head to "Manage Members"
- Deactivate account for that user
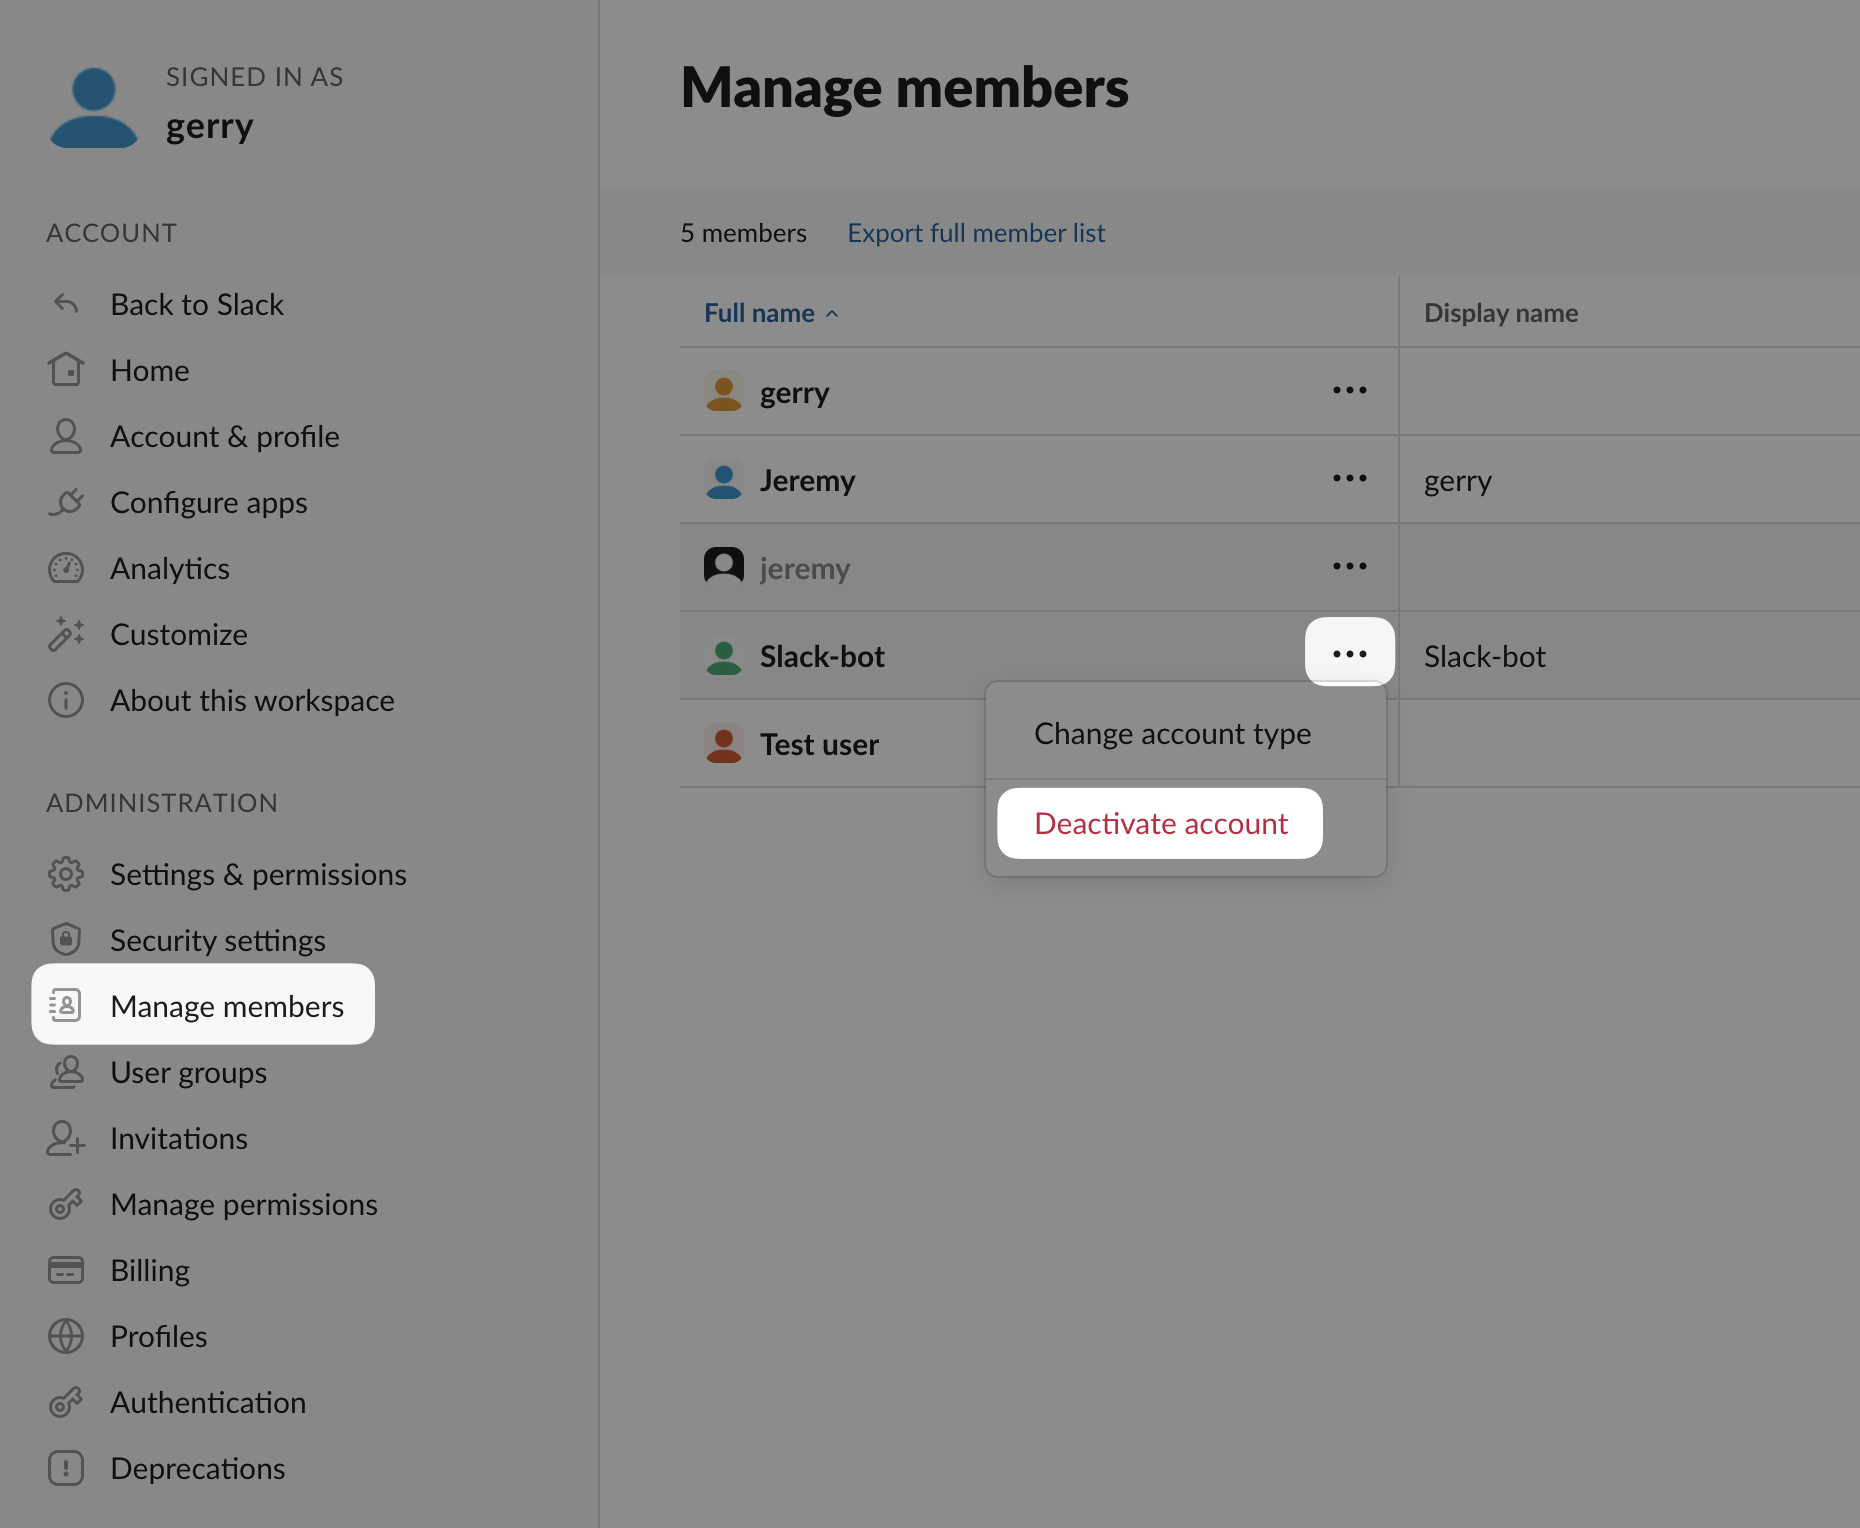
- Delete the profile for that user
Updated 10 days ago