

Microsoft Outlook
Calendar V2: Configure Microsoft Outlook OAuth for Recall so users can sync calendar meetings and automate bot scheduling
Prerequisites
For local development and testing, configure an ngrok static URL and use it as the redirect URI in Step 1 below. When you are ready for production, add your production URL to the list of authorized redirect URIs.
Create a new Microsoft OAuth App
Step 1: Sign in to Microsoft Azure and create a "New Registration"
Sign in to Microsoft Azure and navigate to Entra > App Registration
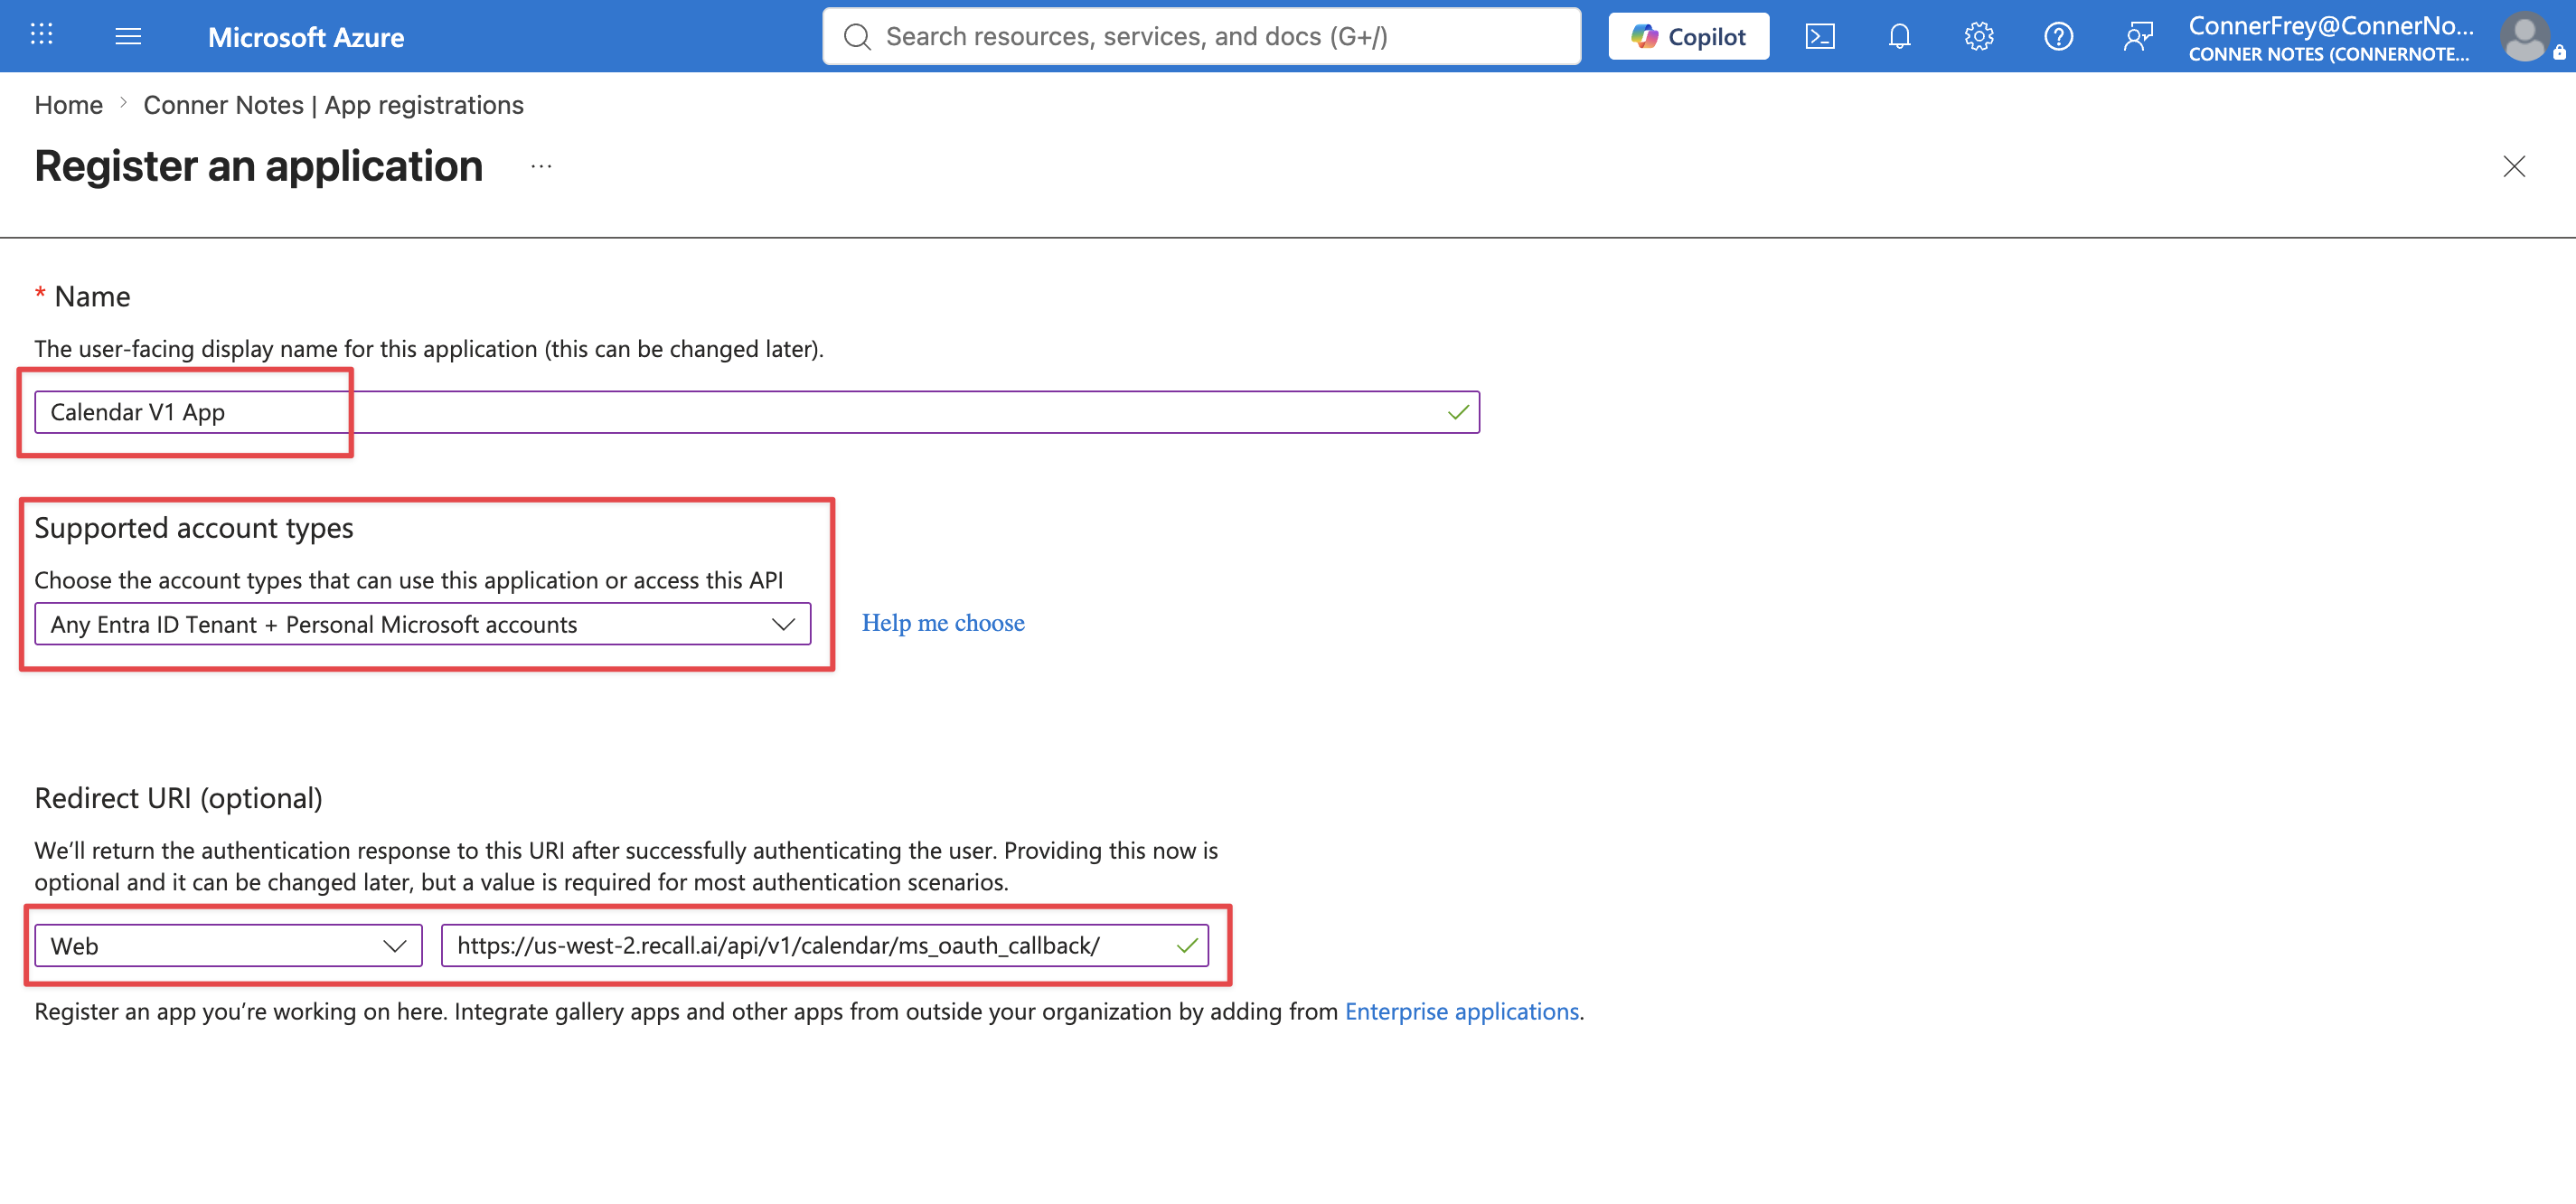
Click "New Registration" and select a name for your app. This will be user-facing (image below).
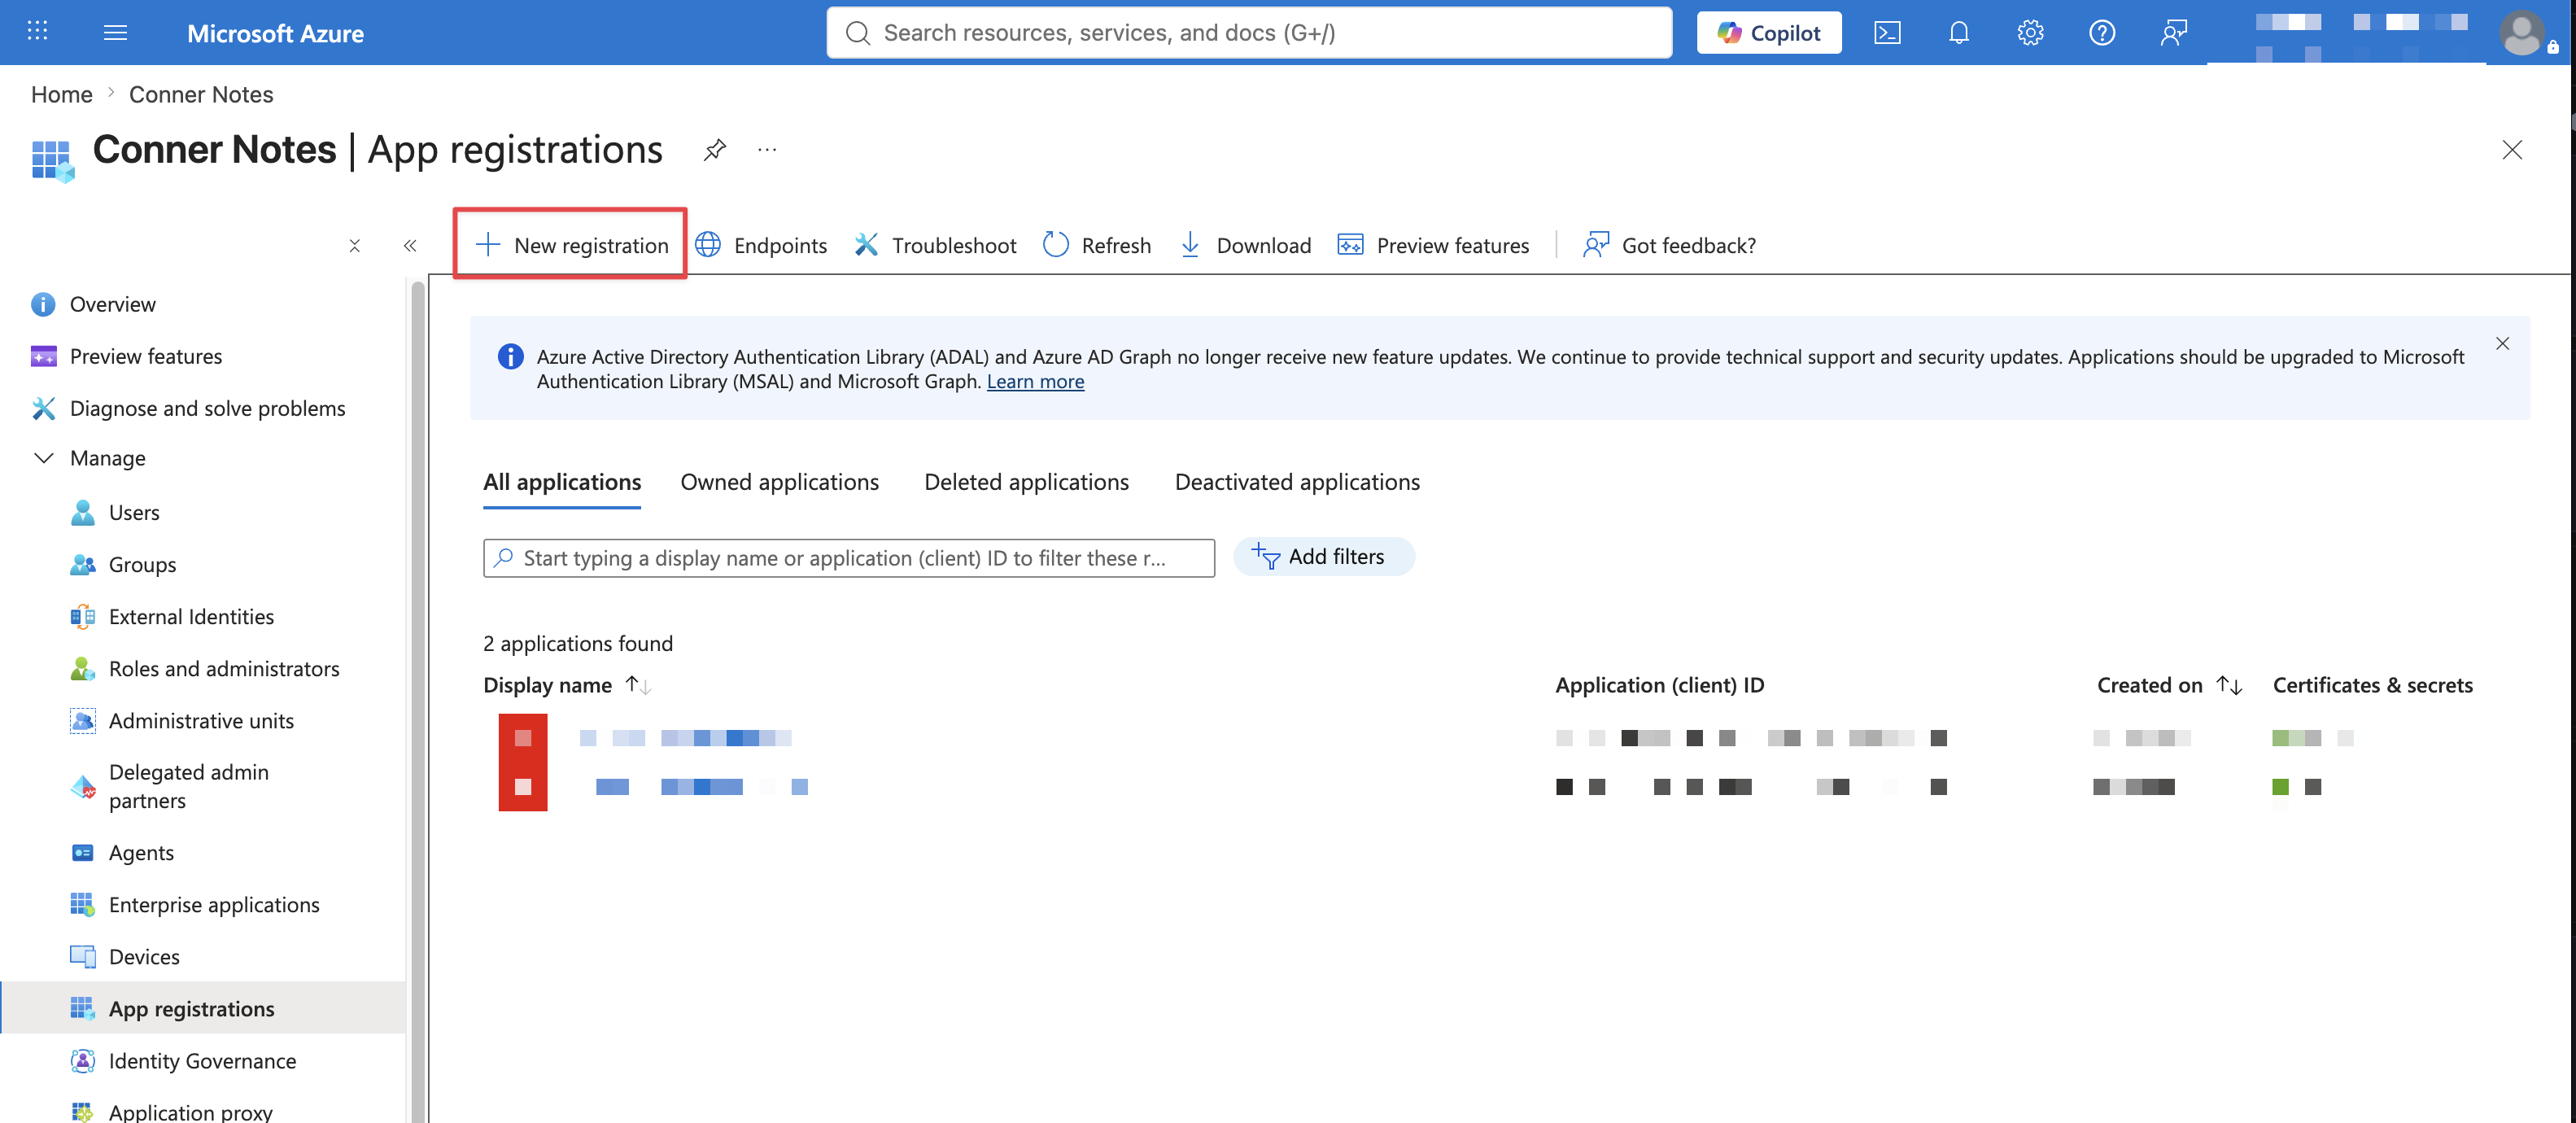
Use these configurations (image below):
- Name: Calendar V1 App (this can be anything and can be changed later)
- Supported account types: "Any Entra ID Tenant + Personal Microsoft accounts"
- Redirect URI (optional):
- Select "Web"
- URI: Enter the URL where users will be redirected after authorizing your application through OAuth 2.0
Finally, press the blue button at the bottom to create your app
For development purpose, see below for moving app to production/submitting for verification
For productionYou must verify ownership of the domain used for the Authorized redirect URI. Domain verification is required when publishing your OAuth 2.0 in production.
This URL must not include Recall's domain and should originate from your own app.
Step 2: Create a new Certificate or Client Secret
Certificate vs Client SecretYou can configure your Microsoft OAuth application with either a certificate or a client secret; you do not need both.
We recommend using a certificate because it provides stronger security and can remain valid for longer, reducing how frequently credentials need to be rotated.
See details below:
Certificate – Recommended
- Can be configured with a long expiration period (100+ years)
- Generated by you
Client Secret
- Only valid for up to 24 months and must be rotated before it expires
- Generated by Microsoft
Certificate Path
In your terminal, navigate to a local directory that is outside of a git repo and use the command below to create 2 files:
private.keycertificat.crt
openssl req -new -x509 \
  -newkey rsa:2048 \
  -keyout private.key \
  -out certificate.crt \
  -days 36500 \
  -nodes \
  -sha256 \
  -subj "/CN=Calendar V2 Application"
Then update the permissions of both files
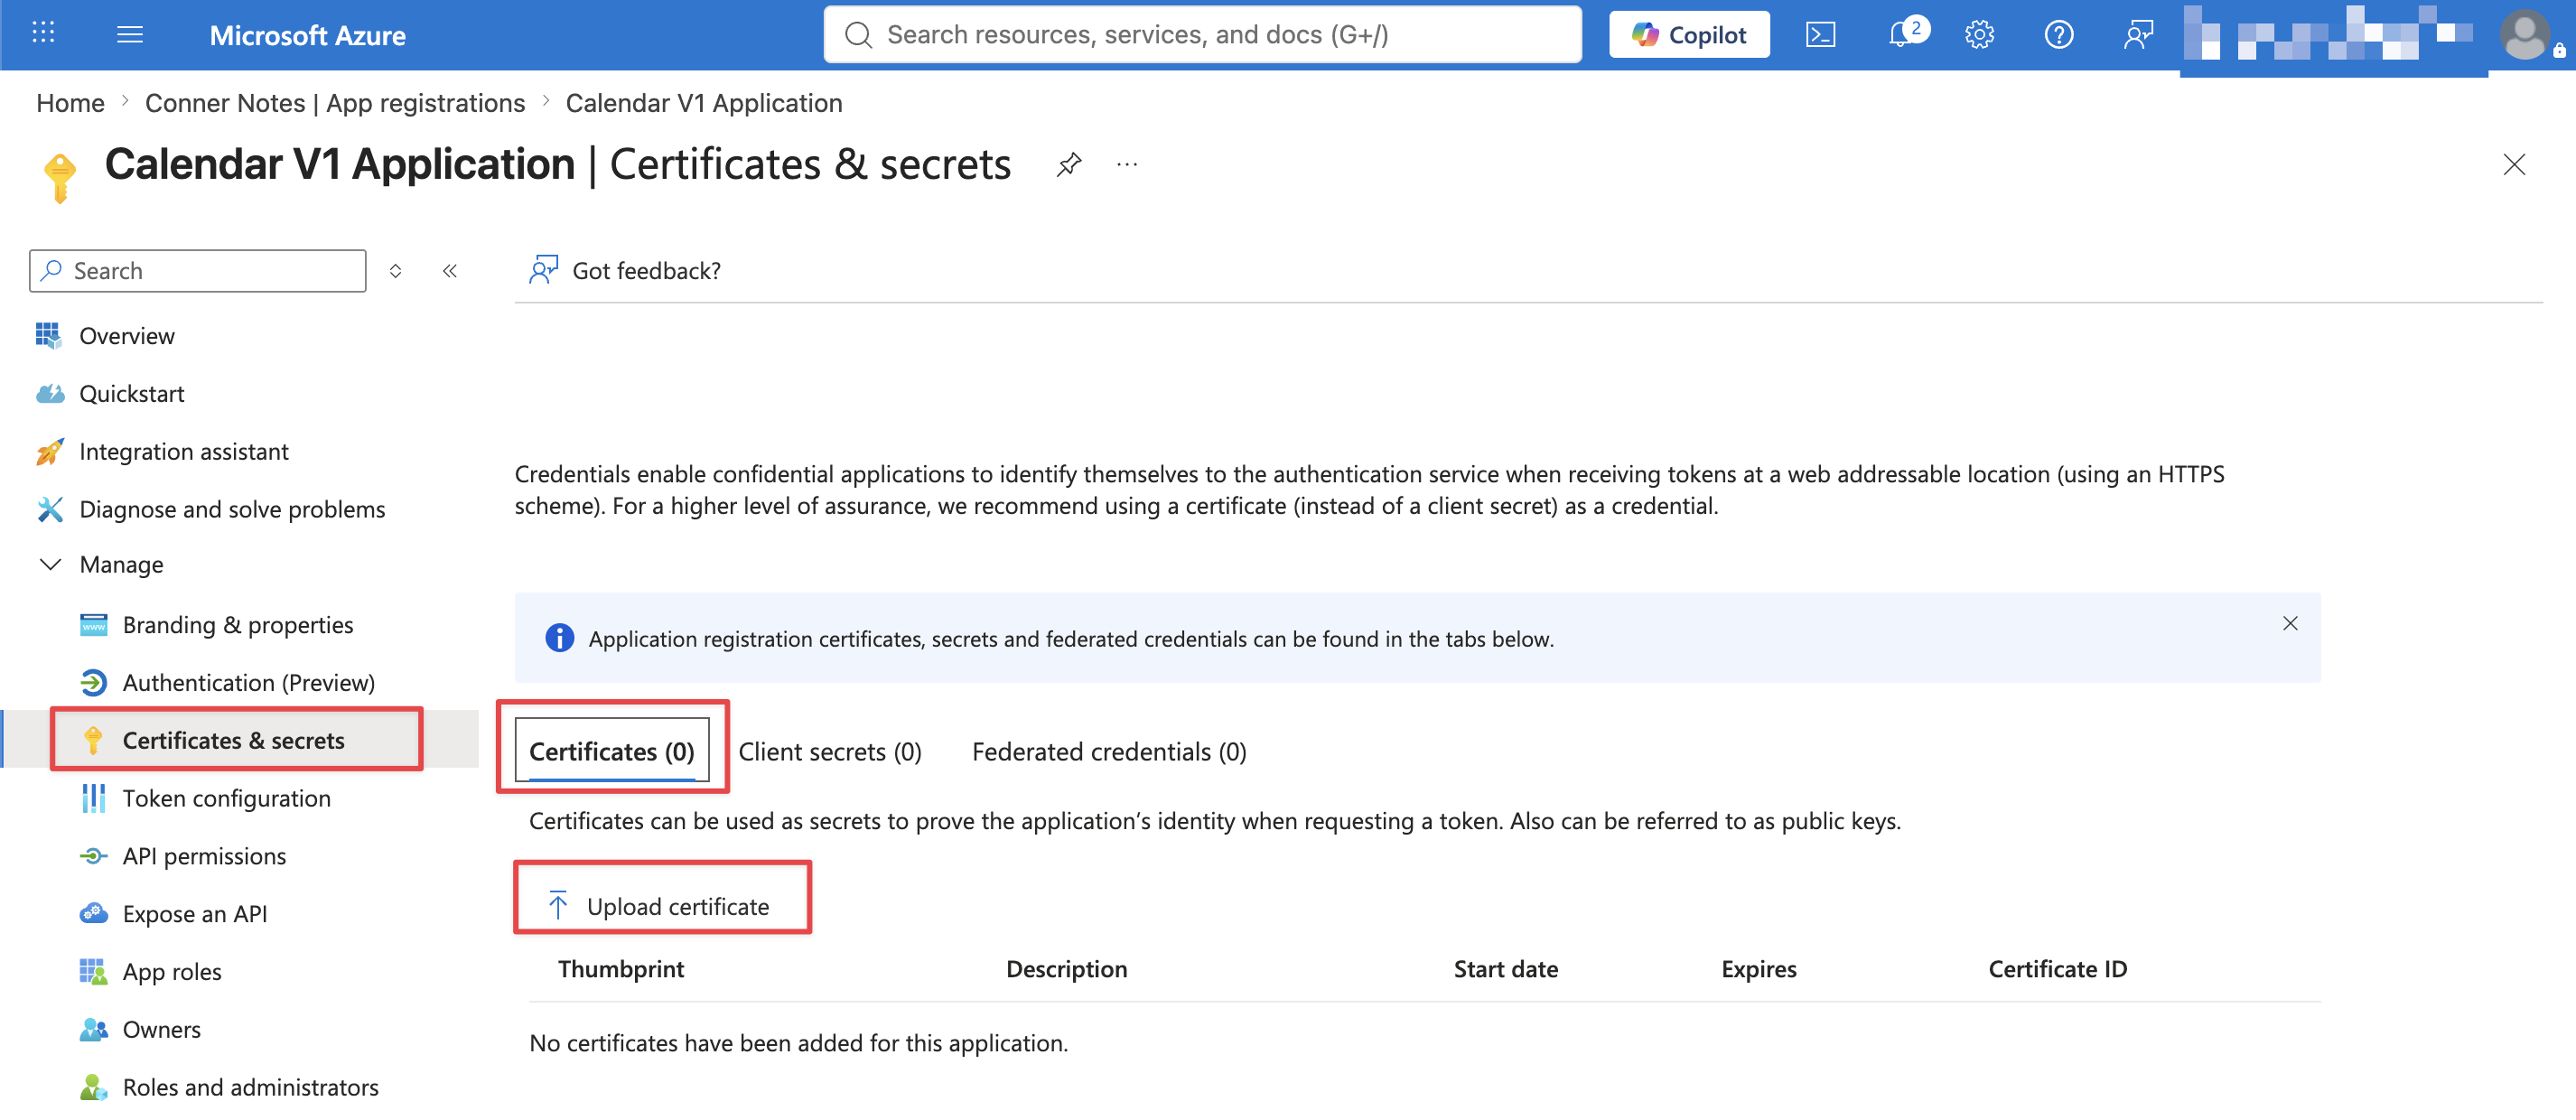
chmod u=rw,go= private.key certificate.crtThen go to Certificates & secrets > Client secrets > Certificates
Click "Upload certificate"
Upload your certificat.crt file (image below)
Note, the "Description" field doesn't matter
Client Secret Path
Go to Certificates & secrets > Client secrets > New client secret (image below)
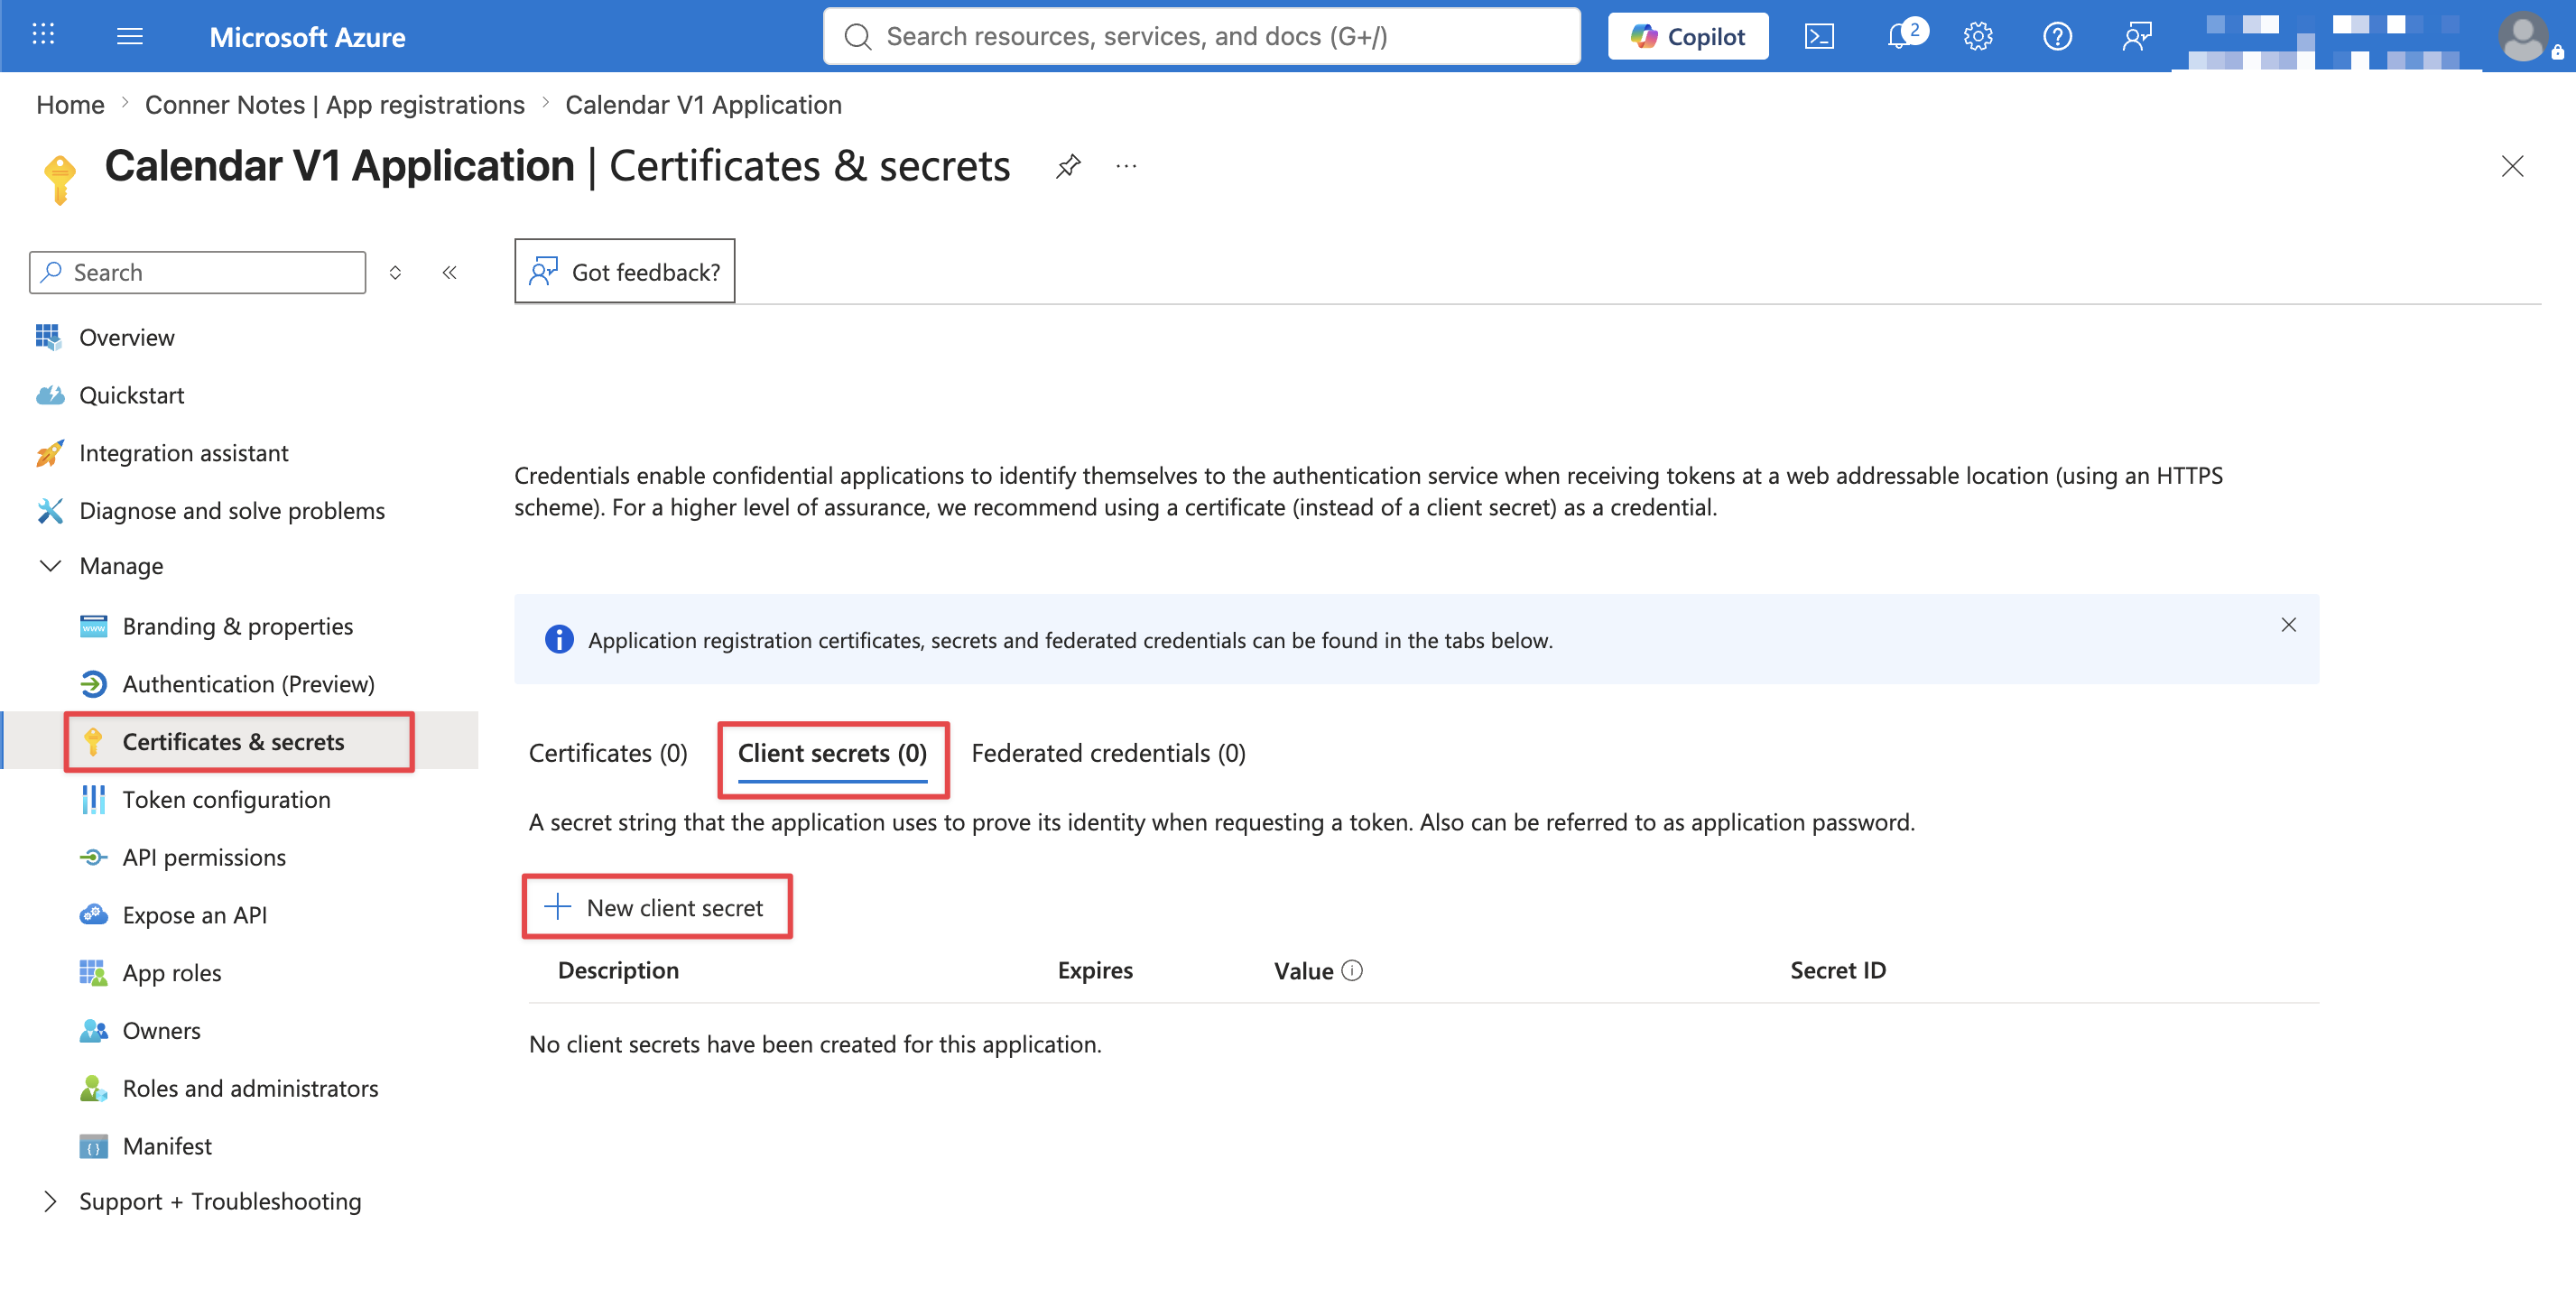
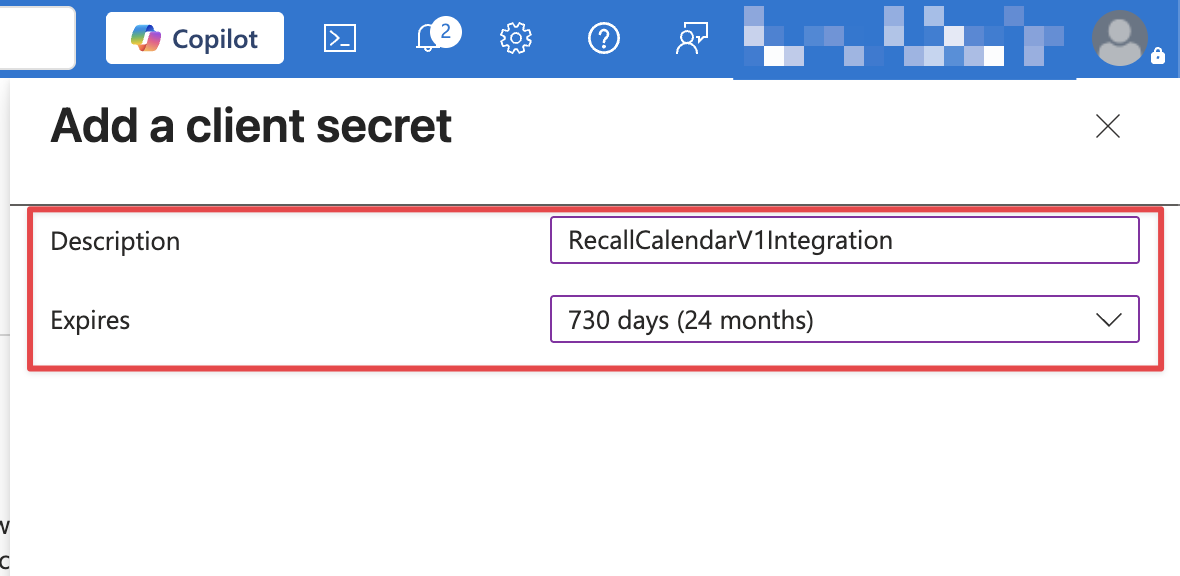
Fill out these fields (image below):
- Description: describe your secret key
- Expires: We highly recommend choosing the longest feasible time for expiry (24 months). Once a credential gets expired, existing calendar connections will need to be re-authorized.
Ensure to copy the secret value as this will be needed in a later step
Your Microsoft client secret will expire — set reminders nowIf you decided to use the "Client Secret path" instead of the "Certification path" (above), we highly recommend doing this:
Before it expiresAdd reminders 1–2 months and again ~1 week before the expiration date.
If it expires
- Microsoft rejects token refresh with this error code (AADSTS7000222)
- Recall disconnects affected Outlook calendar connections
- Scheduled bots are removed from upcoming calendar meetings
- Each affected user must reconnect their calendar via your OAuth flow
To recover
- Create a new secret in Azure
- Update it in Recall → Platforms → Microsoft
- Have affected users reconnect via your OAuth flow
- Steps 2 and 3 are required — a new Azure secret alone will not restore calendar connections.
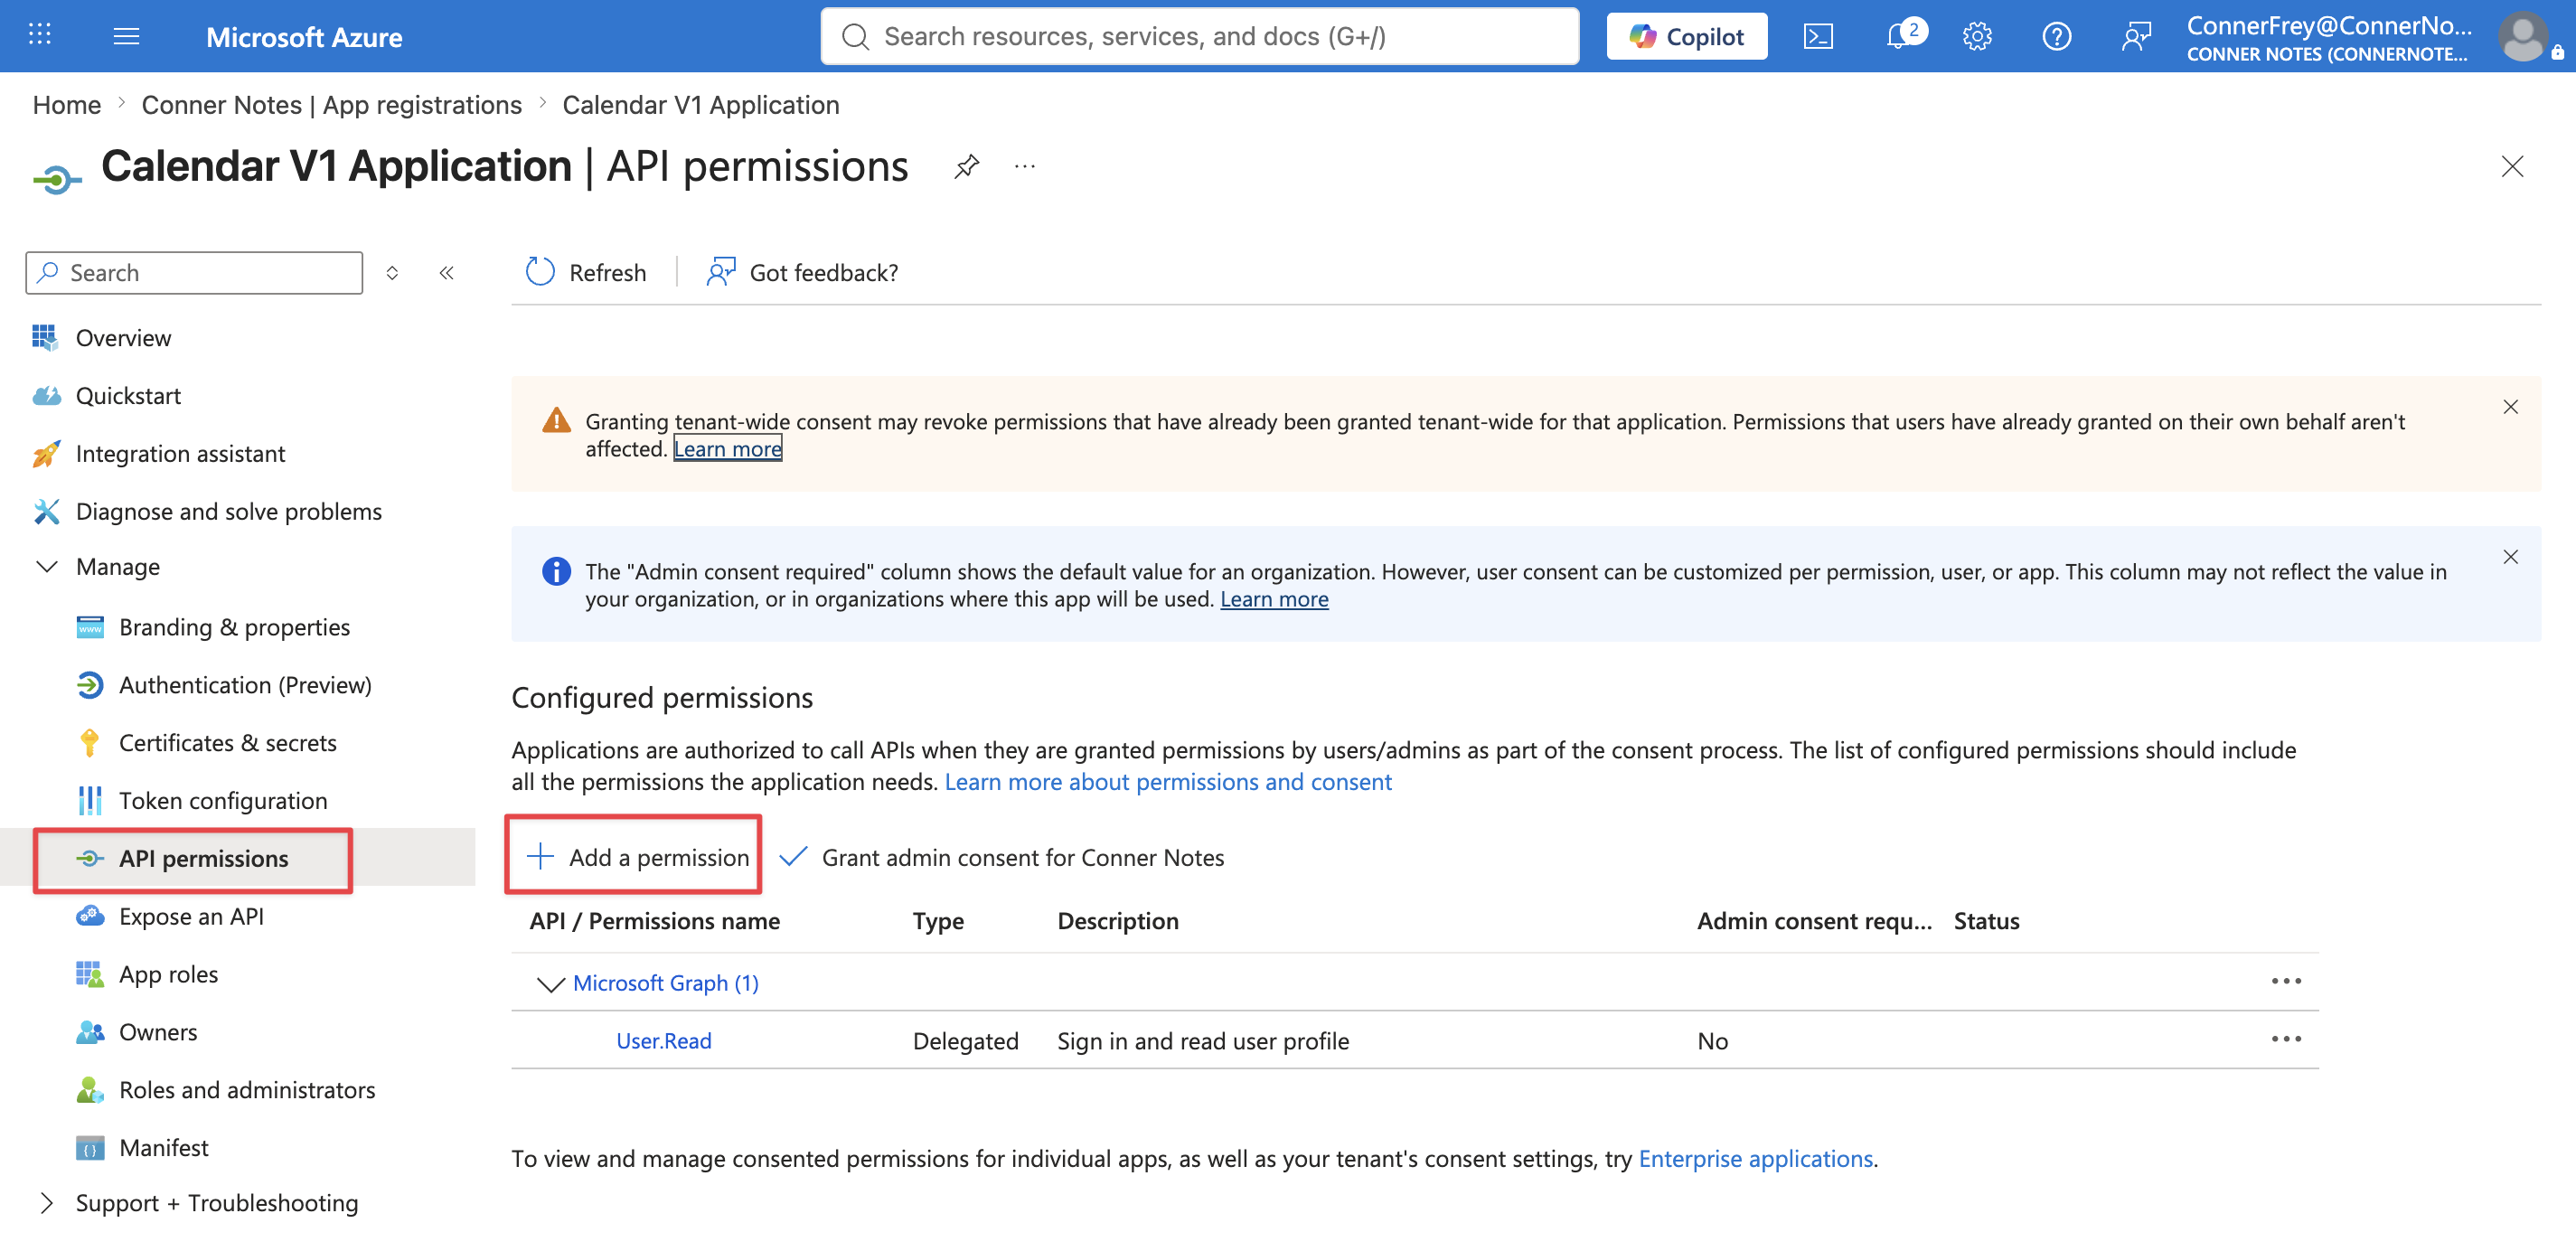
Step 3: Add the "Calendars.Read" API permission
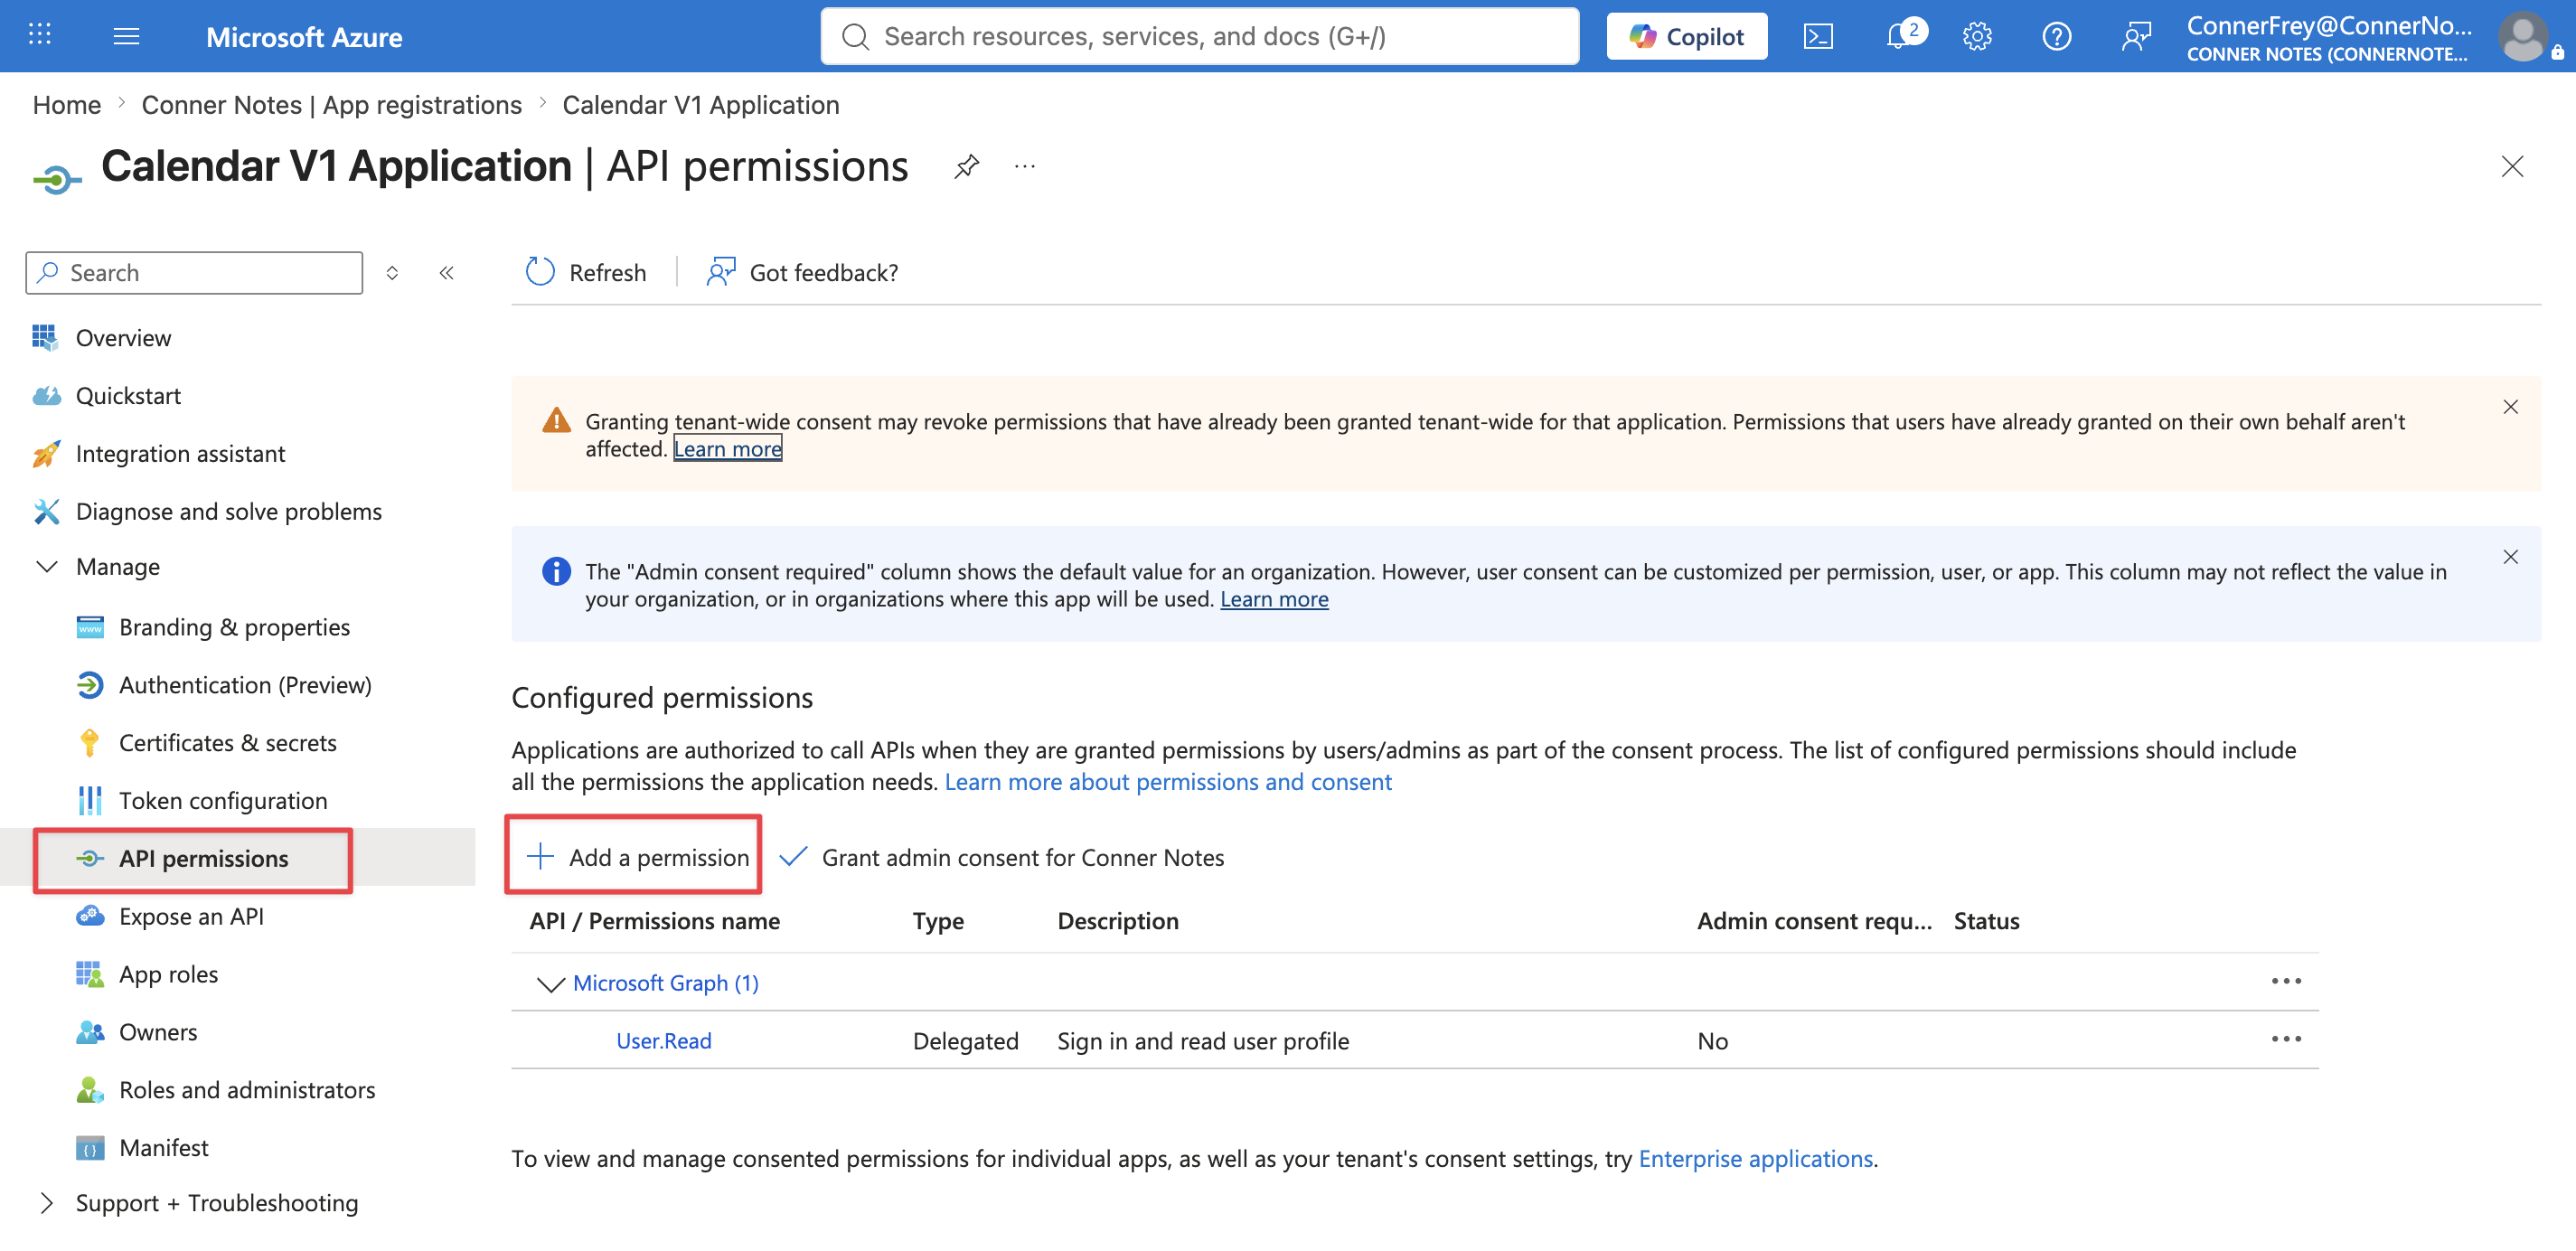
Go to API permissions > "Add a permission" (image below)
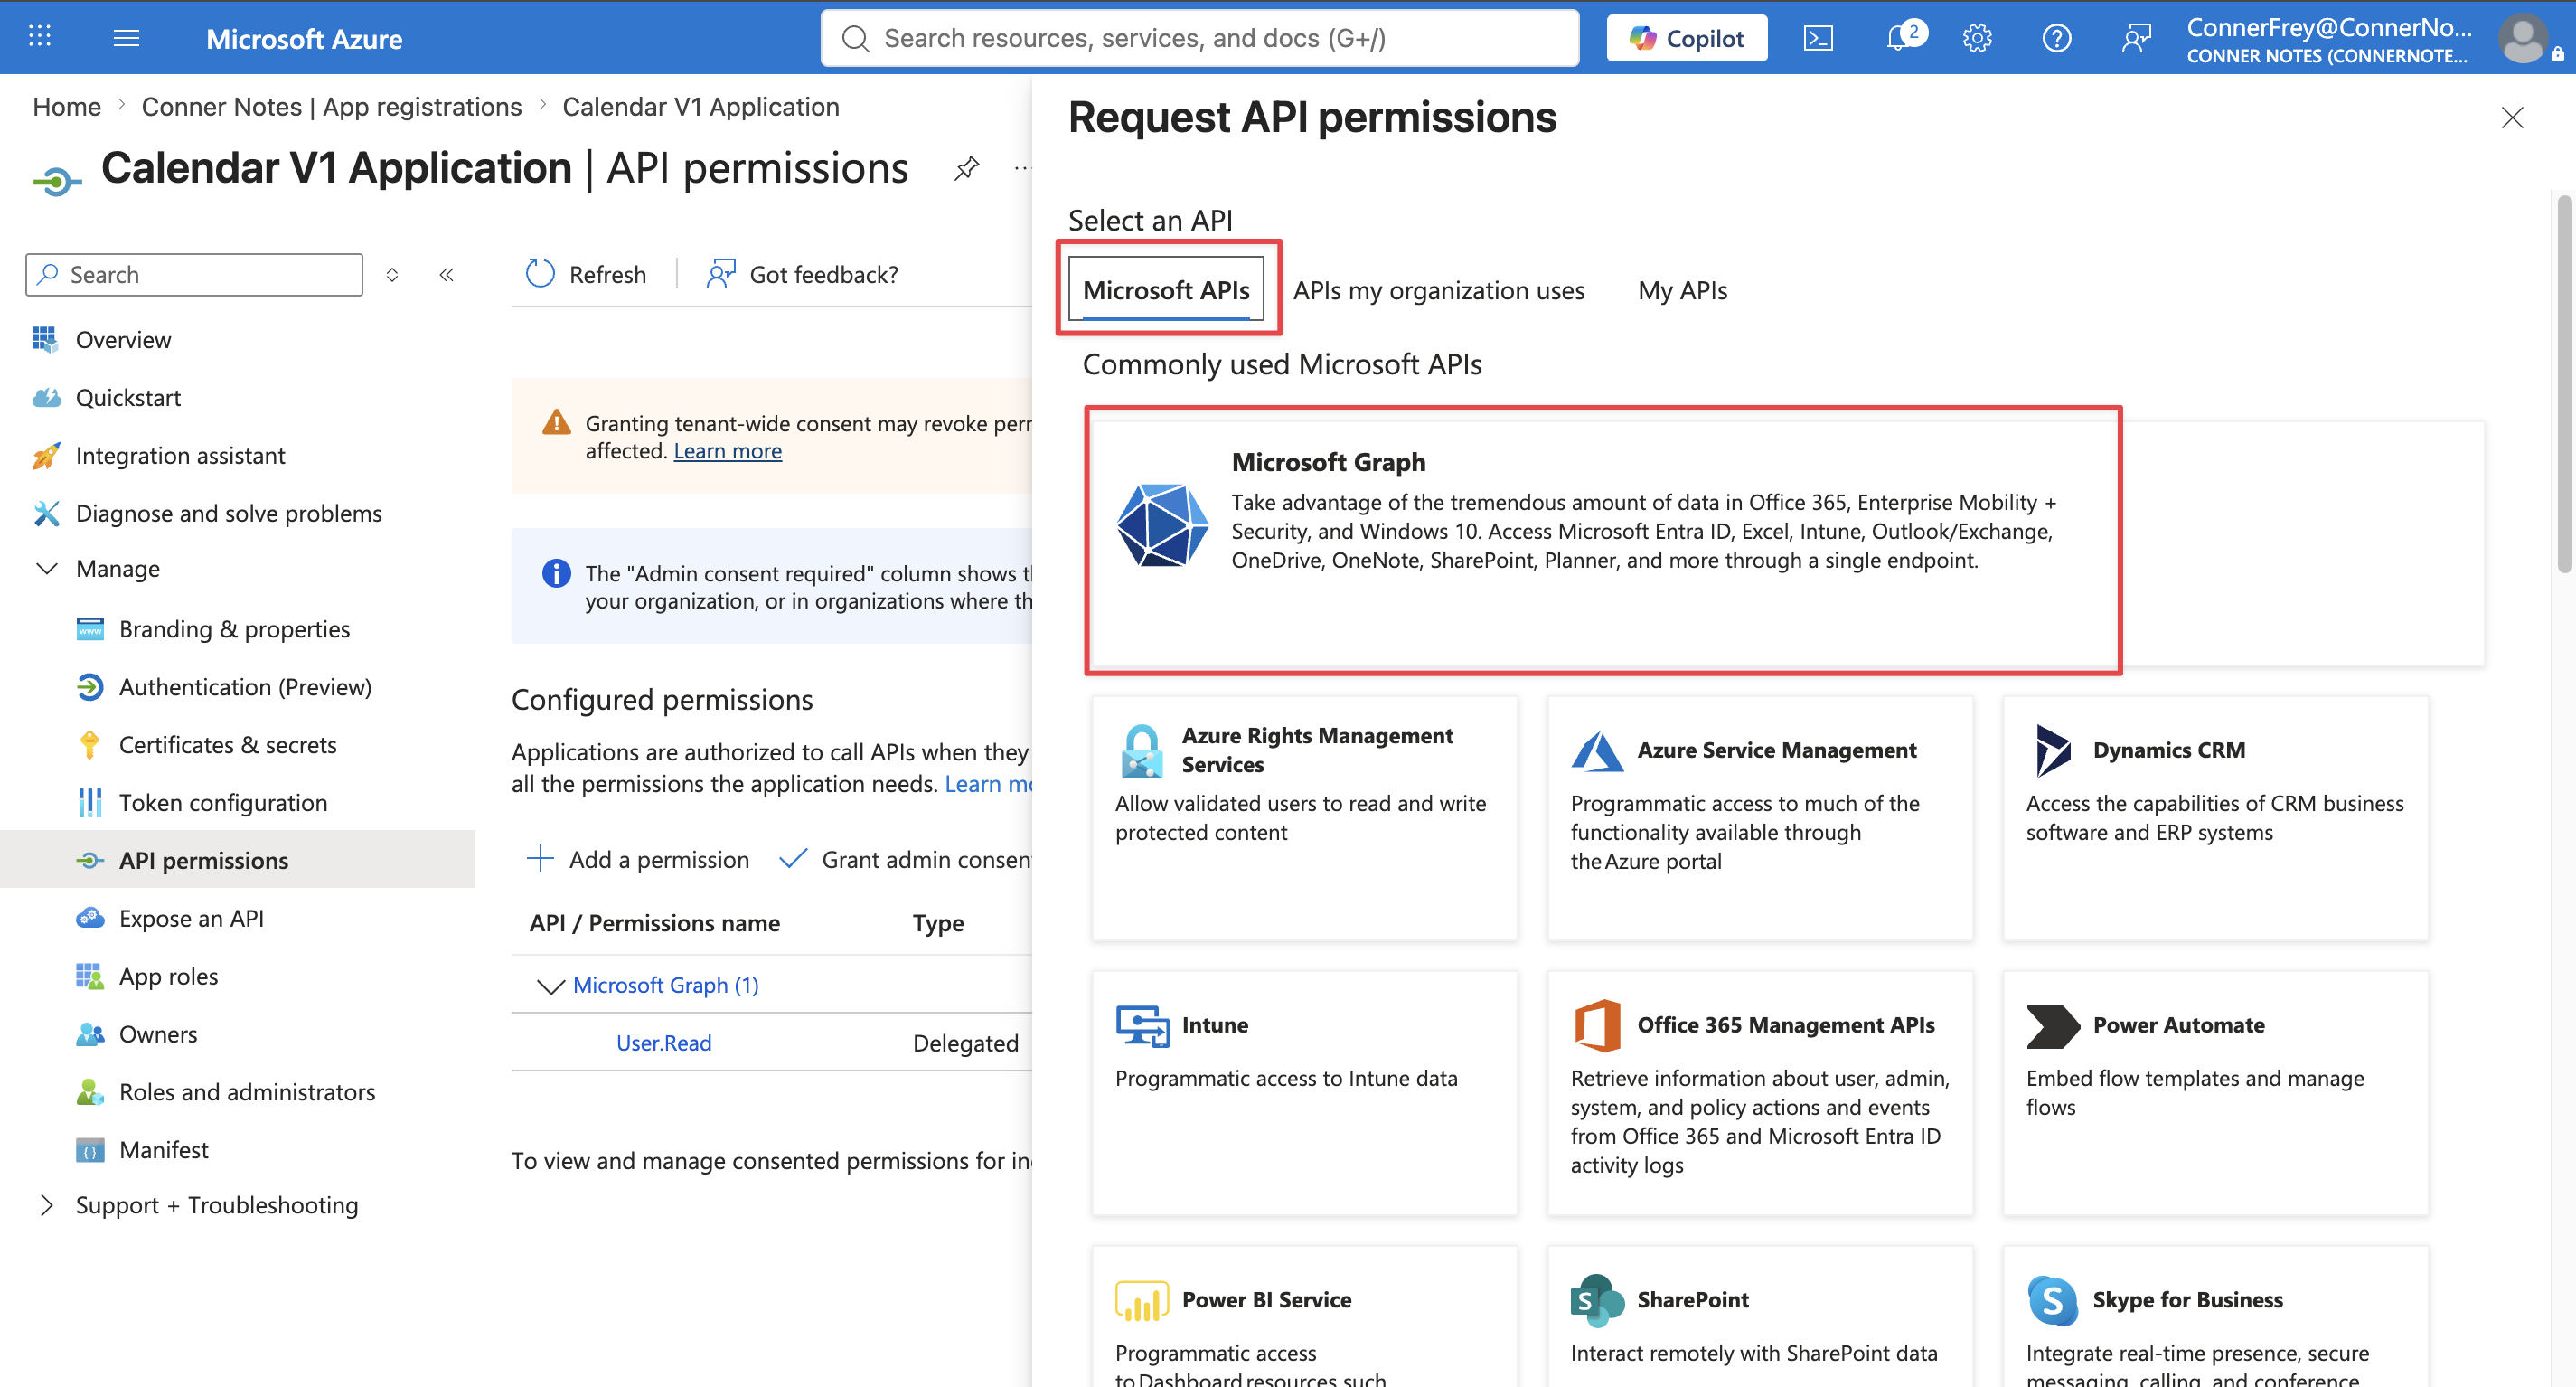
Go to Microsoft Graph > Delegated Permissions > Calendars.Read (image below)
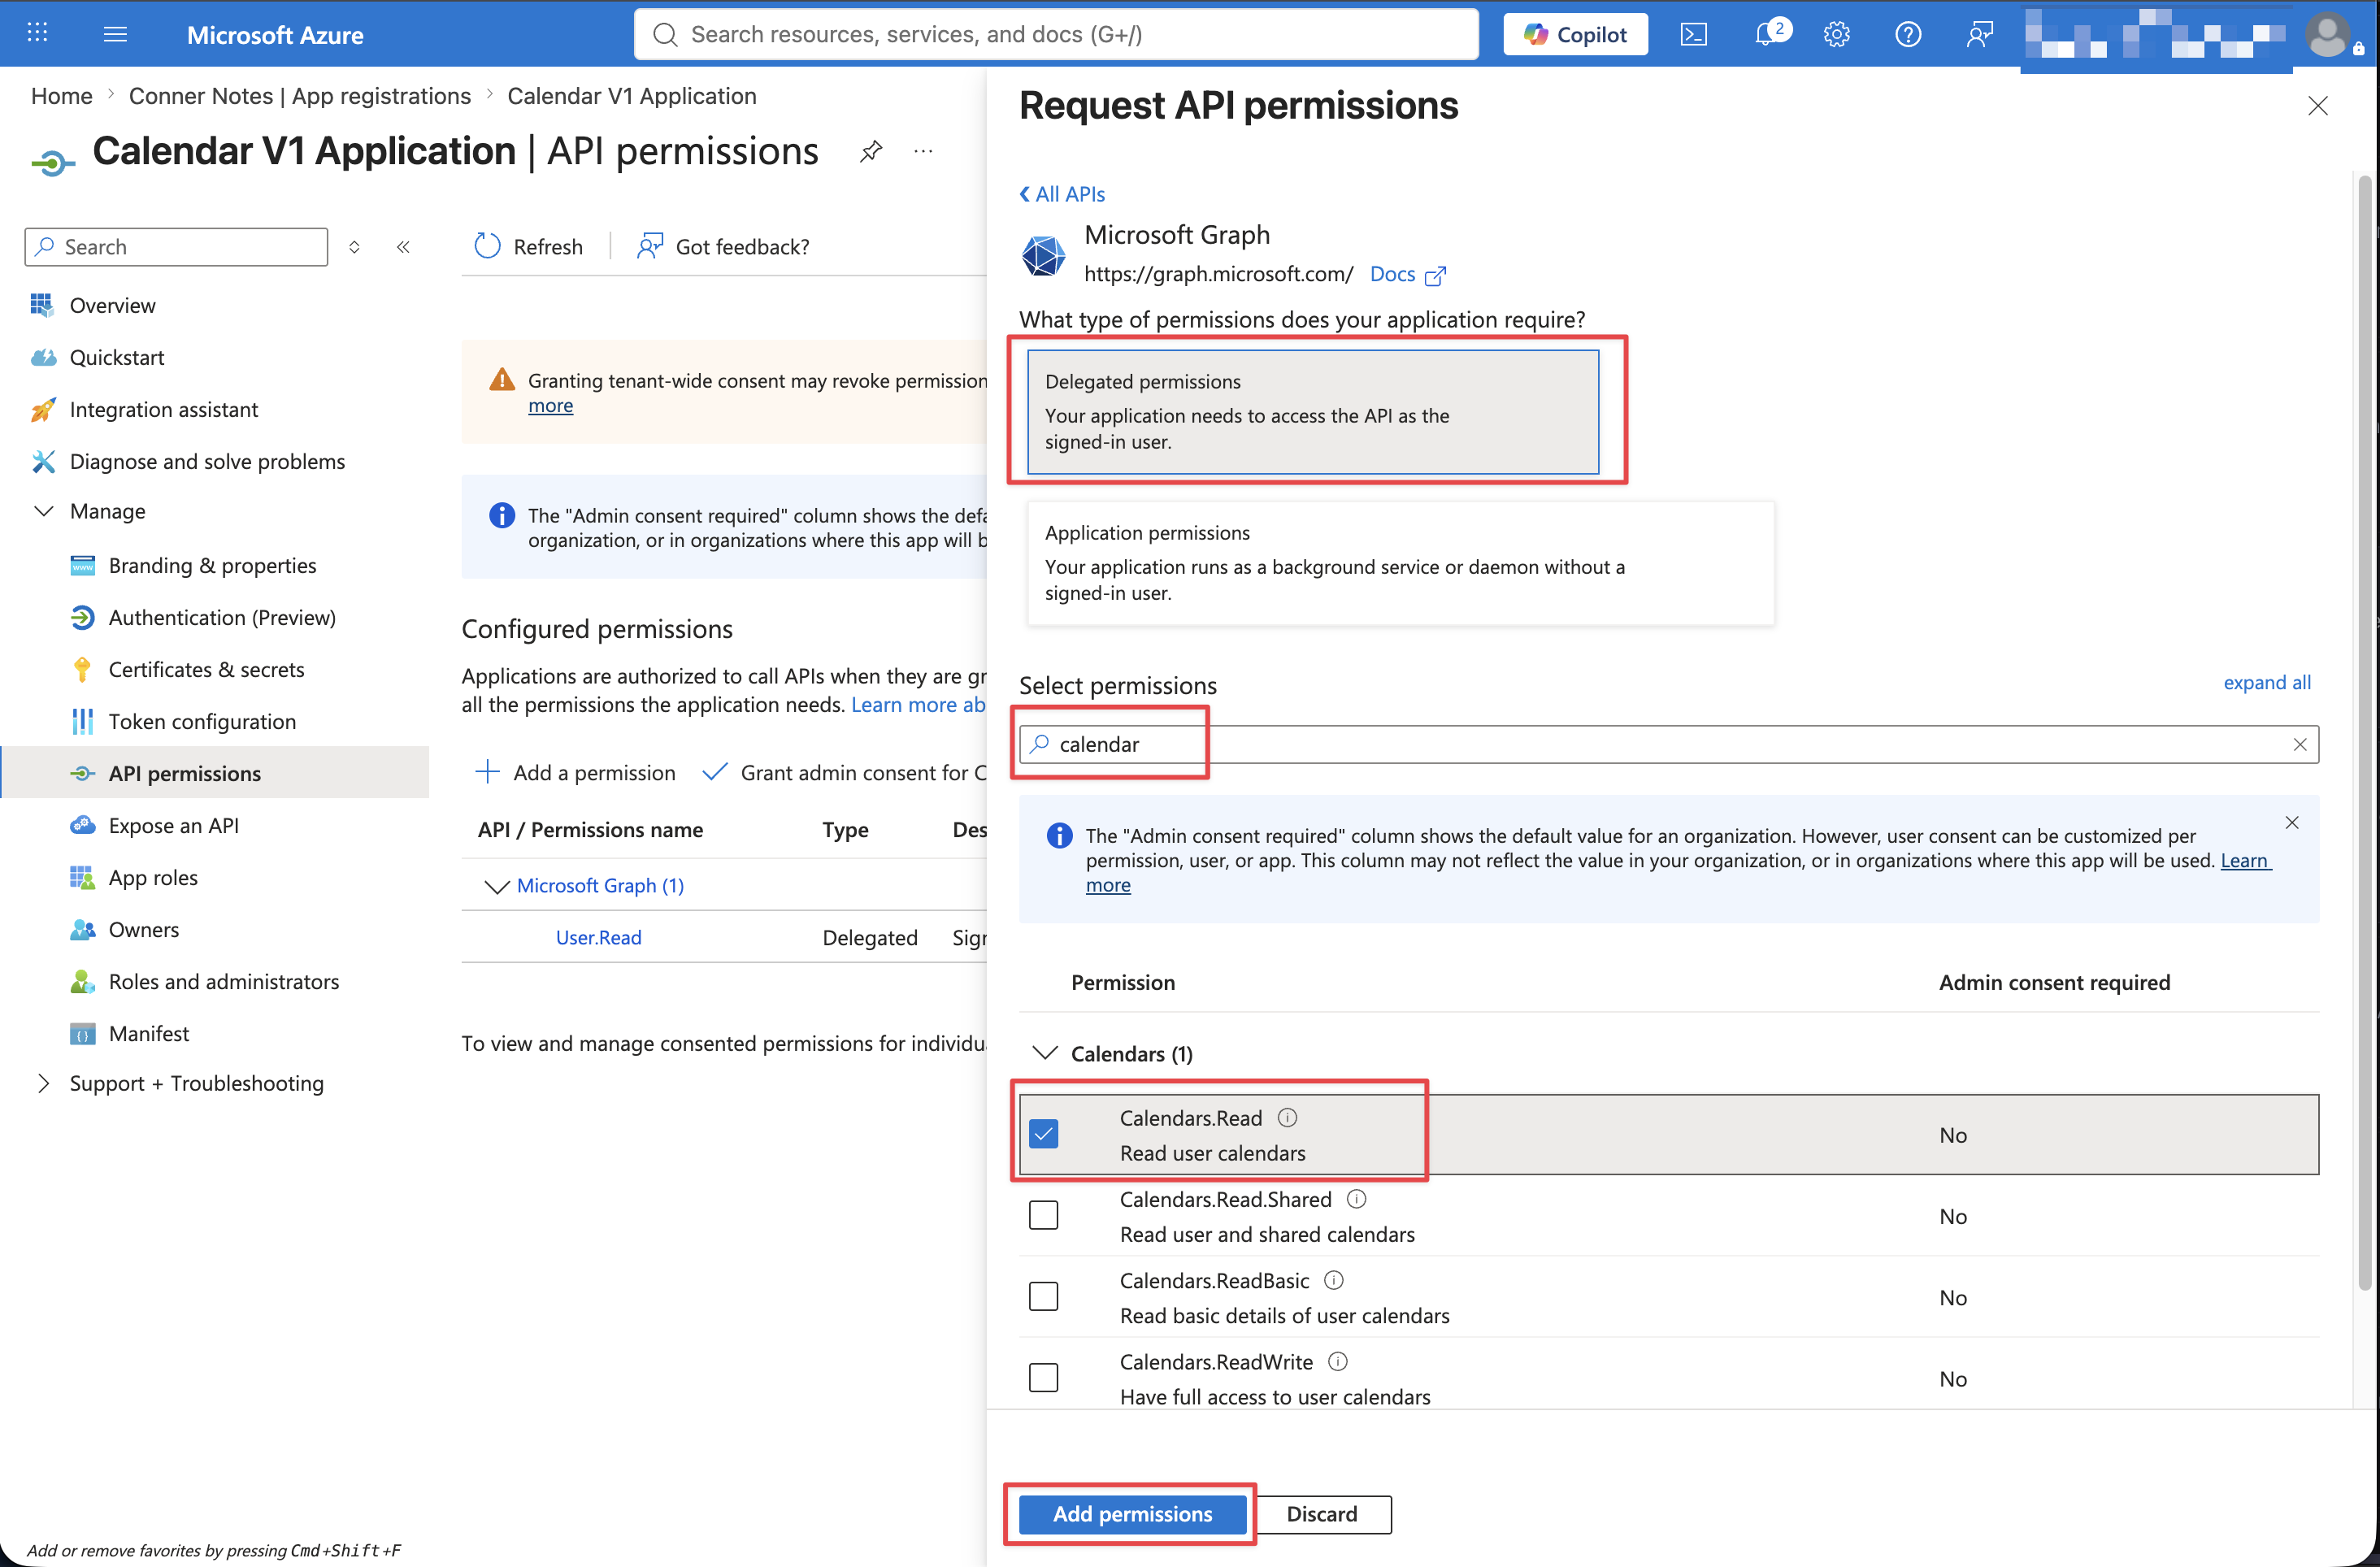
Add the "Calendars.Read" API permission for the app (image below)
Step 4: Set up the OAuth 2.0 authorization code flow
Define the Microsoft OAuth endpoints and application settings:
const microsoftClientId = process.env.MICROSOFT_OUTLOOK_OAUTH_CLIENT_ID!;

const microsoftRedirectUri = `${process.env.PUBLIC_URL}/oauth-callback/microsoft-outlook`;

const microsoftTokenUrl = "https://login.microsoftonline.com/common/oauth2/v2.0/token";
Redirect the user to Microsoft’s authorization endpoint:
function buildMicrosoftAuthorizationUrl(state: string): string {
  const url = new URL(
    "https://login.microsoftonline.com/common/oauth2/v2.0/authorize",
  );

  url.search = new URLSearchParams({
    client_id: microsoftClientId,
    redirect_uri: microsoftRedirectUri,
    response_type: "code",
    response_mode: "query",
    scope: "offline_access openid email https://graph.microsoft.com/Calendars.Read",
    state,
  }).toString();

  return url.toString();
}
Generate state securely, store it in the user’s session, and validate it when Microsoft redirects back.
After validating state, exchange the returned authorization code from your backend using one of the following authentication methods.
See Microsoft’s OAuth 2.0 authorization code flow documentation for more information.
Choose 1 of the 2 paths below for credentials:
Certificate path (recommended)
The
oauth_client_certificateandoauth_client_private_keyvalues must contain the PEM file contents, not the filesystem paths. Keep the private key on the server and never expose it to the browserSee Microsoft’s certificate credential documentation for the client assertion format.
Use the certificate.crt and private.key created in Step 2 to generate a short-lived PS256 client-assertion JWT:
import {
  constants,
  createHash,
  randomUUID,
  sign,
  X509Certificate,
} from "node:crypto";
import { readFileSync } from "node:fs";

function buildMicrosoftClientAssertion(
  certificate: string,
  privateKey: string,
): string {
  const now = Math.floor(Date.now() / 1000);
  const parsedCertificate = new X509Certificate(certificate);

  const header = {
    typ: "JWT",
    alg: "PS256",
    "x5t#S256": createHash("sha256")
      .update(parsedCertificate.raw)
      .digest("base64url"),
  };

  const claims = {
    aud: microsoftTokenUrl,
    iss: microsoftClientId,
    sub: microsoftClientId,
    jti: randomUUID(),
    iat: now,
    nbf: now,
    exp: now + 600,
  };

  const encodedHeader = Buffer.from(
    JSON.stringify(header),
  ).toString("base64url");

  const encodedClaims = Buffer.from(
    JSON.stringify(claims),
  ).toString("base64url");

  const unsignedToken = `${encodedHeader}.${encodedClaims}`;

  const signature = sign("sha256", Buffer.from(unsignedToken), {
    key: privateKey,
    padding: constants.RSA_PKCS1_PSS_PADDING,
    saltLength: 32,
  }).toString("base64url");

  return `${unsignedToken}.${signature}`;
}
Exchange the authorization code and prepare the complete Calendar payload:
const certificate = readFileSync(
  "./path/to/certificate.pem",
  "utf8",
);

const privateKey = readFileSync(
  "./path/to/private-key.pem",
  "utf8",
);

const certificateTokenExchangePayload = {
  client_id: microsoftClientId,
  code: authorizationCode,
  redirect_uri: microsoftRedirectUri,
  grant_type: "authorization_code",
  client_assertion_type: "urn:ietf:params:oauth:client-assertion-type:jwt-bearer",
  client_assertion: buildMicrosoftClientAssertion(
    certificate,
    privateKey,
  ),
};

const certificateTokens = await exchangeAuthorizationCode(
  certificateTokenExchangePayload,
);

const certificatePayload: CreateCalendarPayload = {
  platform: "microsoft_outlook",
  oauth_client_id: microsoftClientId,
  oauth_client_certificate: certificate,
  oauth_client_private_key: privateKey,
  oauth_refresh_token: certificateTokens.refresh_token,
  webhook_url: `${process.env.PUBLIC_URL}/webhooks/recall-calendar-updates`,
};
Client secret path
Exchange the authorization code and prepare the complete Calendar payload:
const clientSecret = process.env.MICROSOFT_OUTLOOK_OAUTH_CLIENT_SECRET!;

const clientSecretTokenExchangePayload = {
  client_id: microsoftClientId,
  client_secret: clientSecret,
  code: authorizationCode,
  redirect_uri: microsoftRedirectUri,
  grant_type: "authorization_code",
};

const clientSecretTokens = await exchangeAuthorizationCode(
  clientSecretTokenExchangePayload,
);

const clientSecretPayload: CreateCalendarPayload = {
  platform: "microsoft_outlook",
  oauth_client_id: microsoftClientId,
  oauth_client_secret: clientSecret,
  oauth_refresh_token: clientSecretTokens.refresh_token,
  webhook_url: `${process.env.PUBLIC_URL}/webhooks/recall-calendar-updates`,
};
Step 5: Exchange the authorization code
Once you have chosen either the certification path or the client secret path, continue with the implementation below:
type MicrosoftTokenResponse = {
  access_token: string;
  refresh_token: string;
  expires_in: number;
  token_type: string;
};

async function exchangeAuthorizationCode(
  payload: Record<string, string>,
): Promise<MicrosoftTokenResponse> {
  const response = await fetch(microsoftTokenUrl, {
    method: "POST",
    headers: {
      "Content-Type": "application/x-www-form-urlencoded",
    },
    body: new URLSearchParams(payload),
  });

  if (!response.ok) {
    throw new Error(
      `Microsoft token exchange failed: ${await response.text()}`,
    );
  }

  return response.json() as Promise<MicrosoftTokenResponse>;
}
The
offline_accessscope is required for Microsoft to return a refresh token.
Step 6: Create the calendar in Recall (putting all the pieces together)
Pick the payload for the authentication method you are using:
// NOTE: Pick only one method below to set the `calendar` variable
// `certificatePayload` and `clientSecretPayload` both come from Step 4

// Recommended certificate flow:
const calendar = await createRecallCalendar(certificatePayload);

// Client-secret flow:
const calendar = await createRecallCalendar(clientSecretPayload);type CreateCalendarPayload = {
platform: "microsoft_outlook";
oauth_client_id: string;
oauth_refresh_token: string;
webhook_url?: string;
} & (
| {
oauth_client_certificate: string;
oauth_client_private_key: string;
oauth_client_secret?: never;
}
| {
oauth_client_secret: string;
oauth_client_certificate?: never;
oauth_client_private_key?: never;
}
);
async function createRecallCalendar(
calendarPayload: CreateCalendarPayload,
) {
const response = await fetch(
`${process.env.RECALL_API_URL}/api/v2/calendars/`,
{
method: "POST",
headers: {
Authorization: `Token ${process.env.RECALL_API_KEY}`,
"Content-Type": "application/json",
},
body: JSON.stringify(calendarPayload),
},
);
if (!response.ok) {
throw new Error(
`Failed to create Recall calendar: ${await response.text()}`,
);
}
return response.json();
}Set RECALL_API_URL to your regional Recall API URL, such as https://us-east-1.recall.ai. Use either certificate credentials or a client secret, never both.
Final notes on Certification vs Client SecretProvide either
oauth_client_secretor bothoauth_client_certificateandoauth_client_private_key. Do not provide both credential types.Never log authorization codes, access tokens, refresh tokens, client secrets, or private keys.
We highly recommend viewing the full Calendar V2 sample application.
Step 7: Submitting Microsoft OAuth Client To Production
More documentation on the process of submitting your app for approval is available here
Updated 2 months ago