

Configuring Microsoft Teams Signed-in Bots
How to sign your bot into a Microsoft teams account
This guide is for you if:Your bot needs to join meetings that only allow signed-in Microsoft teams users
Limitations
- Signed-in bot names cannot be overridden - Signed-in Microsoft Teams bots get their name from the Microsoft Teams account used to sign-in the bot. This overrides the
bot_nameparameter in Create Bot endpoint- Signed-in Microsoft Teams bots must be in their own Organization - Signed-in Microsoft Teams bots must be in their own organization due to global organization-level permission changes
Step 1: Set up a new Microsoft 365 Business account
Do not create the bot account in your existing Microsoft business organizationSince the authenticated bot requires global organization-level permission changes, authenticated Teams bots should always use a new Microsoft account
1.1: Head to the Microsoft 365 Business page to buy the Microsoft 365 Business Basic license
1.2: After clicking "Buy Now", proceed to login with your admin account
1.3: Microsoft will then ask you to set up your account and pay for the license
1.4: Once done, you will need to sign into the M365 admin dashboard
Note: Microsoft may request you to set up MFA for this admin account
Step 2: Create the bot's account
Step 2.1: Create a new user for the bot
Navigate to: Users > Active users
Note: you should see your admin in the active users
Click "Add a user" (see image below)
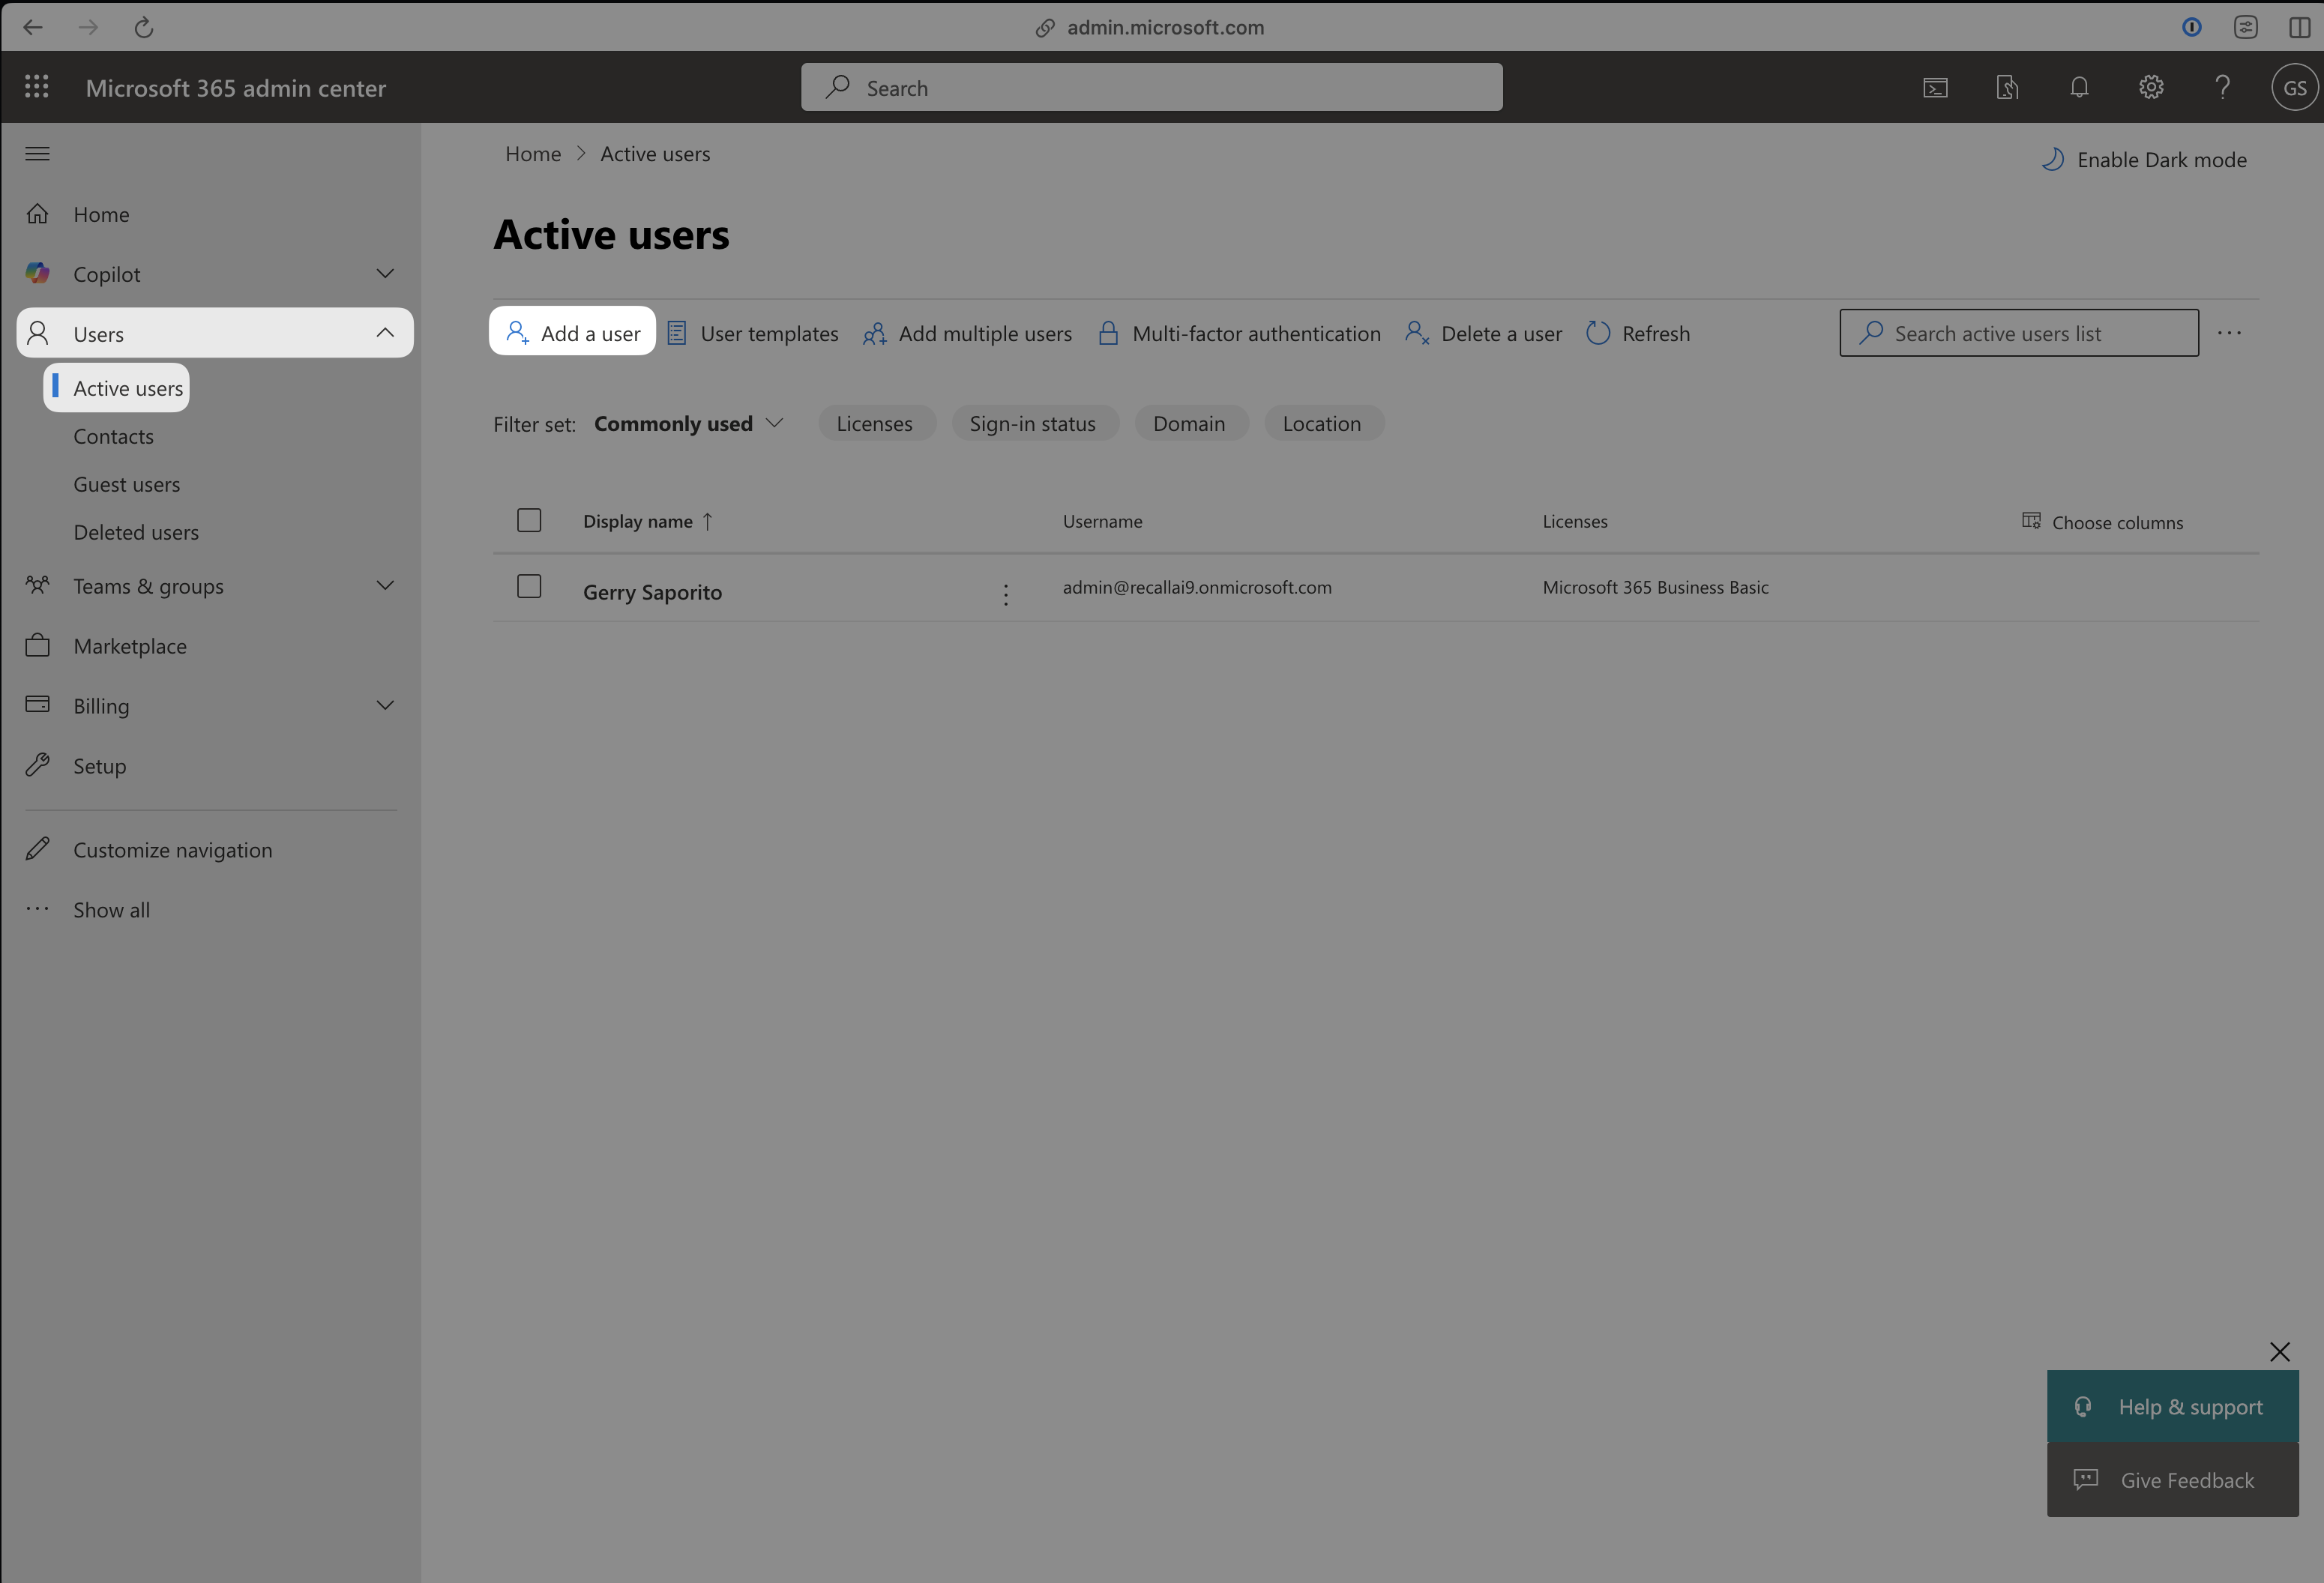
Next, fill out these fields for the bot (make sure to write them down in a separate place):
- Display name
- Password
-
Note: If you automatically create a password, make sure to "reveal" the password in the final step and write it down
-
- You can auto-assign a user license in this step OR you can transfer the license in Step 2.2 below, it makes no difference. You do not need to buy an additional license for the bot.
- You do not need to apply roles/permissions or fill out any additional details
Again, you will need to save the bot's email and password for later, make sure to write this info in a separate note
The bot display name and profile picture cannot be overriddenRegardless of what you specify in your Create Bot request, the display name and profile picture will always be taken from the Microsoft account details defined in this section
Step 2.2: Reassign the Teams license to the bot user
Head to Billing > Licenses > Microsoft 365 Business Basic and select your admin account.
Click "Unassign licenses" and then click "Unassign" on the confirm dialog pop up:
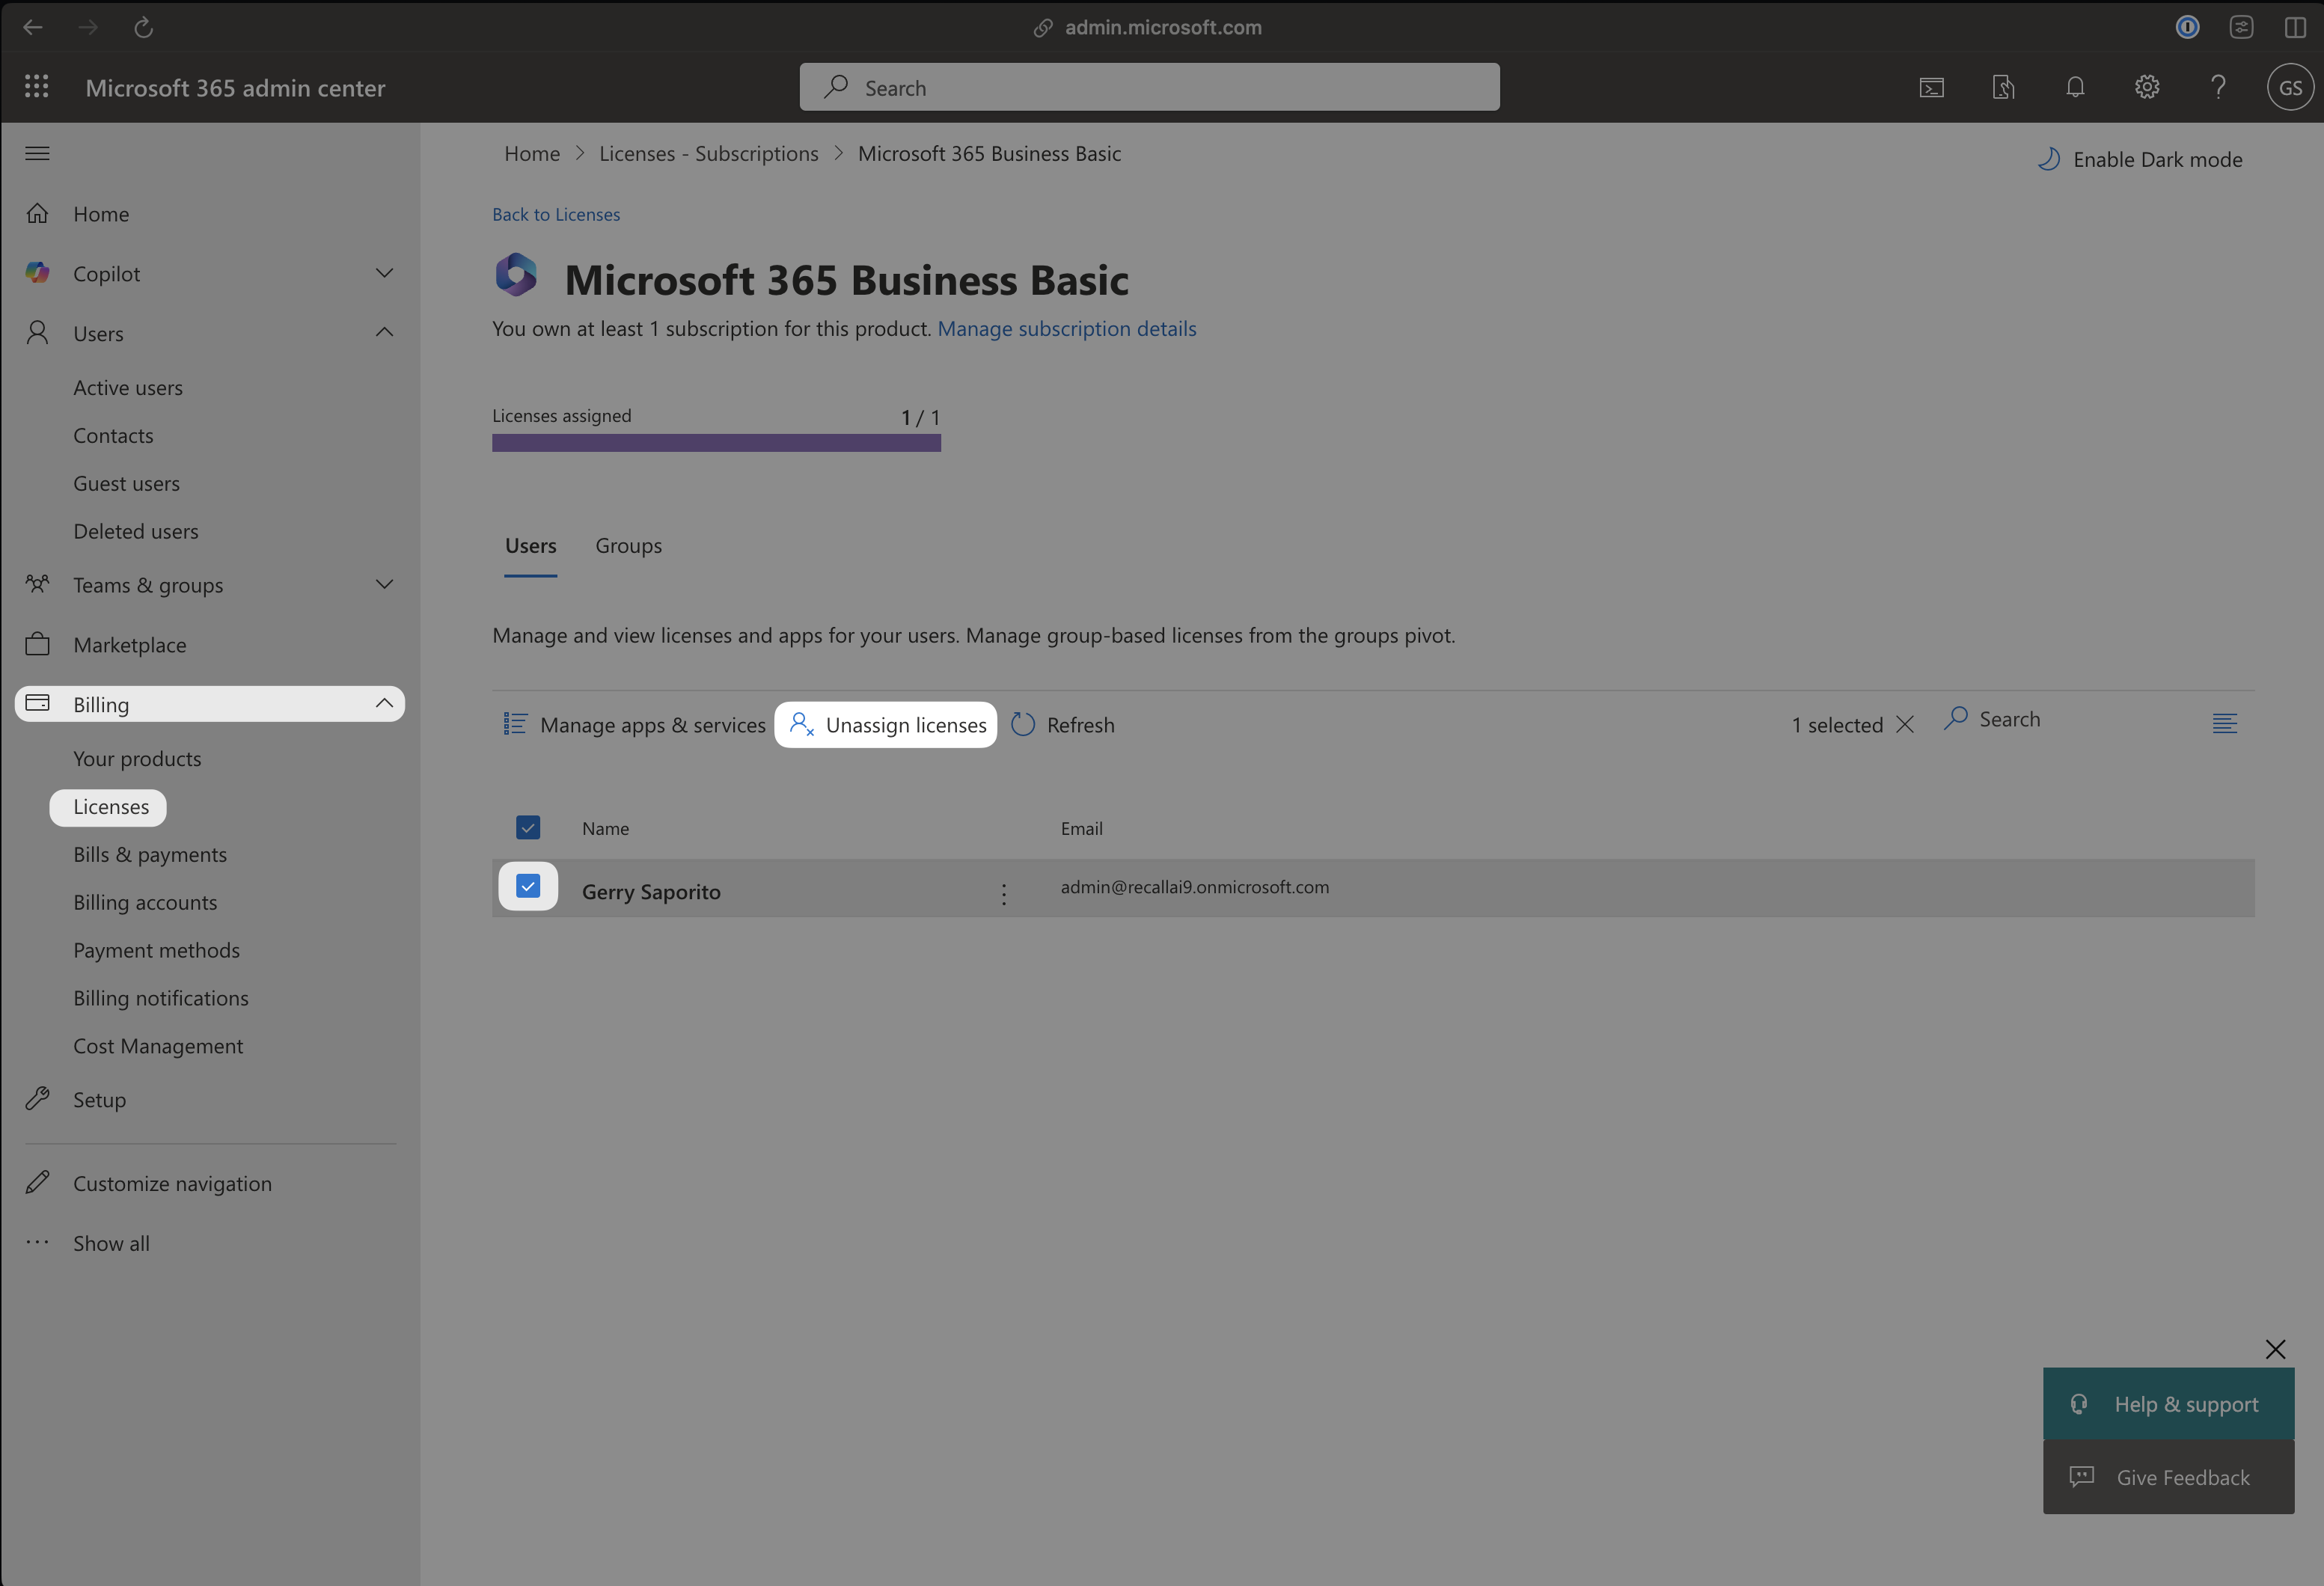
After, reload the page and then you can reassign the license to the bot user.
If you are prompted to buy another license after unassigning, wait a few minutes before refreshing the page. Microsoft may need some time to free up the license before you can reassign it

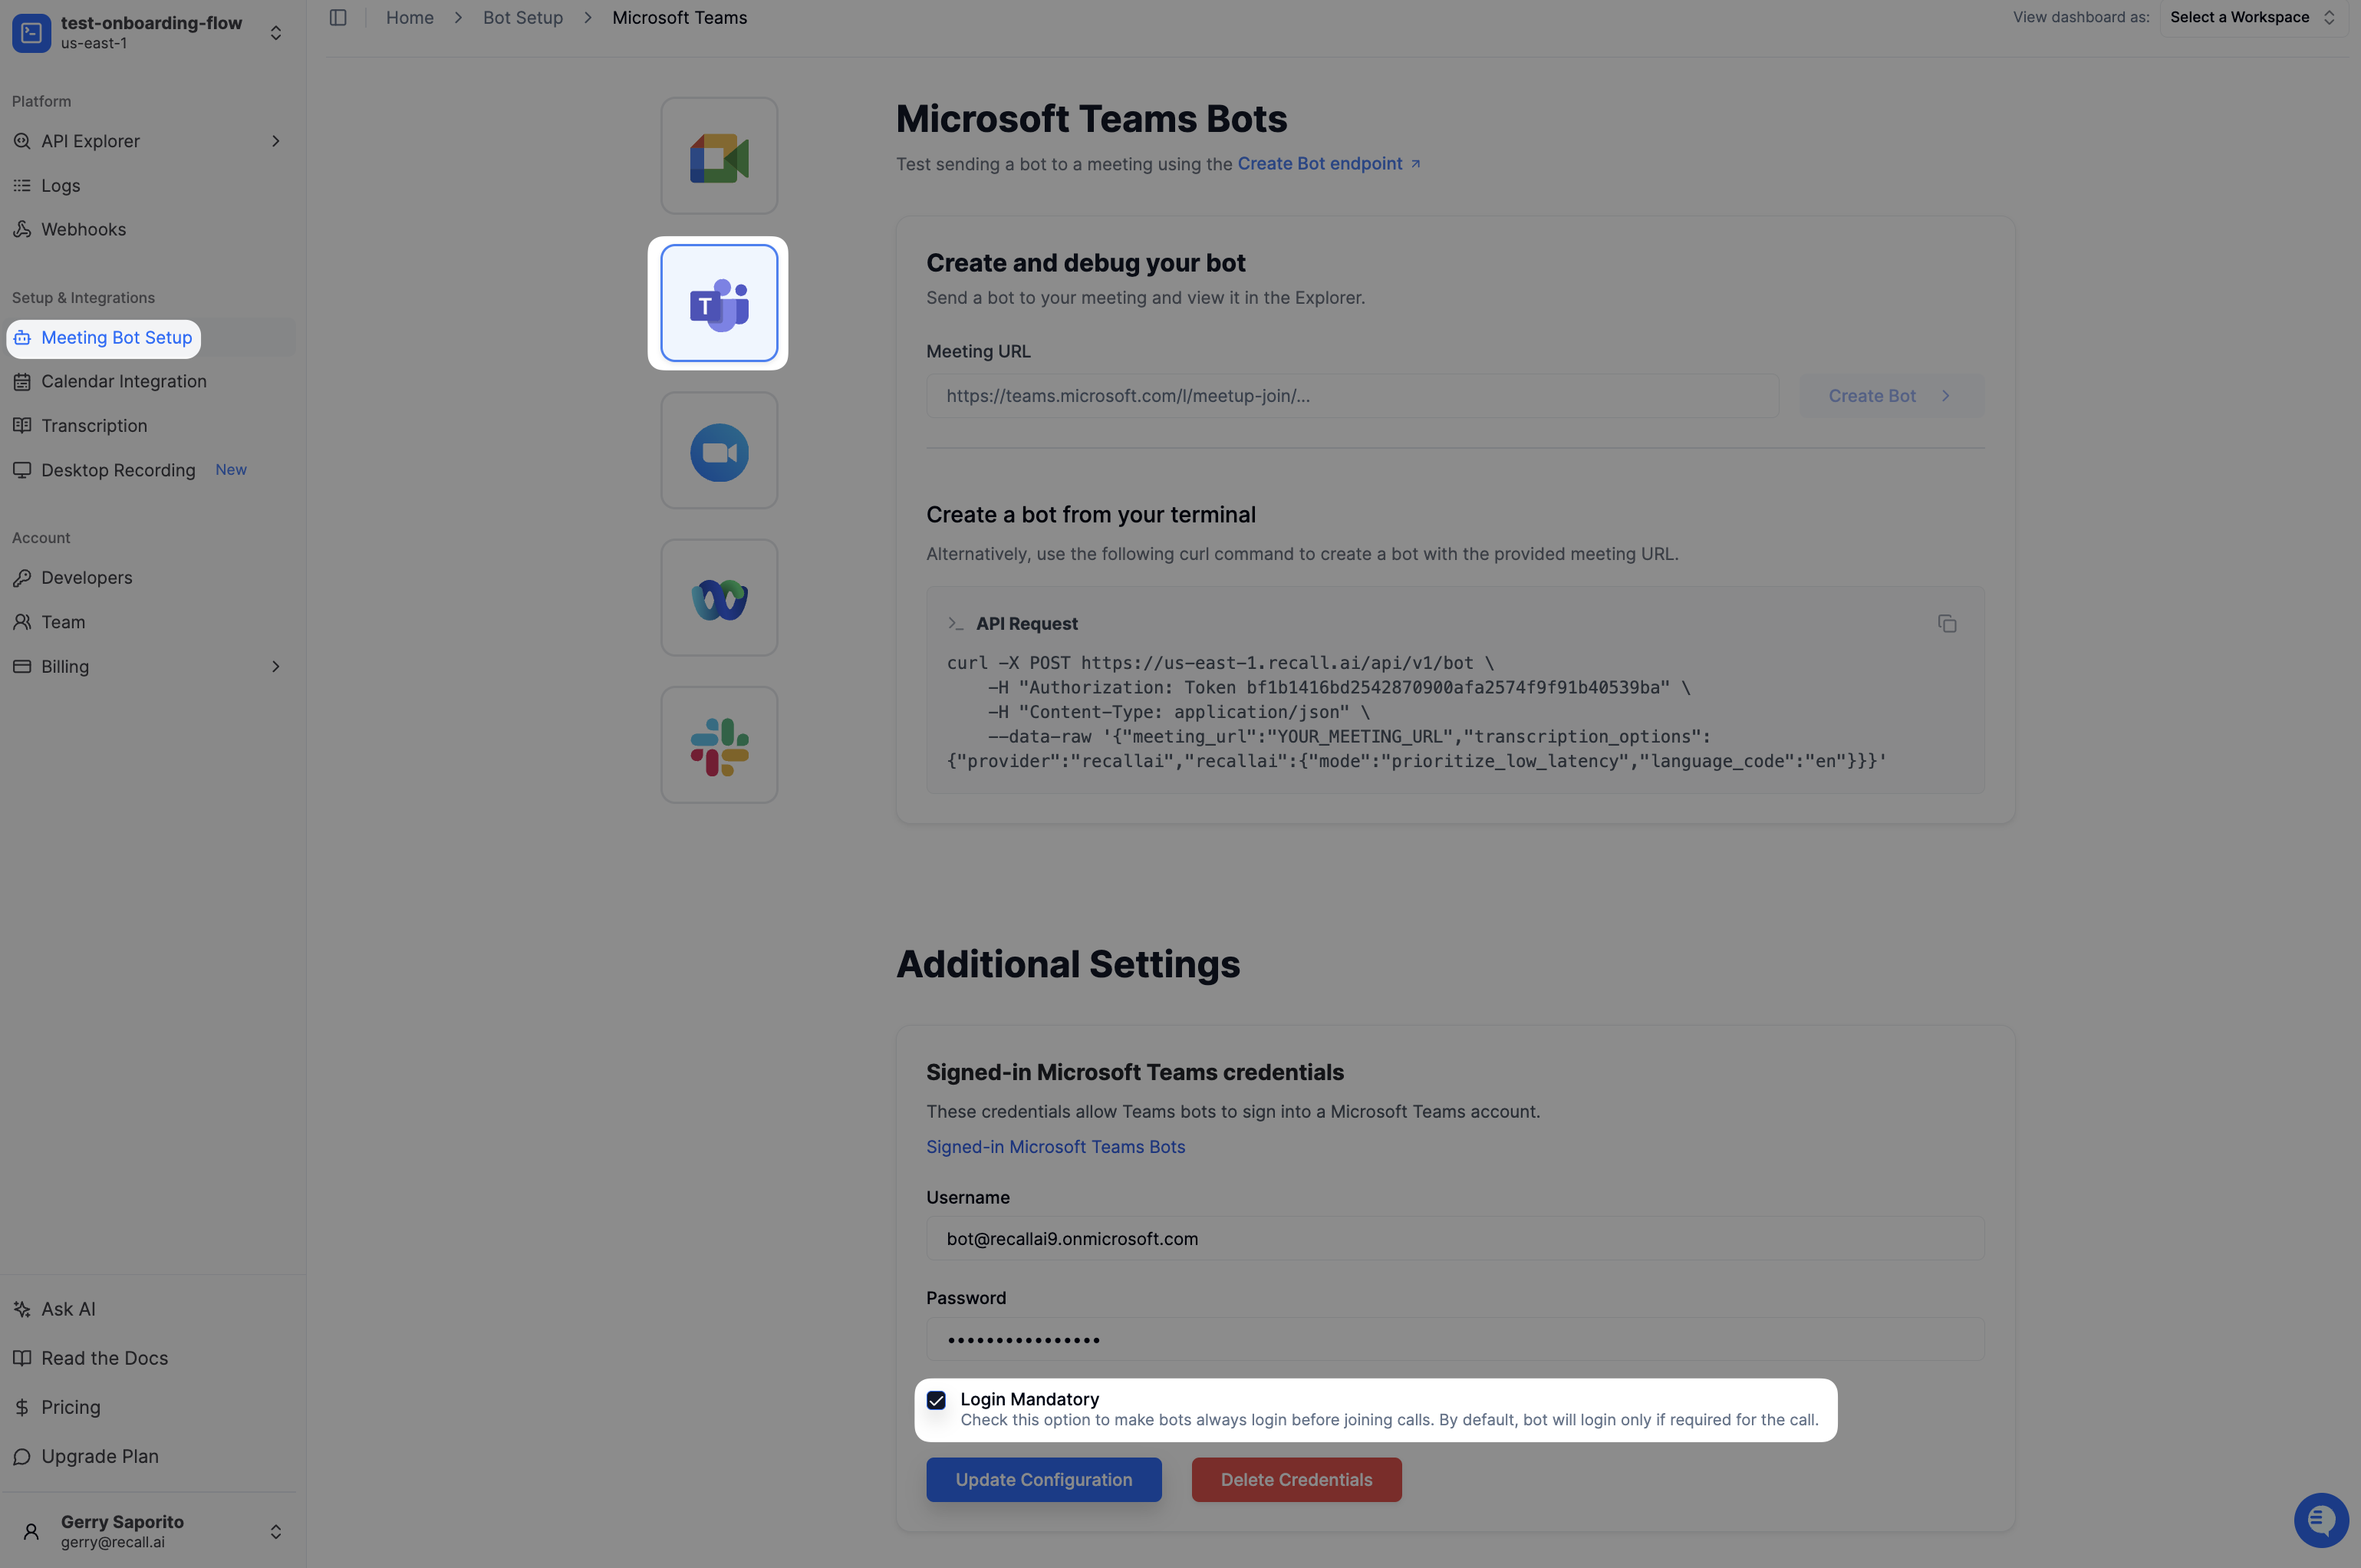
Step 3: Add the bot's sign-in credentials in the Recall dashboard
Head to the Meeting Bot Setup > Microsoft Teams setup dashboard page
Add the bot's email & password
View the Microsoft Teams setup dashboard
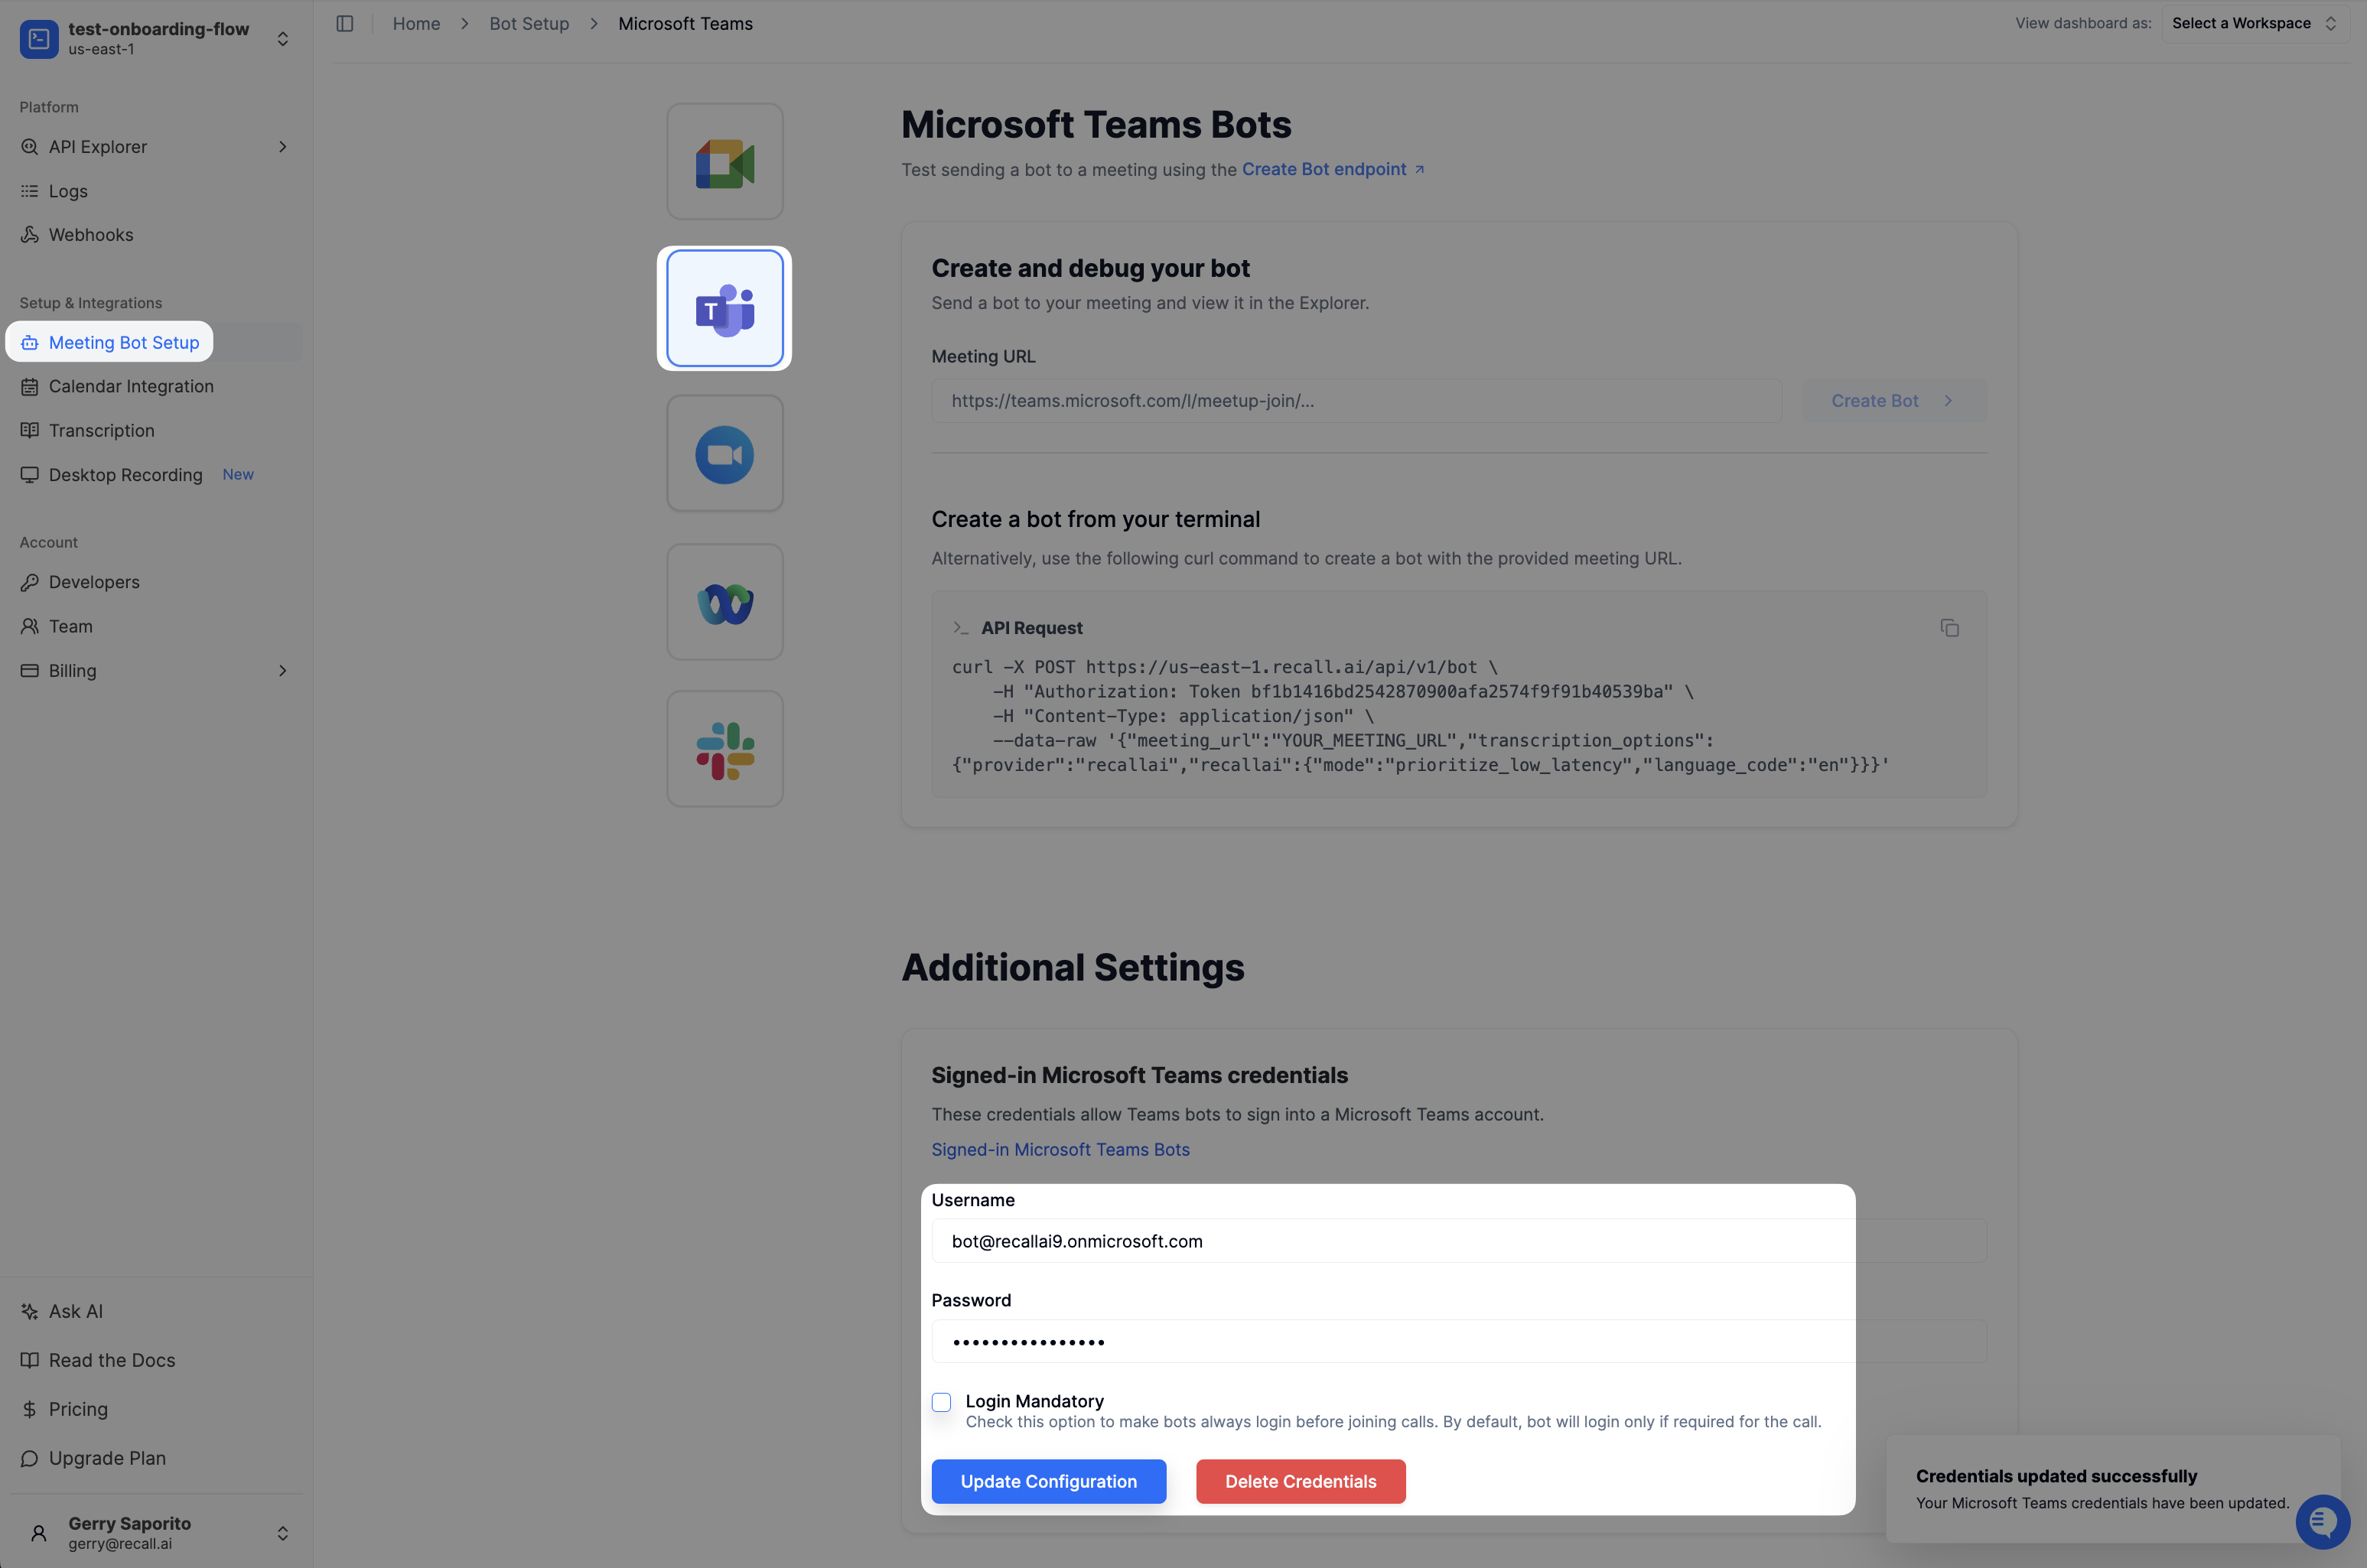
We recommend keeping Login Mandatory option "Disabled"
Login Mandatory (Disabled)The bot will only attempt to login for calls where signed in participants are mandatory
Login Mandatory (Enabled)Forces the bot to always login before joining the call. This means the bot's profile (name and picture) will be used every time the bot joins the call.
This will override the
bot_namesetting you have set
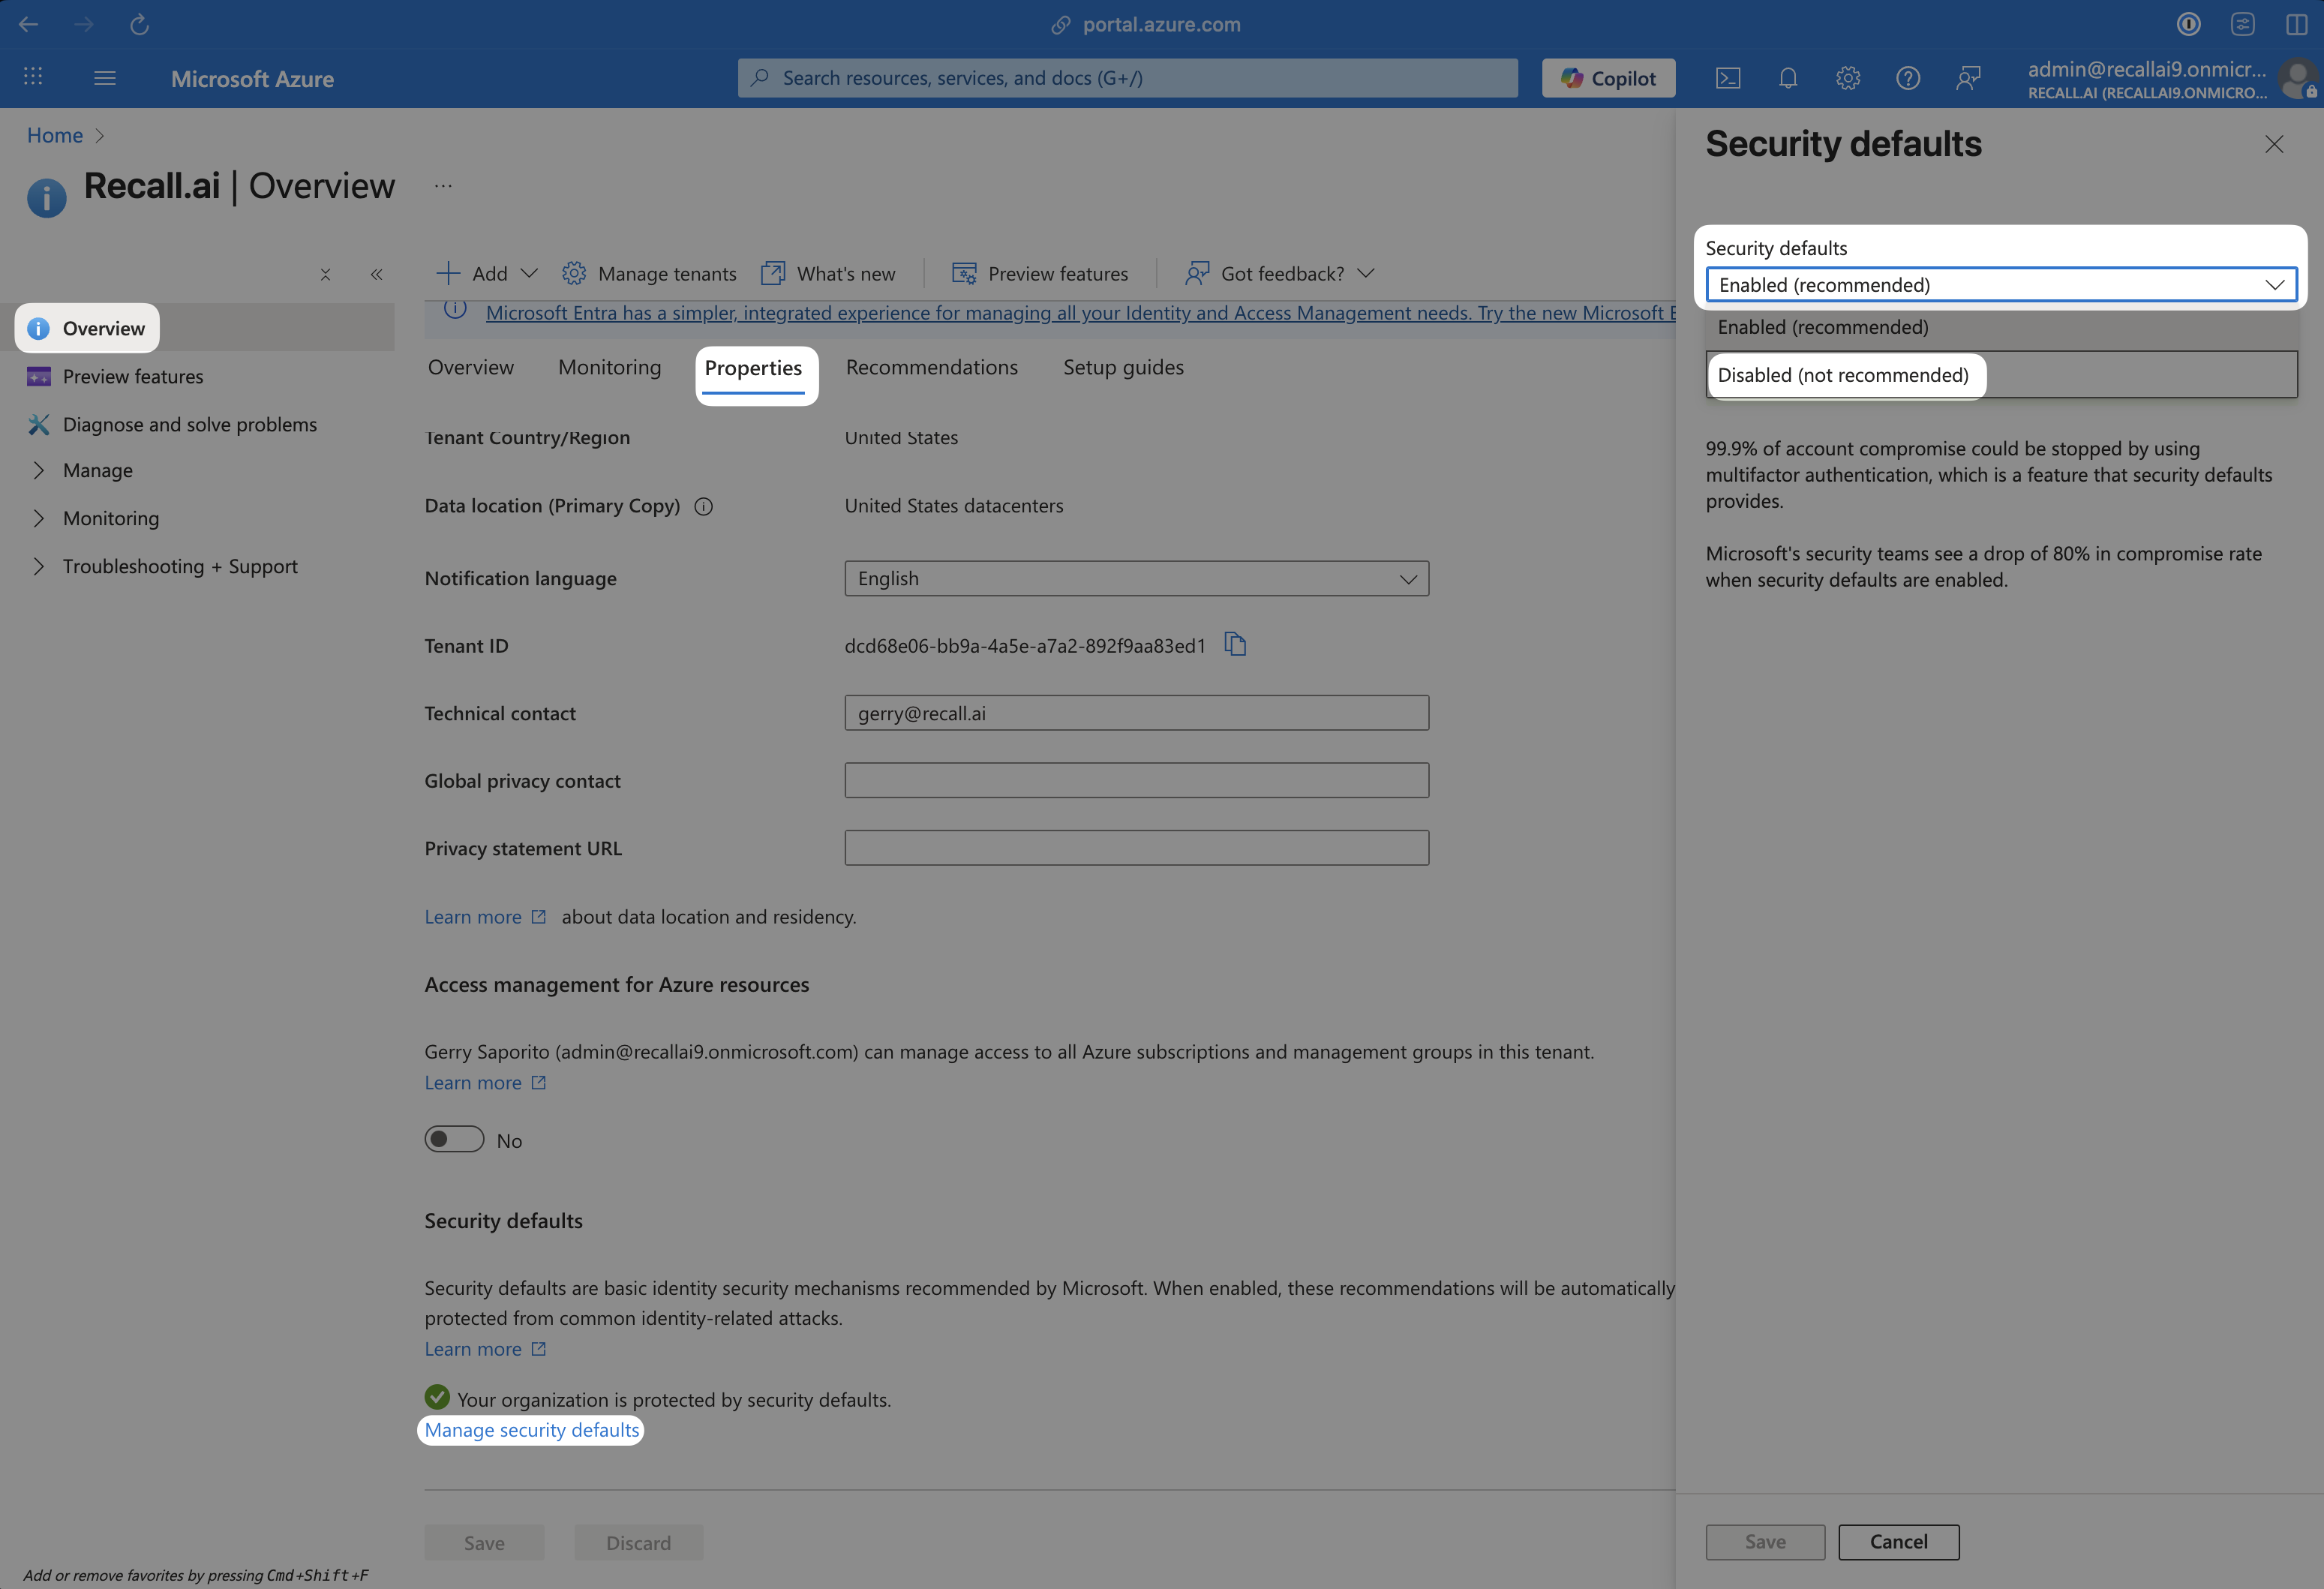
Step 4: Update the Microsoft tenant's security settings
Step 4.1: Create a pay-as-you-go azure account
Sign into the Azure admin portal using the admin account
Step 4.2: Disabling Security Defaults
All tabs and fields for Step 4.2 can be seen in the image below
Search for the "Microsoft Entra ID" product in the top search bar inside the Azure admin portal
Inside the Microsoft Entra Id product, disable the security defaults found in:
- Overview > Properties > Manage Security Defaults
- Set Security Defaults to "Disabled (not recommended)" inside the right sidebar
- If asked to fill out the Reason for disabling field, simply select "Other" and write "Preference" in the text box
- Click Save at the bottom
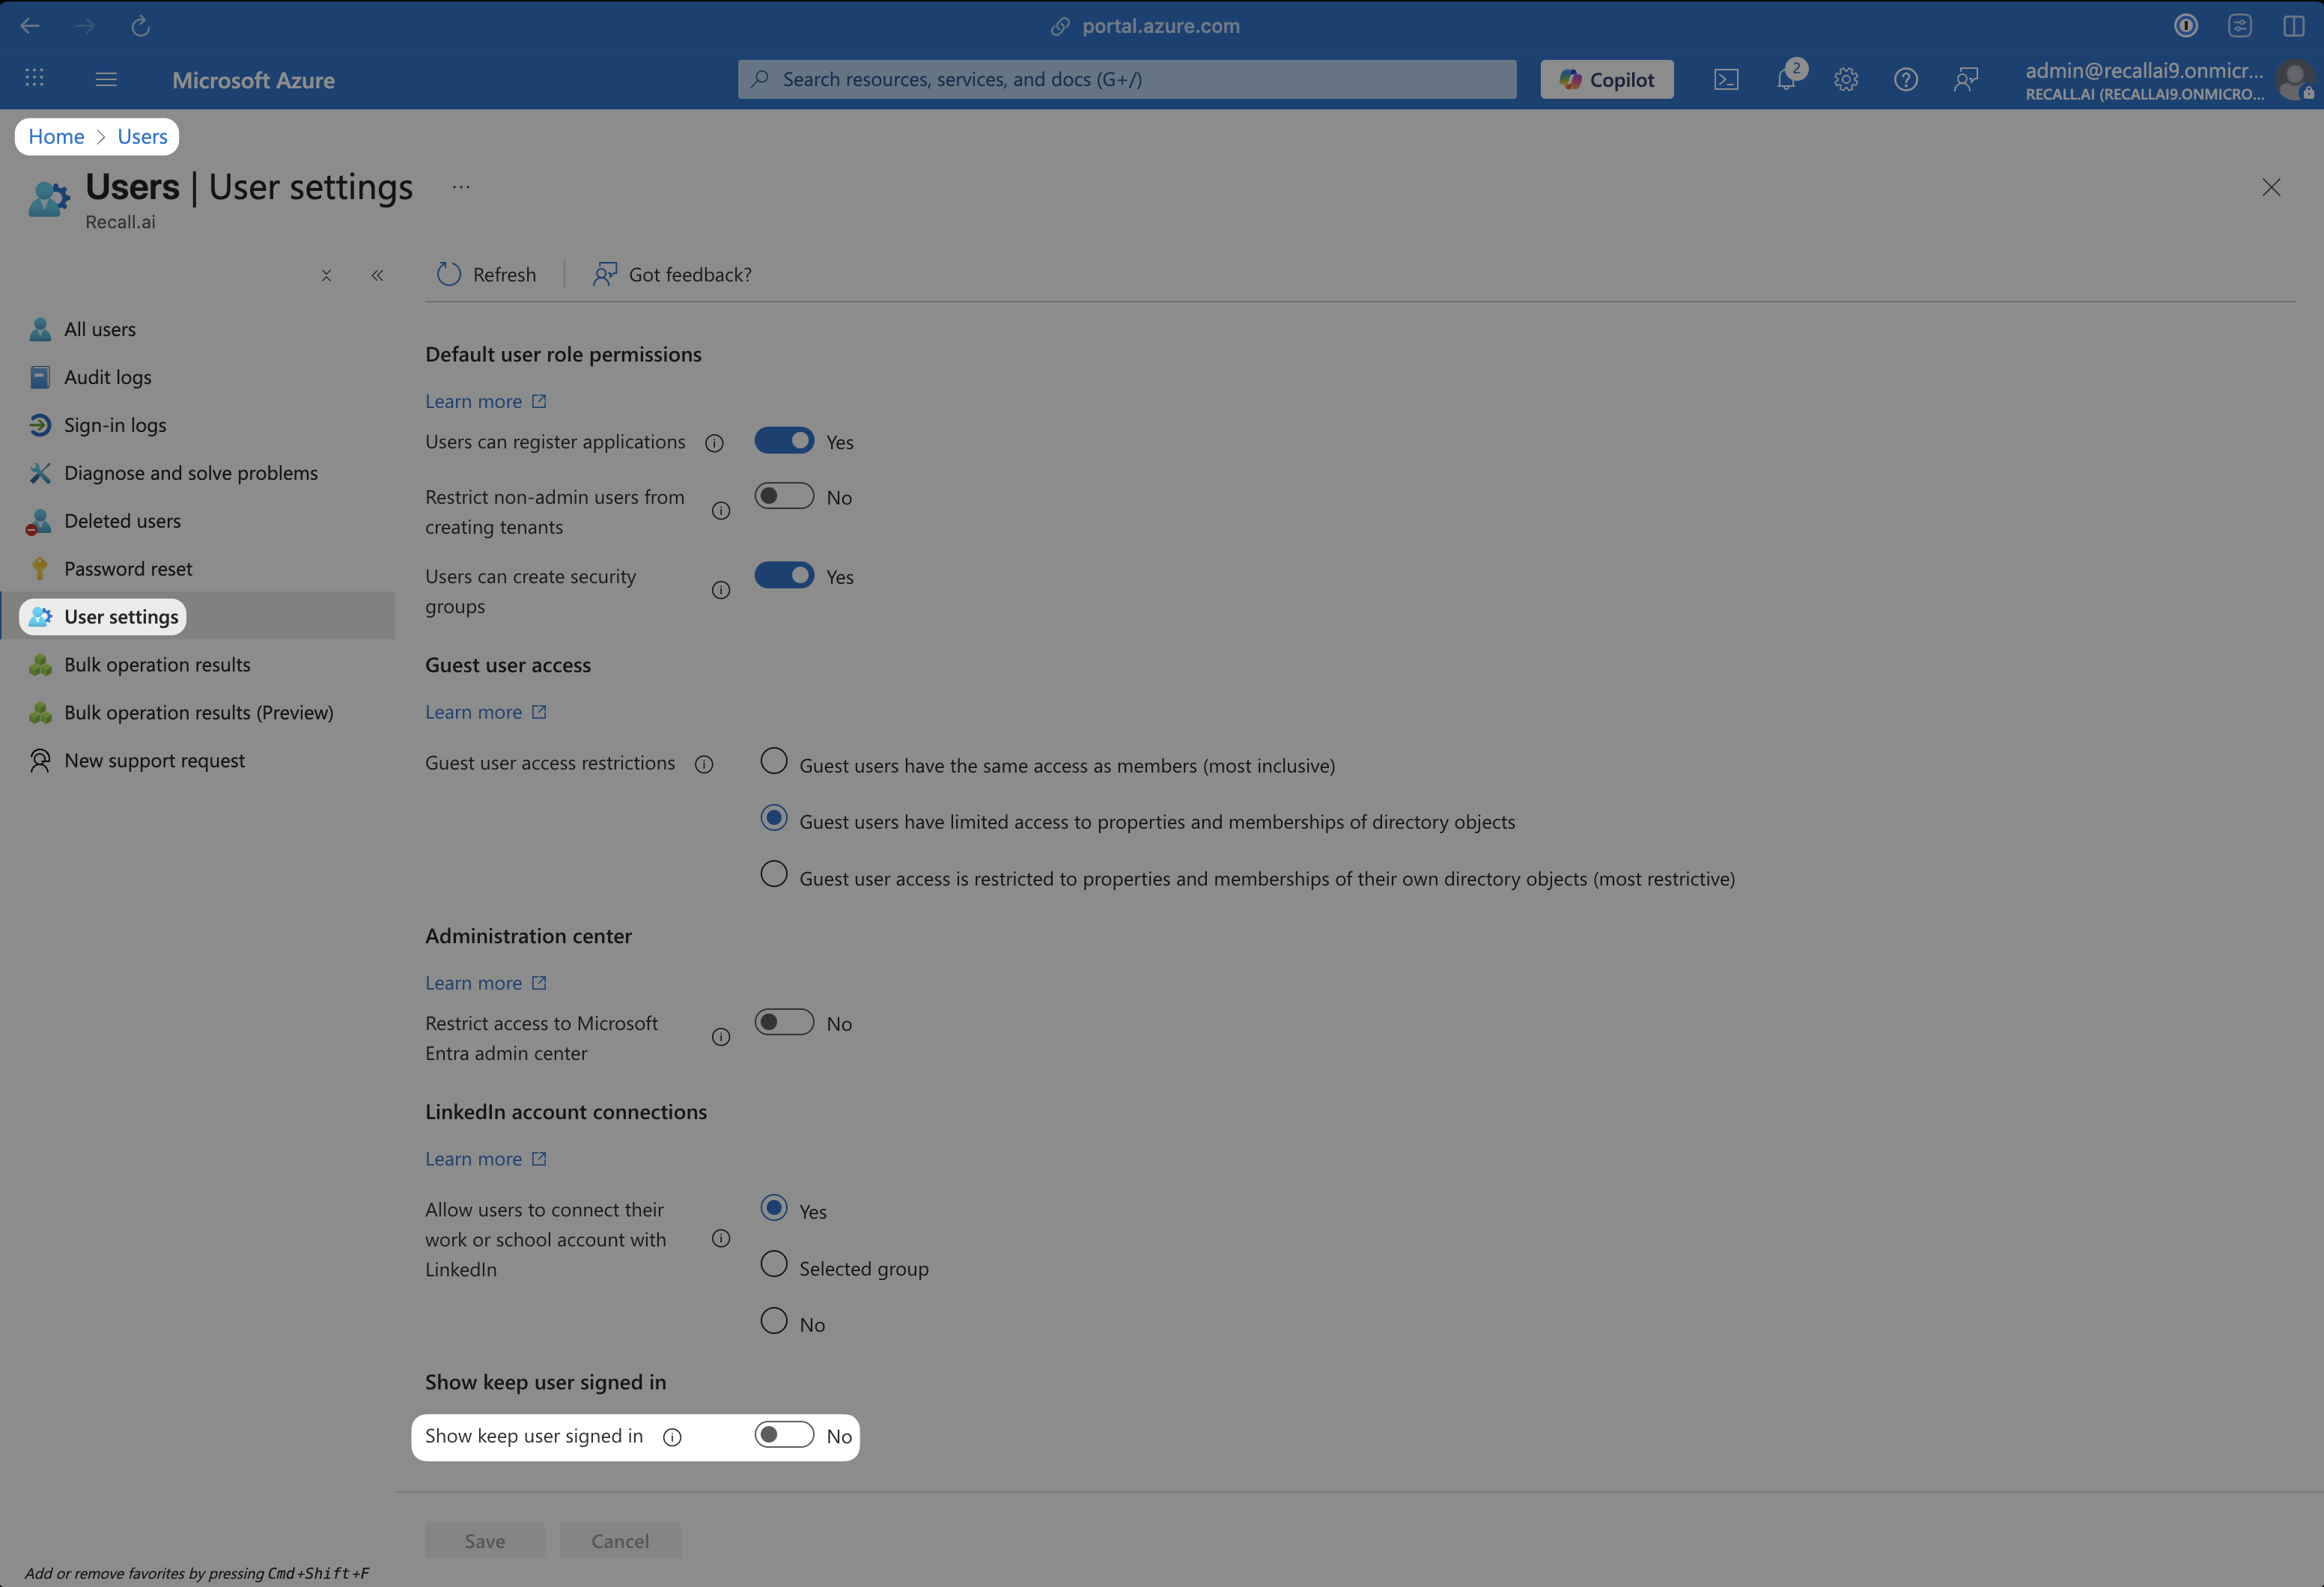
Step 4.3: Disable "Show keep user signed in"
All tabs and fields for Step 4.3 can be seen in the image below
Search for the "Users" product in the top search bar
Once in the Users product:
- Click on User Settings in the sidebar and disable the "Show keep users signed in" toggle
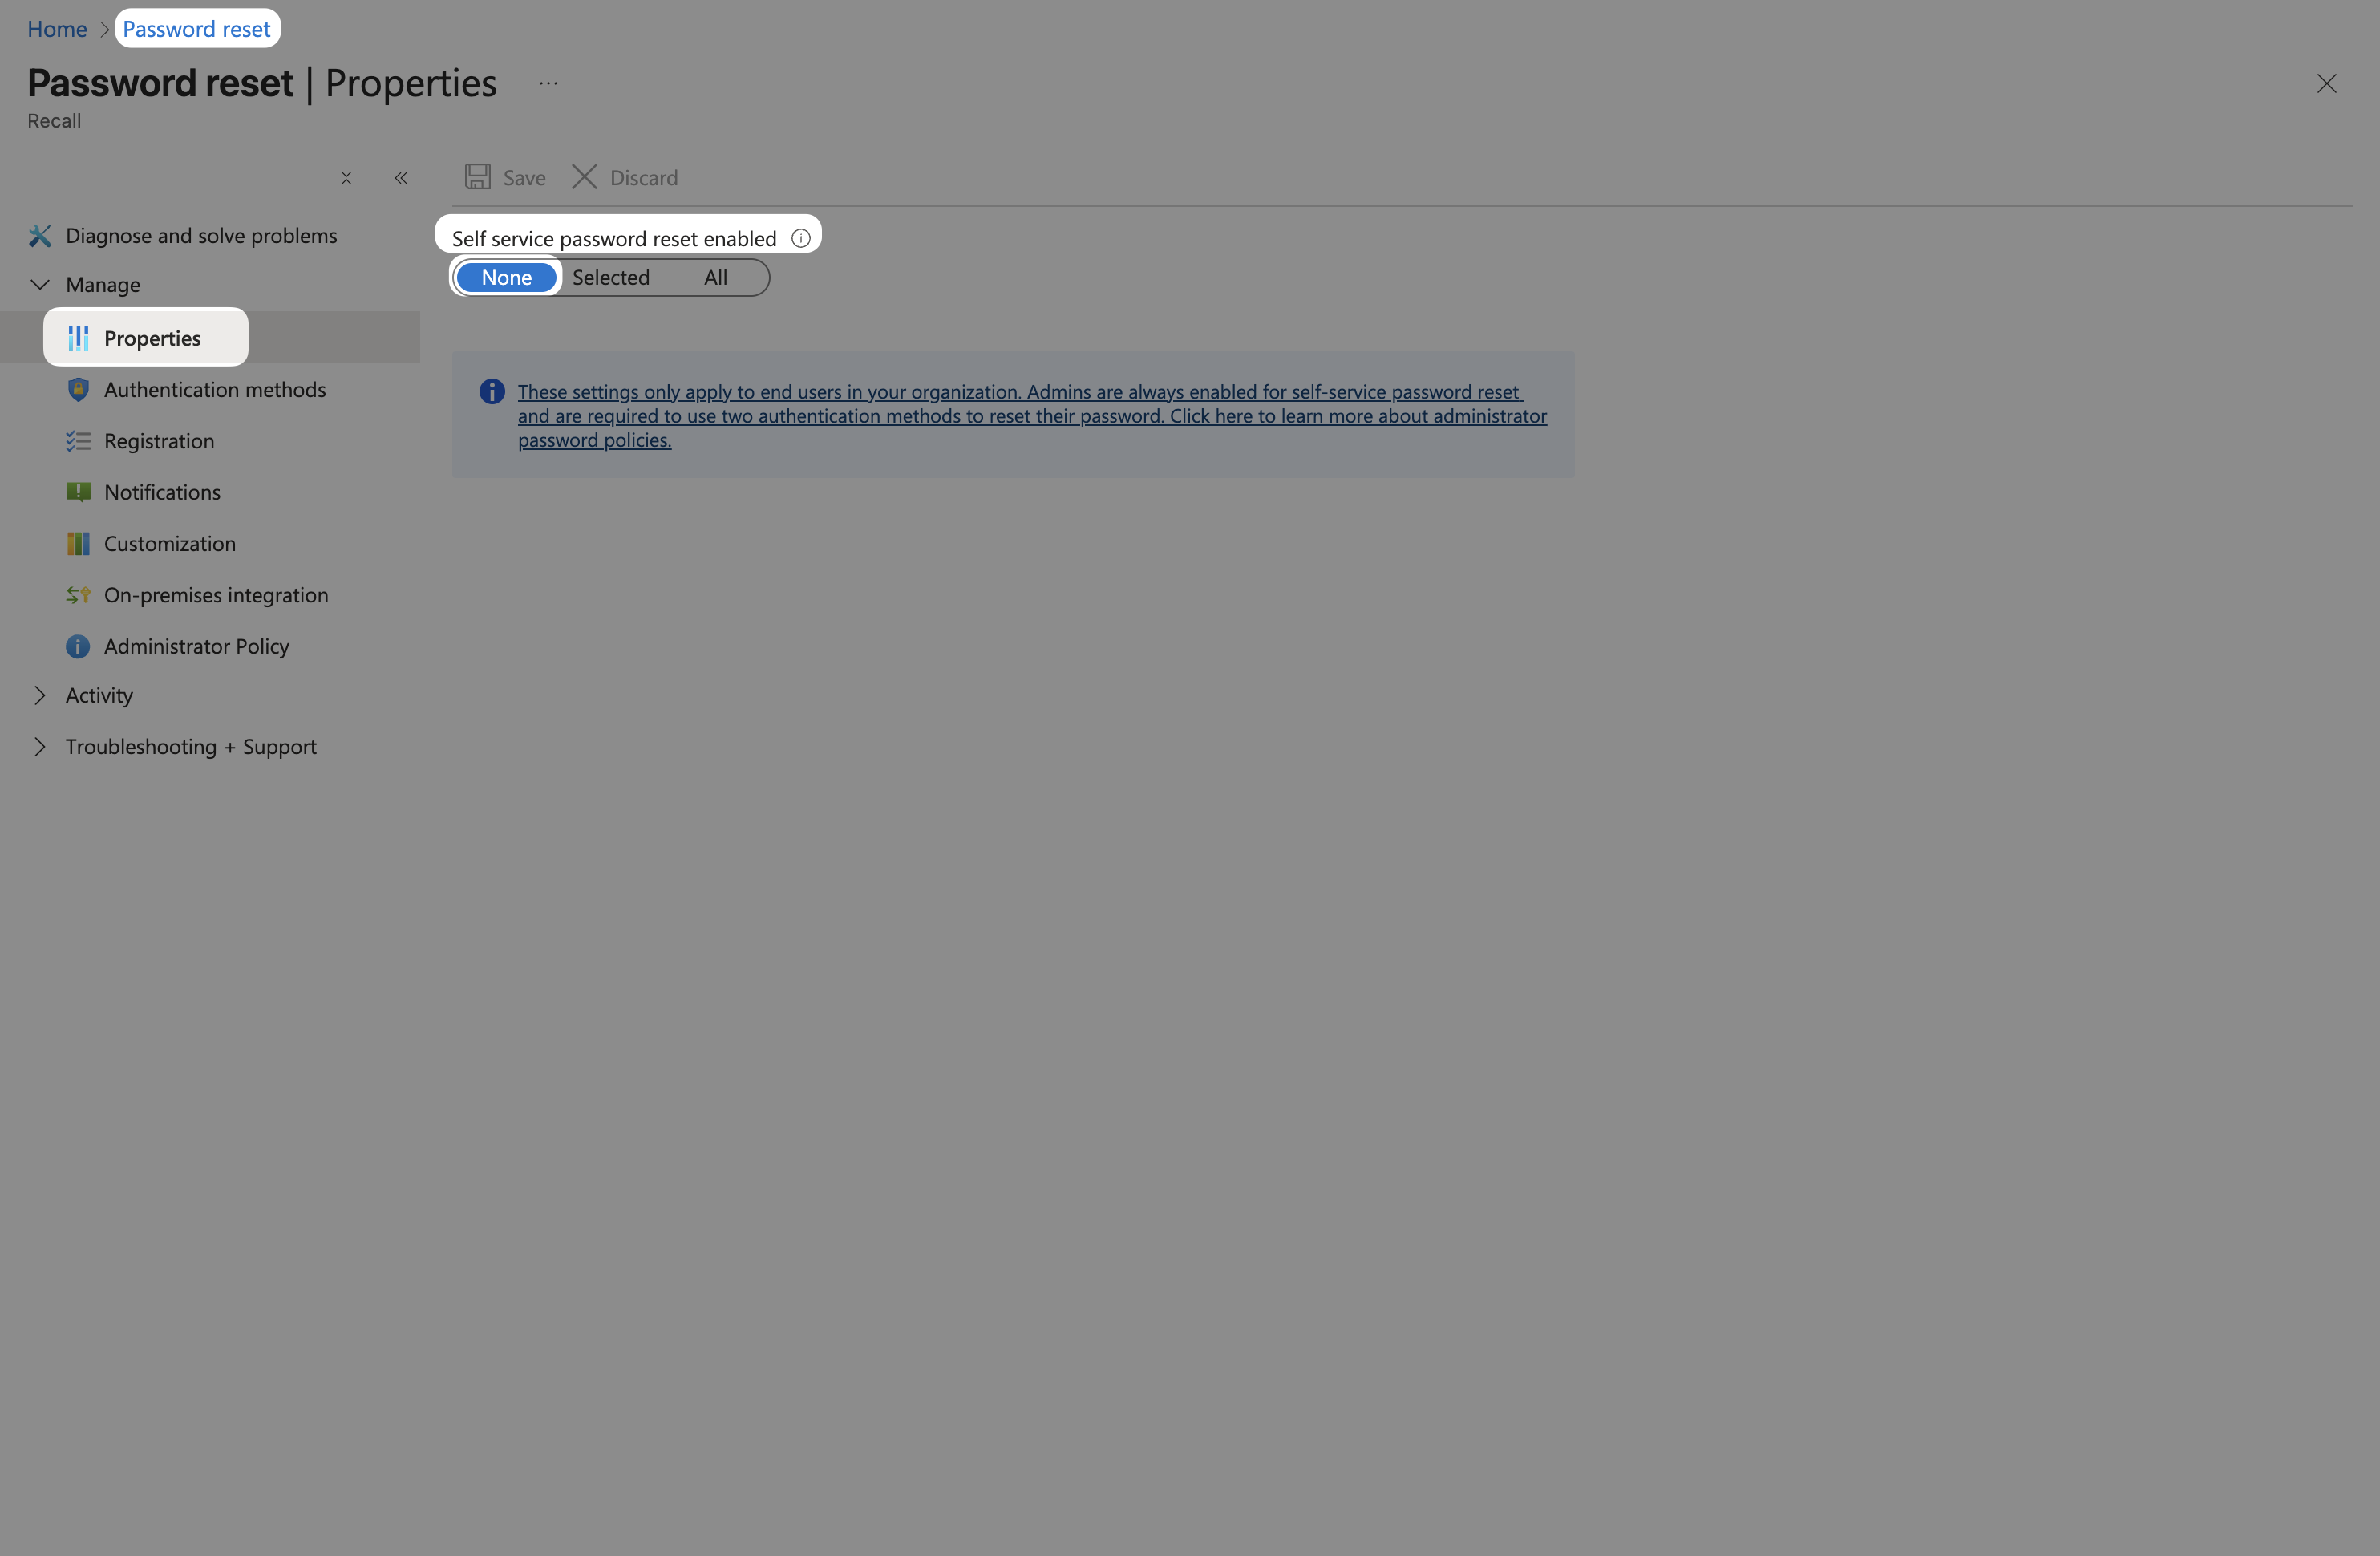
Step 4.4: Disable "Self-Service Password Reset (SSPR) policy"
All tabs and fields for Step 4.4 can be seen in the image below
Search for the "Password reset" product
Once in the Password reset product:
- Click on Properties in the sidebar
- Set the "Self service password reset enabled" option to "None" (this is generally the default)
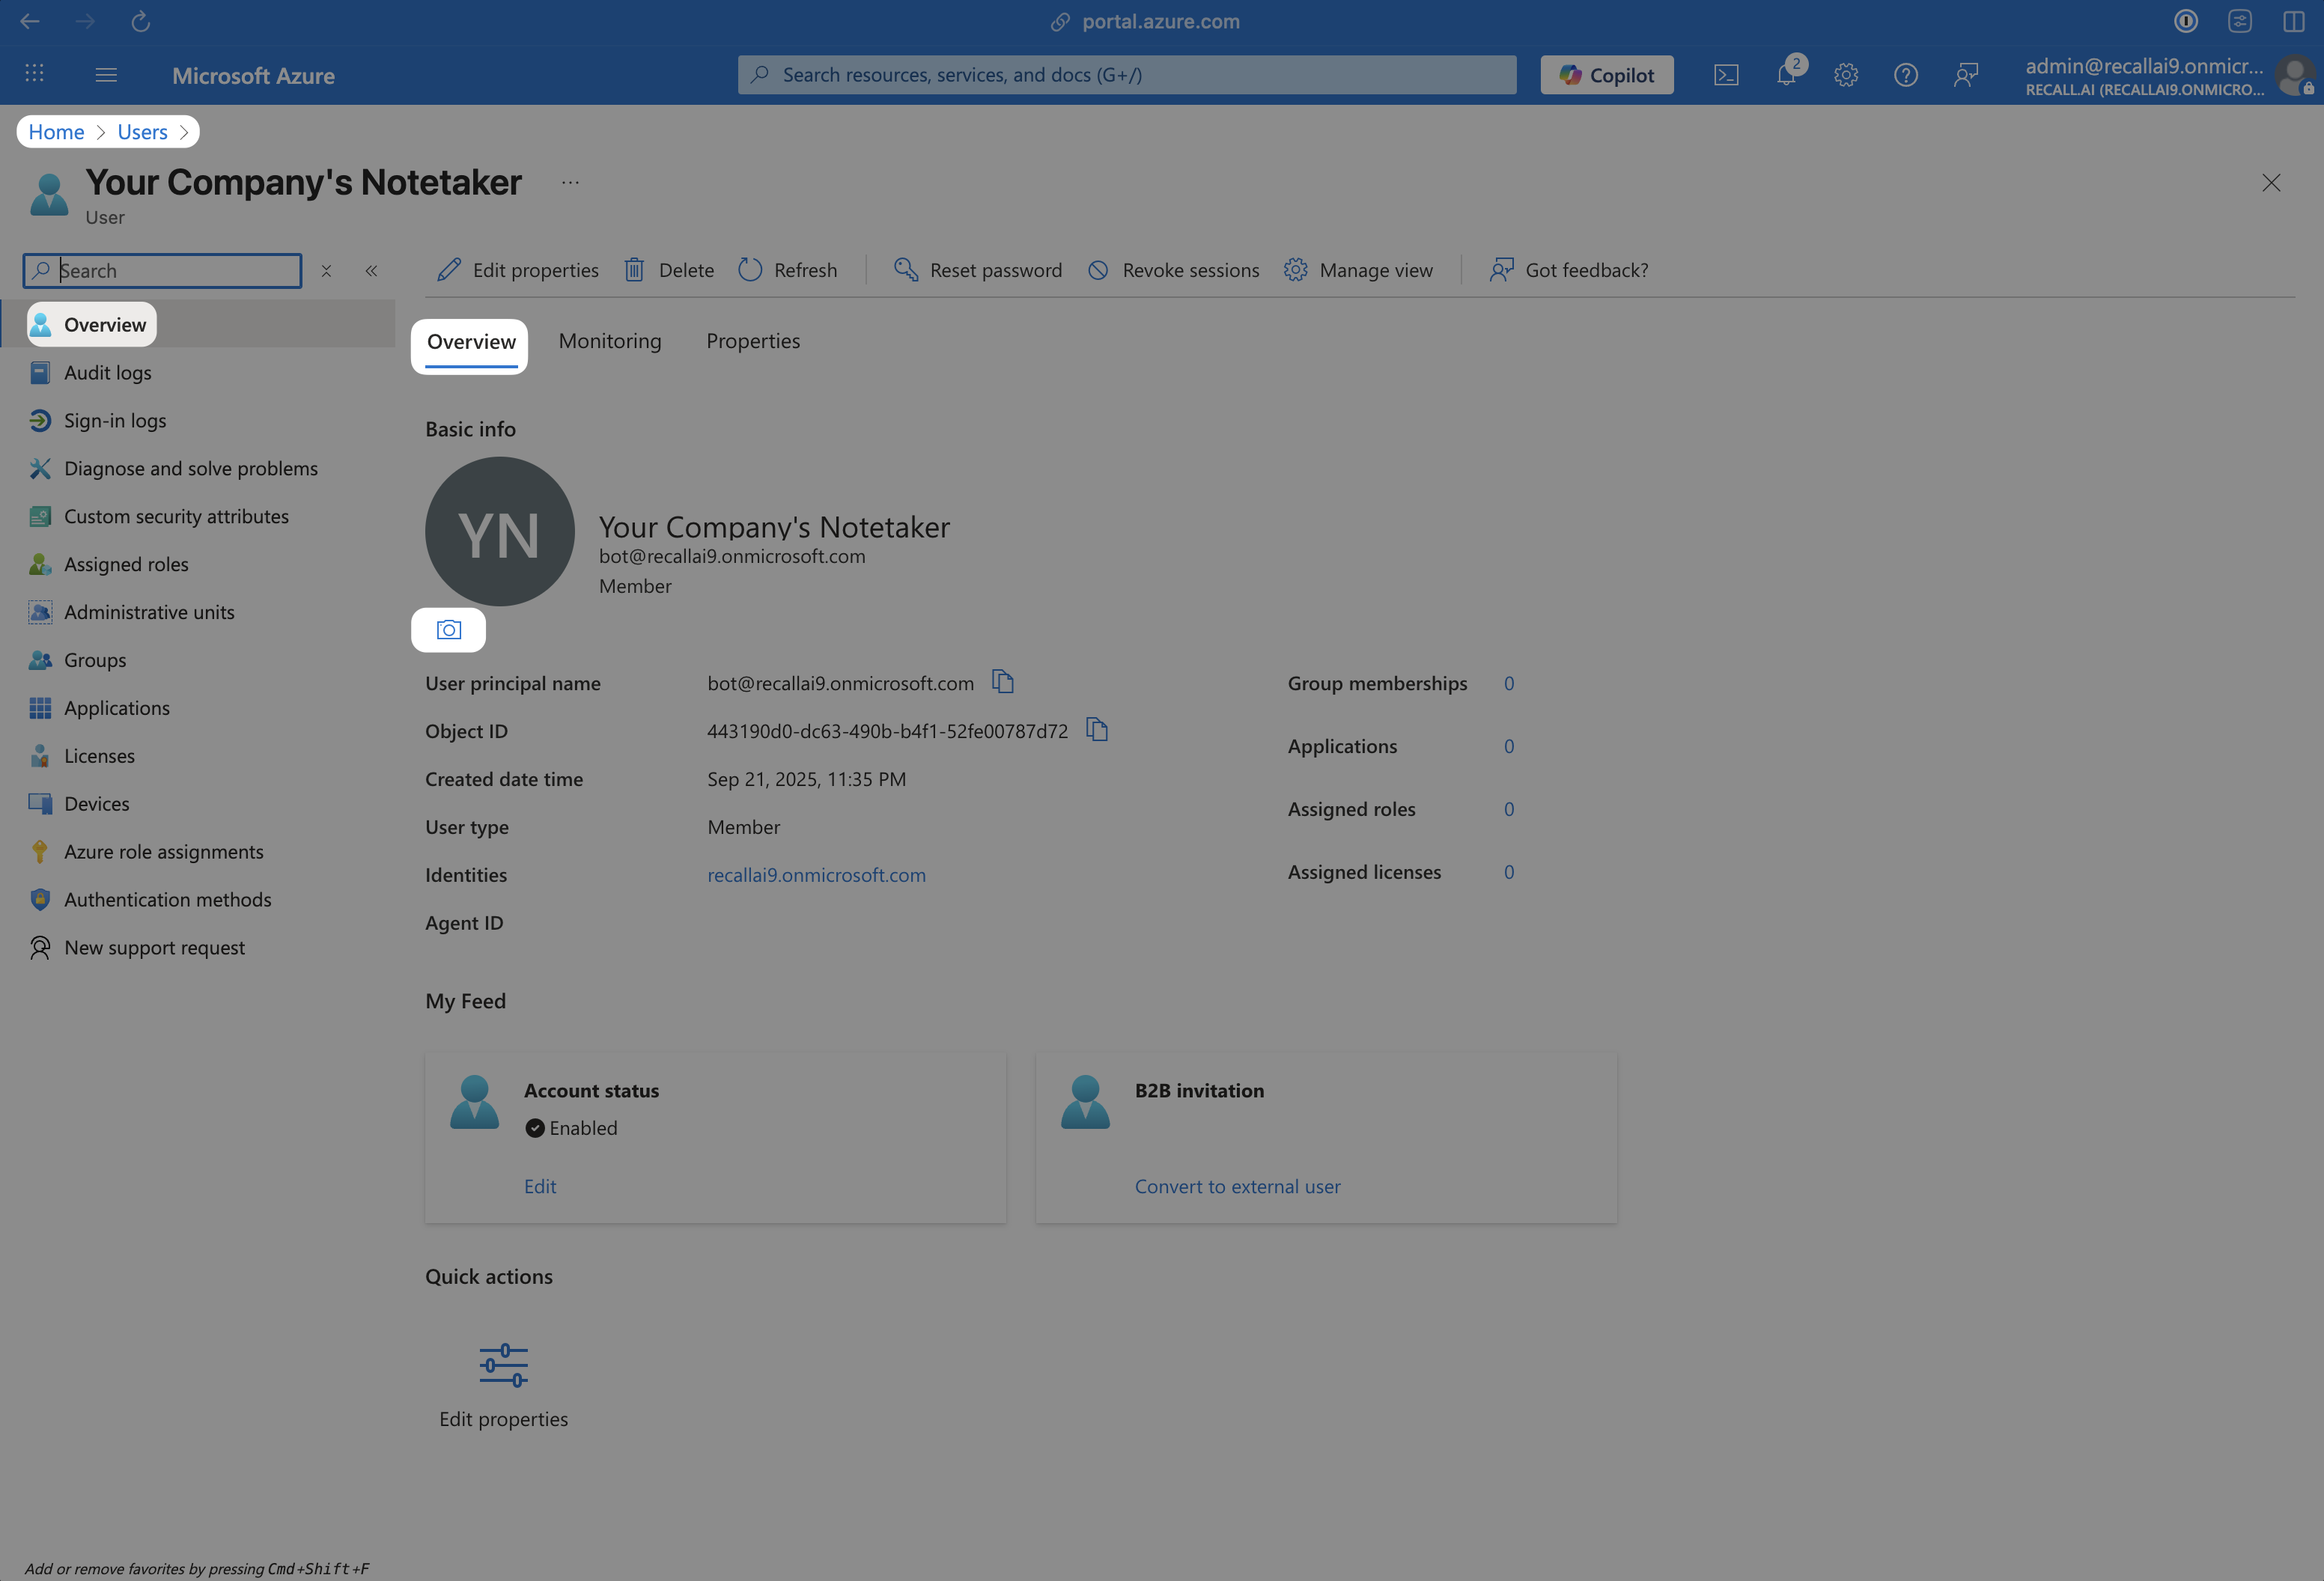
[Optional] Step 4.5: Set the bot's profile picture
All tabs and fields for Step 4.5 can be seen in the image below
Search for the "Users" product in the top search bar (same as step 4.3 above)
Once in the Users product:
- Click on your bot's name in the Display Name column
-
If you don't see the bot's profile, wait a couple minutes and reload the page
- This navigates to the bot's profile
-
- Click on Overview > [Camera Icon] to set the bot's profile picture
Step 5: Test the bot
Now that your new bot account is set up, you can try sending your bot to a new Microsoft Teams meeting
You can quickly test this by sending a bot to the meeting using the interactive Create Bot api docs. Make sure you use a new Teams Meeting URL and the API key from the Recall account with your Microsoft Teams Business Account login credentials
When testing, enable the "Login Mandatory" option in the Recall dashboard's Meeting Bot Setup > Teams > Signed-in Microsoft Teams credentials. Then you can send a bot to a Teams meeting to see it sign-in.
Don't forget to disable "Login Mandatory" again after your test
Note that the bot will only sign in for meetings that require signed-in participants
FAQs
Why does the bot sometimes have (Guest) and others (External) after the display name?
(Guest) and others (External) after the display name?
Bot is not signed inA bot has
(Guest)after the display name
Bot is signed inA bot has
(External)after the display name
If you want the bot to always show (External) instead of (Guest), you can enable the "Login Mandatory" checkbox in the Teams Web Credentials. Note that logging in the bots take a significantly longer time to join calls
Why does the bot have (Unverified) after the display name?
(Unverified) after the display name?Microsoft released an update February 2024 that affects how Teams participants are displayed depending on their account's relationship with the organization.
This only affects the new version of teams (teams.microsoft.com), and is not applicable for the old version (teams.live.com).
Below is a summary of these changes:
No label: All participants who are part of the organizer’s organization.
External: All participants who are external to the organizer’s organization but have a trusted relationship with the organizer or their organization. This means the domain of the signed-in user is on the host's list of trusted domains
Unverified: All other participants will be seen with this label. This will include Microsoft Entra ID users who belong to organizations that do not have an explicit external access setup with the organizer’s organization, Microsoft Account (personal) users, users who are not using any Microsoft ID while joining meetings, and others.
This means that, by default, bot that join a Teams meetings hosted at teams.microsoft.com will have the Unverified suffix.
Would Microsoft Teams Essentials plan also work for setting this up or does this requires a Microsoft 365 Business Basic?
We haven't tested the Microsoft Teams Essentials plan ourselves so we can't say for certain but we recommend our devs use the Microsoft 365 Business Basic plan as this is what we used for setup and it contains all the required security settings and configurations needed for the bot to join calls
Is there a way to detect beforehand when a Signed-in Teams bot will be required for a user meeting
There is not a way for you to detect what kind of bot will be required for a meeting beforehand because the bot will need to attempt to sign in and encounter the "you need to sign in" page for us to know
That being said, we also have an option in the dashboard to make the bot sign in for every meeting (called "Login Mandatory", referenced in Step 3 above). If you leave this bot unchecked, it will only sign in for meetings that require participant sign-in
We generally recommend developers leave this box unchecked (do not sign in for every meeting, only when required) to keep the bot's join time as low as possible
Can we use our own Teams organization or do we need a new Teams organization for every customer?
We recommend creating a new organization for the bot, then all of your customers can invite this bot to their org (so you only need one new org for all your customers). We recommend creating a new organization for your bot because you need to update the org's security settings which you typically don't want to apply to your whole org
We also recommend having your customers tenants add the bots domain as a "trusted organization" in their security settings
Will Signed-in Teams bots work for Calendar V1, V2, scheduled bots, or ad-hoc bots?
This will work for all meetings (Calendar V1 / V2 meetings, scheduled meetings, or ad hoc meetings). Once you configure signed-in Teams bots in the Recall dashboard, there is no additional configuration required to make them work for all meeting types.