Recall-Managed OAuth
OAuth your customers' Zoom Account using Recall-managed OAuth.
The last step in the Zoom OAuth integration process is to actually direct your users through the OAuth authorization flow.
Since Recall-managed OAuth manages access and refresh tokens for you, the only two implementation steps necessary are:
- Directing the user to a Zoom OAuth URL
- Creating a Zoom OAuth Credential in Recall using the
codereceived in the OAuth callback
For demonstration purposes, we will abstract some of this implementation and pass the authorization code manually through an API request to Recall.
In production, this should be done programmatically in your app, for example by requesting Zoom OAuth permission as part of your onboarding flow, or having your users click a button in your app to connect their Zoom account.
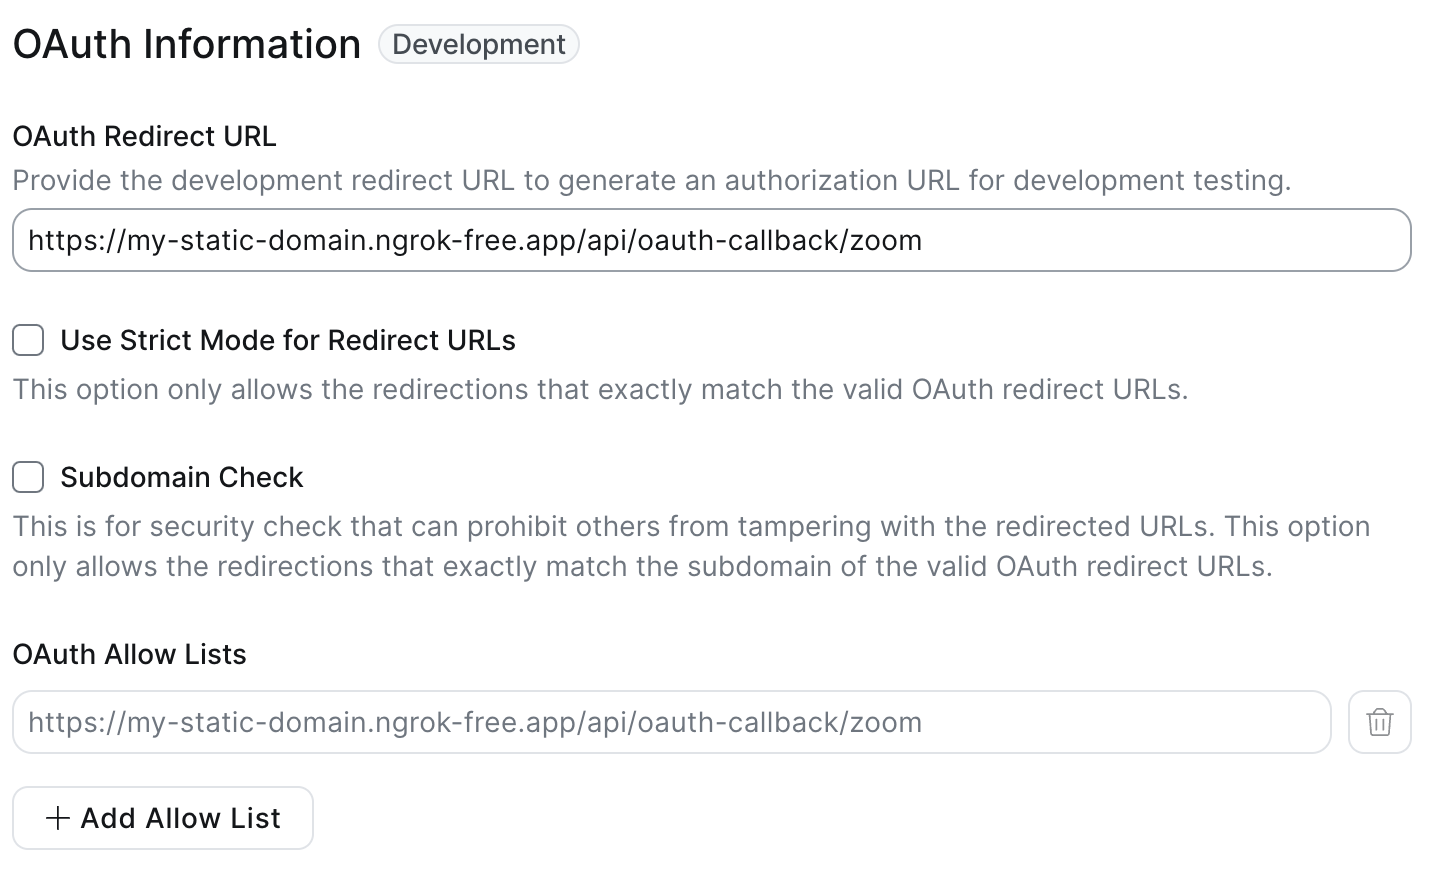
Registering A Redirect URL
Under Basic Information, add an OAuth Redirect URL (the OAuth Allow List will be automatically updated).
For testing purposes, this can be any URL, though it can be convenient to use a placeholder for a server endpoint that will handle passing this authorization code to Recall for when you implement the end to end user flow. We recommend using a service like Ngrok that can forward requests to your localhost. See this guide to get set up with Ngrok.
In the example below, this is set to: https://my-static-domain.ngrok-free.app/oauth-callback/zoom
Avoid using localhost as a Redirect URL, even for testing. This will throw an error when you get to the final step of creating an OAuth Credential!
Constructing a Zoom OAuth URL
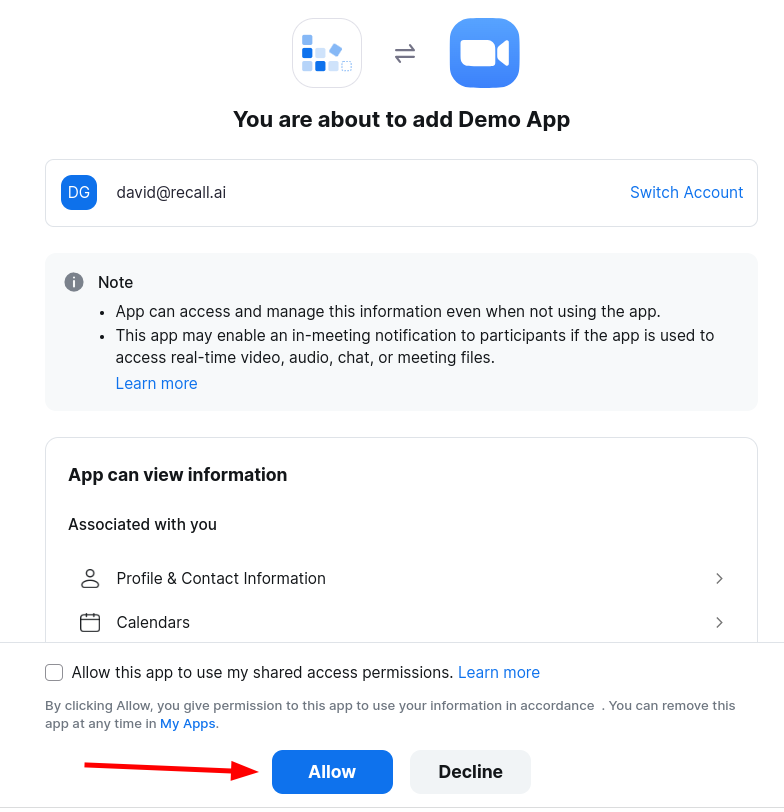
A Zoom OAuth URL is the URL that you'll be navigating your users to, for them to grant the permissions. For example, you might have a button that says "Connect Zoom", that redirects your user to the OAuth URL.
You can generate the URL using the following code:
function generateAuthUrl(redirectUri: string, zoomAppClientId: string): string {
    const baseUrl = "https://zoom.us/oauth/authorize";
    const queryParams = {
        "response_type": "code",
        "redirect_uri": redirectUri,
        "client_id": zoomAppClientId,
    };
    const queryString = new URLSearchParams(queryParams).toString();
    return `${baseUrl}?${queryString}`;
}
from urllib.parse import urlencode
def generate_auth_url(redirect_uri, client_id):
base_url = "https://zoom.us/oauth/authorize"
query_params = {
"response_type": "code",
"redirect_uri": redirect_uri,
"client_id": client_id,
}
return base_url + "?" + urlencode(query_params)The redirect_uri should exactly match the configured OAuth redirect URL step above.
After calling this function, you should get a URL that looks like the following: https://zoom.us/oauth/authorize?response_type=code&redirect_uri=https%3A%2F%2Fmy-static-domain.ngrok-free.app%2Foauth-callback%2Fzoom&client_id=YOUR_CLIENT_ID_HERE
Paste this URL into your web browser, and grant the permission when prompted by Zoom.
Obtaining the OAuth Code
After clicking "Allow", you will be redirected to the redirect_uri configured in the previous step.
Since we don't yet have a server running to process this request yet, you will see a page similar to below:
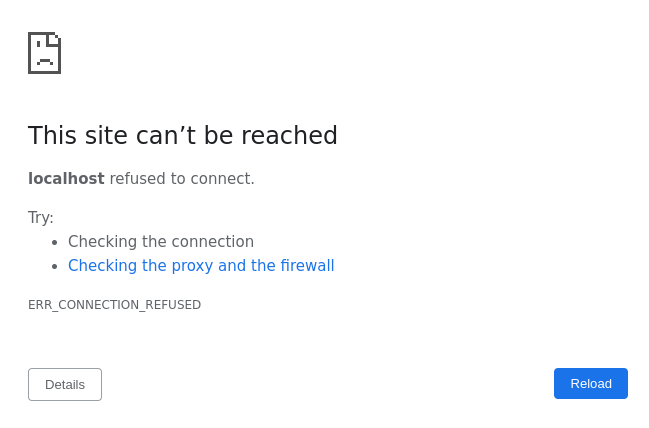
This is expected behavior. You now want to look at the URL in your web browser, which should look something like the following: https://my-static-domain.ngrok-free.app/oauth-callback/zoom?code=JFiSLNVIEejhfiJLmU6AuTnKZQ
The value in the code query parameter is your OAuth code. Save this for the next step.
If you're getting "Invalid redirect", check your Redirect URIThe redirect URI specified in the query parameter must match exactly the redirect URI registered in the Zoom OAuth App console, including any trailing slashes.
Calling the Recall API
Now that the user has authorized their account, we can use the OAuth code to register them in the Recall API by calling the Create Zoom OAuth Credential endpoint.
$ curl -X POST https://us-east-1.recall.ai/api/v2/zoom-oauth-credentials/
	-H 'Authorization: ${RECALL_API_KEY}'
 	-H 'Content-Type: application/json'
  -d '{
    "oauth_app": "${RECALL_ZOOM_OAUTH_APP_ID}",
    "authorization_code": {
      "code": "JFiSLNVIEejhfiJLmU6AuTnKZQ",
      "redirect_uri": "${ZOOM_OAUTH_REDIRECT_URI}"
    }
  }'
Example 201 response:
{
  "id":"dadcc9c3-2a6d-4f9a-9467-ff3a2b02a82f",
  "oauth_app":"2d40abfe-c692-4723-b26f-869ebfbde4cf",
  "user_id":"...",                   // Populated for User-managed apps
  "account_id": "...",               // Populated for Admin-managed apps
  "access_token_callback_url": null, // Not applicable, only used for customer-managed OAuth
  "created_at":"2024-04-24T06:38:38.879706Z"
}
If you're getting "Invalid Grant", check your Redirect URIThe redirect URI sent in this request must match EXACTLY the redirect URI registered in the Zoom OAuth App console, including any trailing slashes.
Handling Re-authorization
(This is legacy copy which suggests using the conflicting_* attributes in 400 response to resolve re-auth issues, It is preserved here only for reference)
When a user revokes their OAuth permissions, their Zoom OAuth Credential will be marked with a status of unhealthy in Recall.
Deauthorization notifications are sent only for public Zoom apps; apps published on Zoom's App Marketplace. Deauthorizations for development apps do not trigger notifications
This means Recall will not mark
statusasunhealthyfor development apps. Recall will only mark statuses as unhealthy in production apps
If the user tries to re-authenticate to your app, currently you must handle this case by recreating their credentials.
In this case, your logic directing a user through the OAuth flow should add a code path for handling a 400 response from Create Zoom OAuth Credential with a conflicting_zoom_account_id in the body:
- If your app is an account-managed app, it will return the following:
{
  "detail": "A Zoom OAuth Credential already exists for this OAuth App and Zoom account(account_id: ...). A Zoom OAuth App can have at most one Zoom OAuth Credential registered per authorized Zoom account. Please delete the existing Zoom OAuth Credential for Zoom account(account_id: ...) and try again.",
  "conflicting_zoom_account_id": "..."
}- If your app is a user-managed app, it will return the following:
{
  "detail": "A Zoom OAuth Credential already exists for this OAuth App and Zoom account(user_id: ...). A Zoom OAuth App can have at most one Zoom OAuth Credential registered per authorized Zoom user. Please delete the existing Zoom OAuth Credential for Zoom user(user_id: ...) and try again.",
  "conflicting_zoom_user_id": "..."
}
You can then:
- Find the old credential by using the List Zoom OAuth Credentials api. You can use the
conflicting_zoom_account_idorconflicting_zoom_user_idto query the existing OAuth credential - Delete the credential using the old Zoom OAuth Credential ID
- Recreate the credentials
Updated 1 day ago