Zoom OAuth Setup
Set up the Recall Zoom OAuth integration.
Granular scopesZoom introduced new "granular" scopes in April 2024 to replace their Legacy scopes. Existing apps are unaffected, but any newly created apps will use these new granular scopes.
For previously created apps using Legacy scopes, see Zoom OAuth Setup.
1. Zoom App Setup
Create the App
Navigate to the Zoom App marketplace and select Develop > Build App
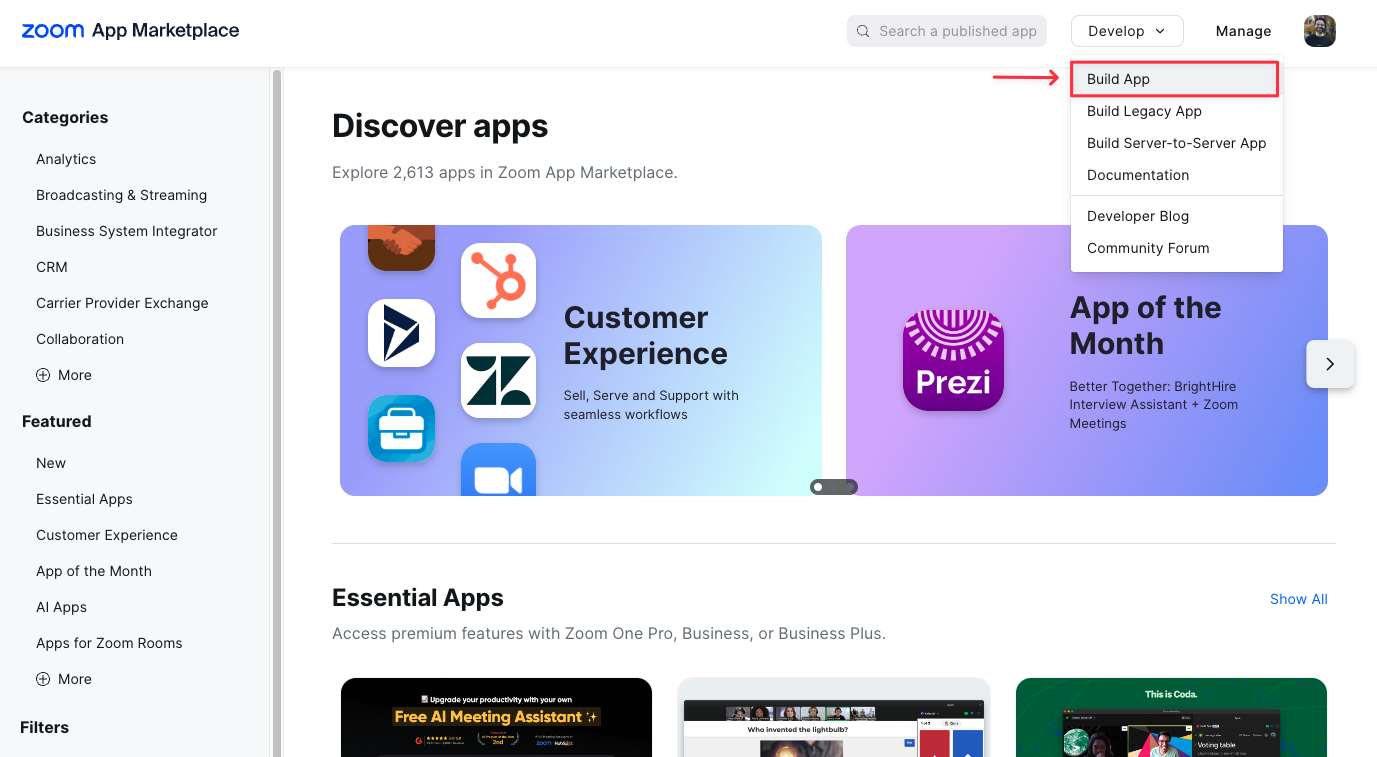
Creating a new Zoom App
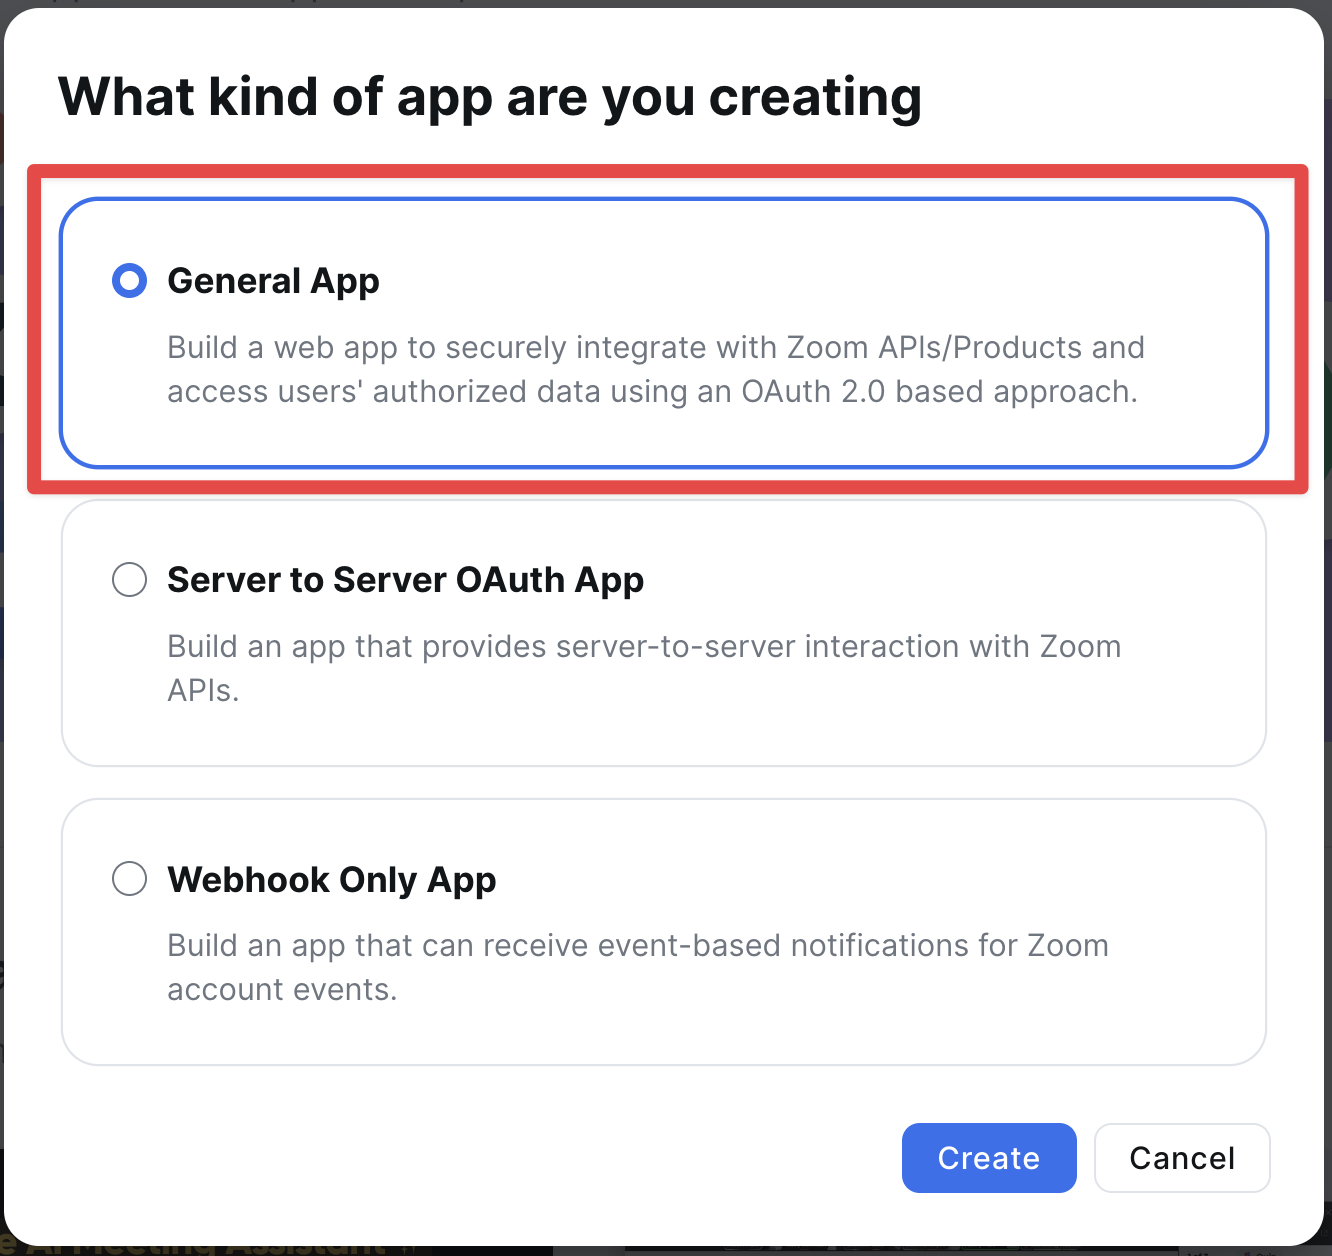
Select General App in the dialog:
Select how your users will manage your app:
- User-managed: Individual end users authenticate via OAuth
- Account-managed: Zoom account admins authenticate the app for their entire organization
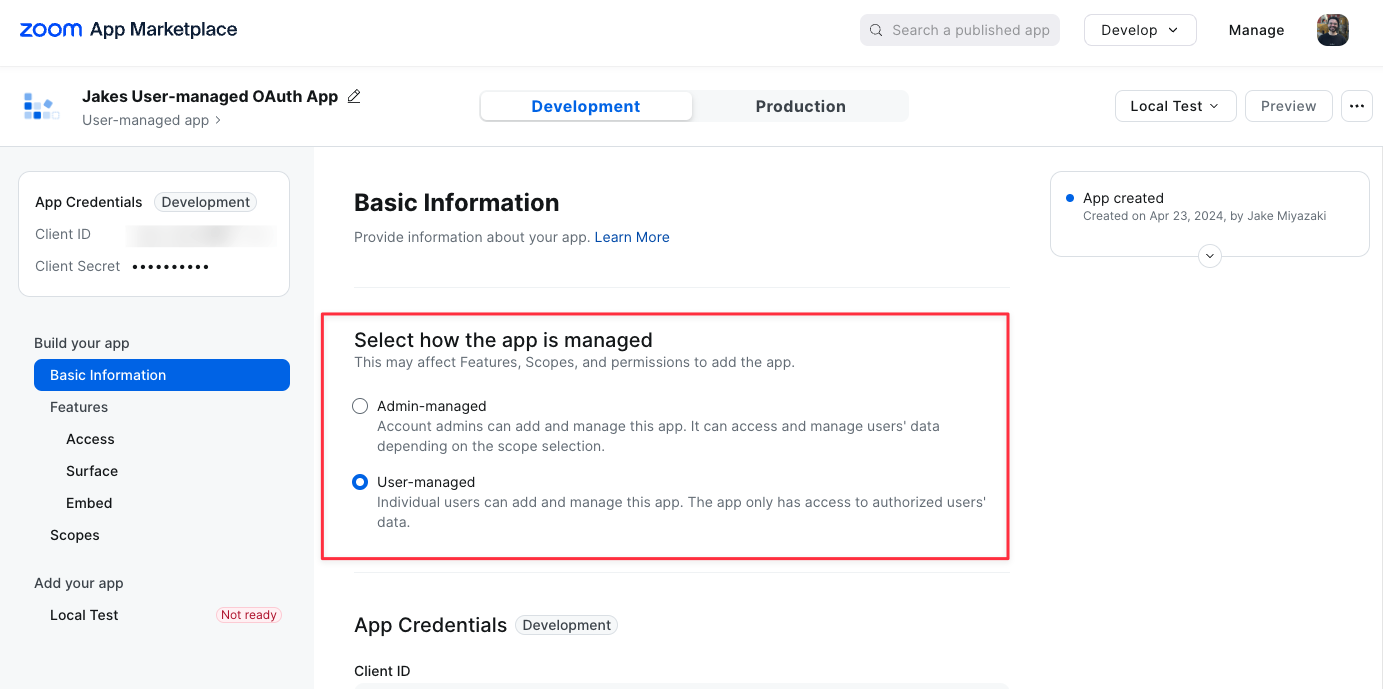
Select how the app is managed: User vs Admin-managed
In general, if your app serves individual end users, you should default to User-managed. If your app is used by entire organizations, you should use admin-managed.
Scopes
For the Zoom OAuth integration to work properly, we need to include a several OAuth scopes.
These are different for user-level and account-level apps - make sure to select the scopes accordingly.
User-level (user-managed) scopes
| Scope Name | Purpose |
|---|---|
meeting:read:local_recording_token | This scope is used to retrieve the "Join Token For Local Recording", which is provided to the bot to allow it to automatically begin recording without prompting the host for permission. |
meeting:read:list_meetings | This scope is used to enumerate all of a user's scheduled meetings, so that we can match meeting ID's to hosts. This enables us to generate a "Join Token for Local Recording" using the correct host credentials when a bot is sent to one of the meetings. |
meeting:read:meeting | This scope is enabled automatically if meeting:read:list_meetings is enabled, and cannot be removed |
user:read:user | This scope is used to read the user's Personal Meeting ID (PMI), so that a "Join Token for Local Recording" can be generated when a bot is sent to that meeting. |
user:read:zak | This scope is enabled automatically if Meeting SDK functionality is enabled on your OAuth app, and cannot be removed |
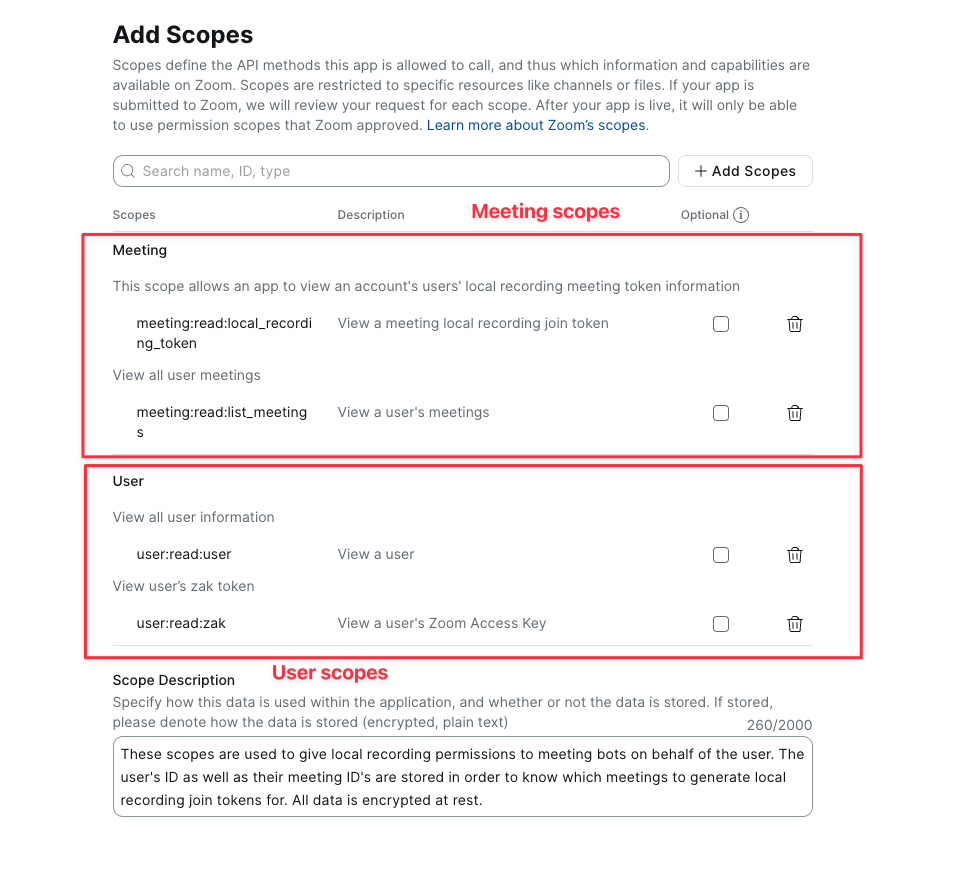
OAuth scopes for user-managed apps
The user:read:zak scope is only required if you're using the same Zoom App to
provide Meeting SDK functionality to your Zoom bots.
For the scope description, we recommend the following:
These scopes are used to give local recording permissions to meeting bots on behalf of the user. The user's ID as well as their meeting ID's (including their PMI) are stored in order to know which meetings to generate local recording join tokens for. All data is encrypted at rest.
Account-level (admin-managed) scopes
| Scope Name | Purpose |
|---|---|
meeting:read:local_recording_token:admin | This scope is used to retrieve the "Join Token For Local Recording", which is provided to the bot to allow it to automatically begin recording without prompting the host for permission. |
meeting:read:list_meetings:admin | This scope is used to enumerate all users' scheduled meetings, so that a "Join Token for Local Recording" can be generated when a bot is sent to one of the meetings. |
user:read:list_users:admin | This scope is used to read the users' Personal Meeting ID (PMI), so that a "Join Token for Local Recording" can be generated when a bot is sent to that meeting. |
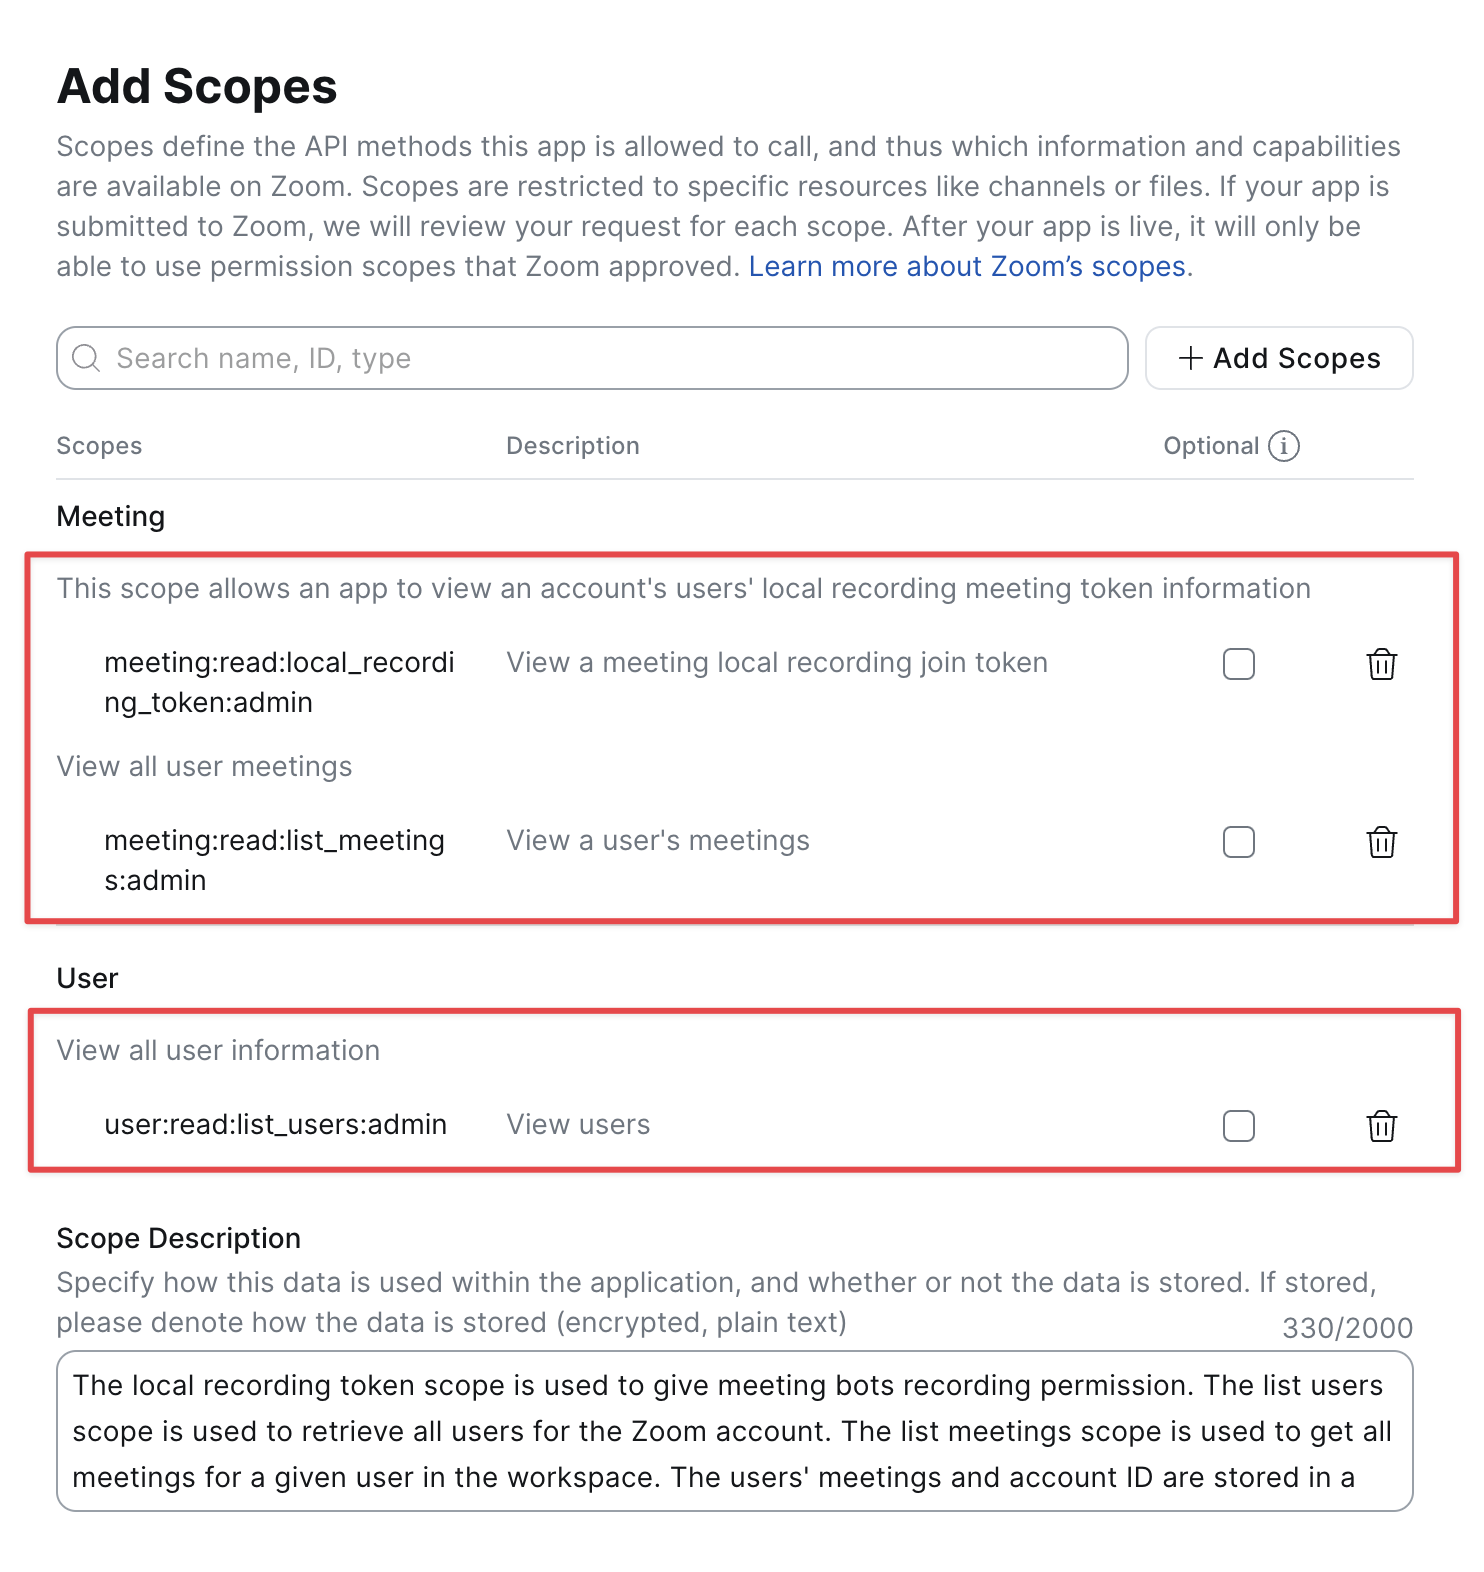
OAuth scopes for admin-managed apps
In the Scope Description, we recommend the following response:
The local recording token scope is used to give meeting bots recording permission. The list users scope is used to retrieve all users for the Zoom account. The list meetings scope is used to get all meetings for a given user in the workspace. The users' meetings and account ID are stored in a database and are encrypted at rest.
Note about data storageZoom requires you to specify how data is stored when using additional scopes.
Regardless of your app type, you should add the following to the description:
All data is encrypted using AES-256 encryption.
Save your app details
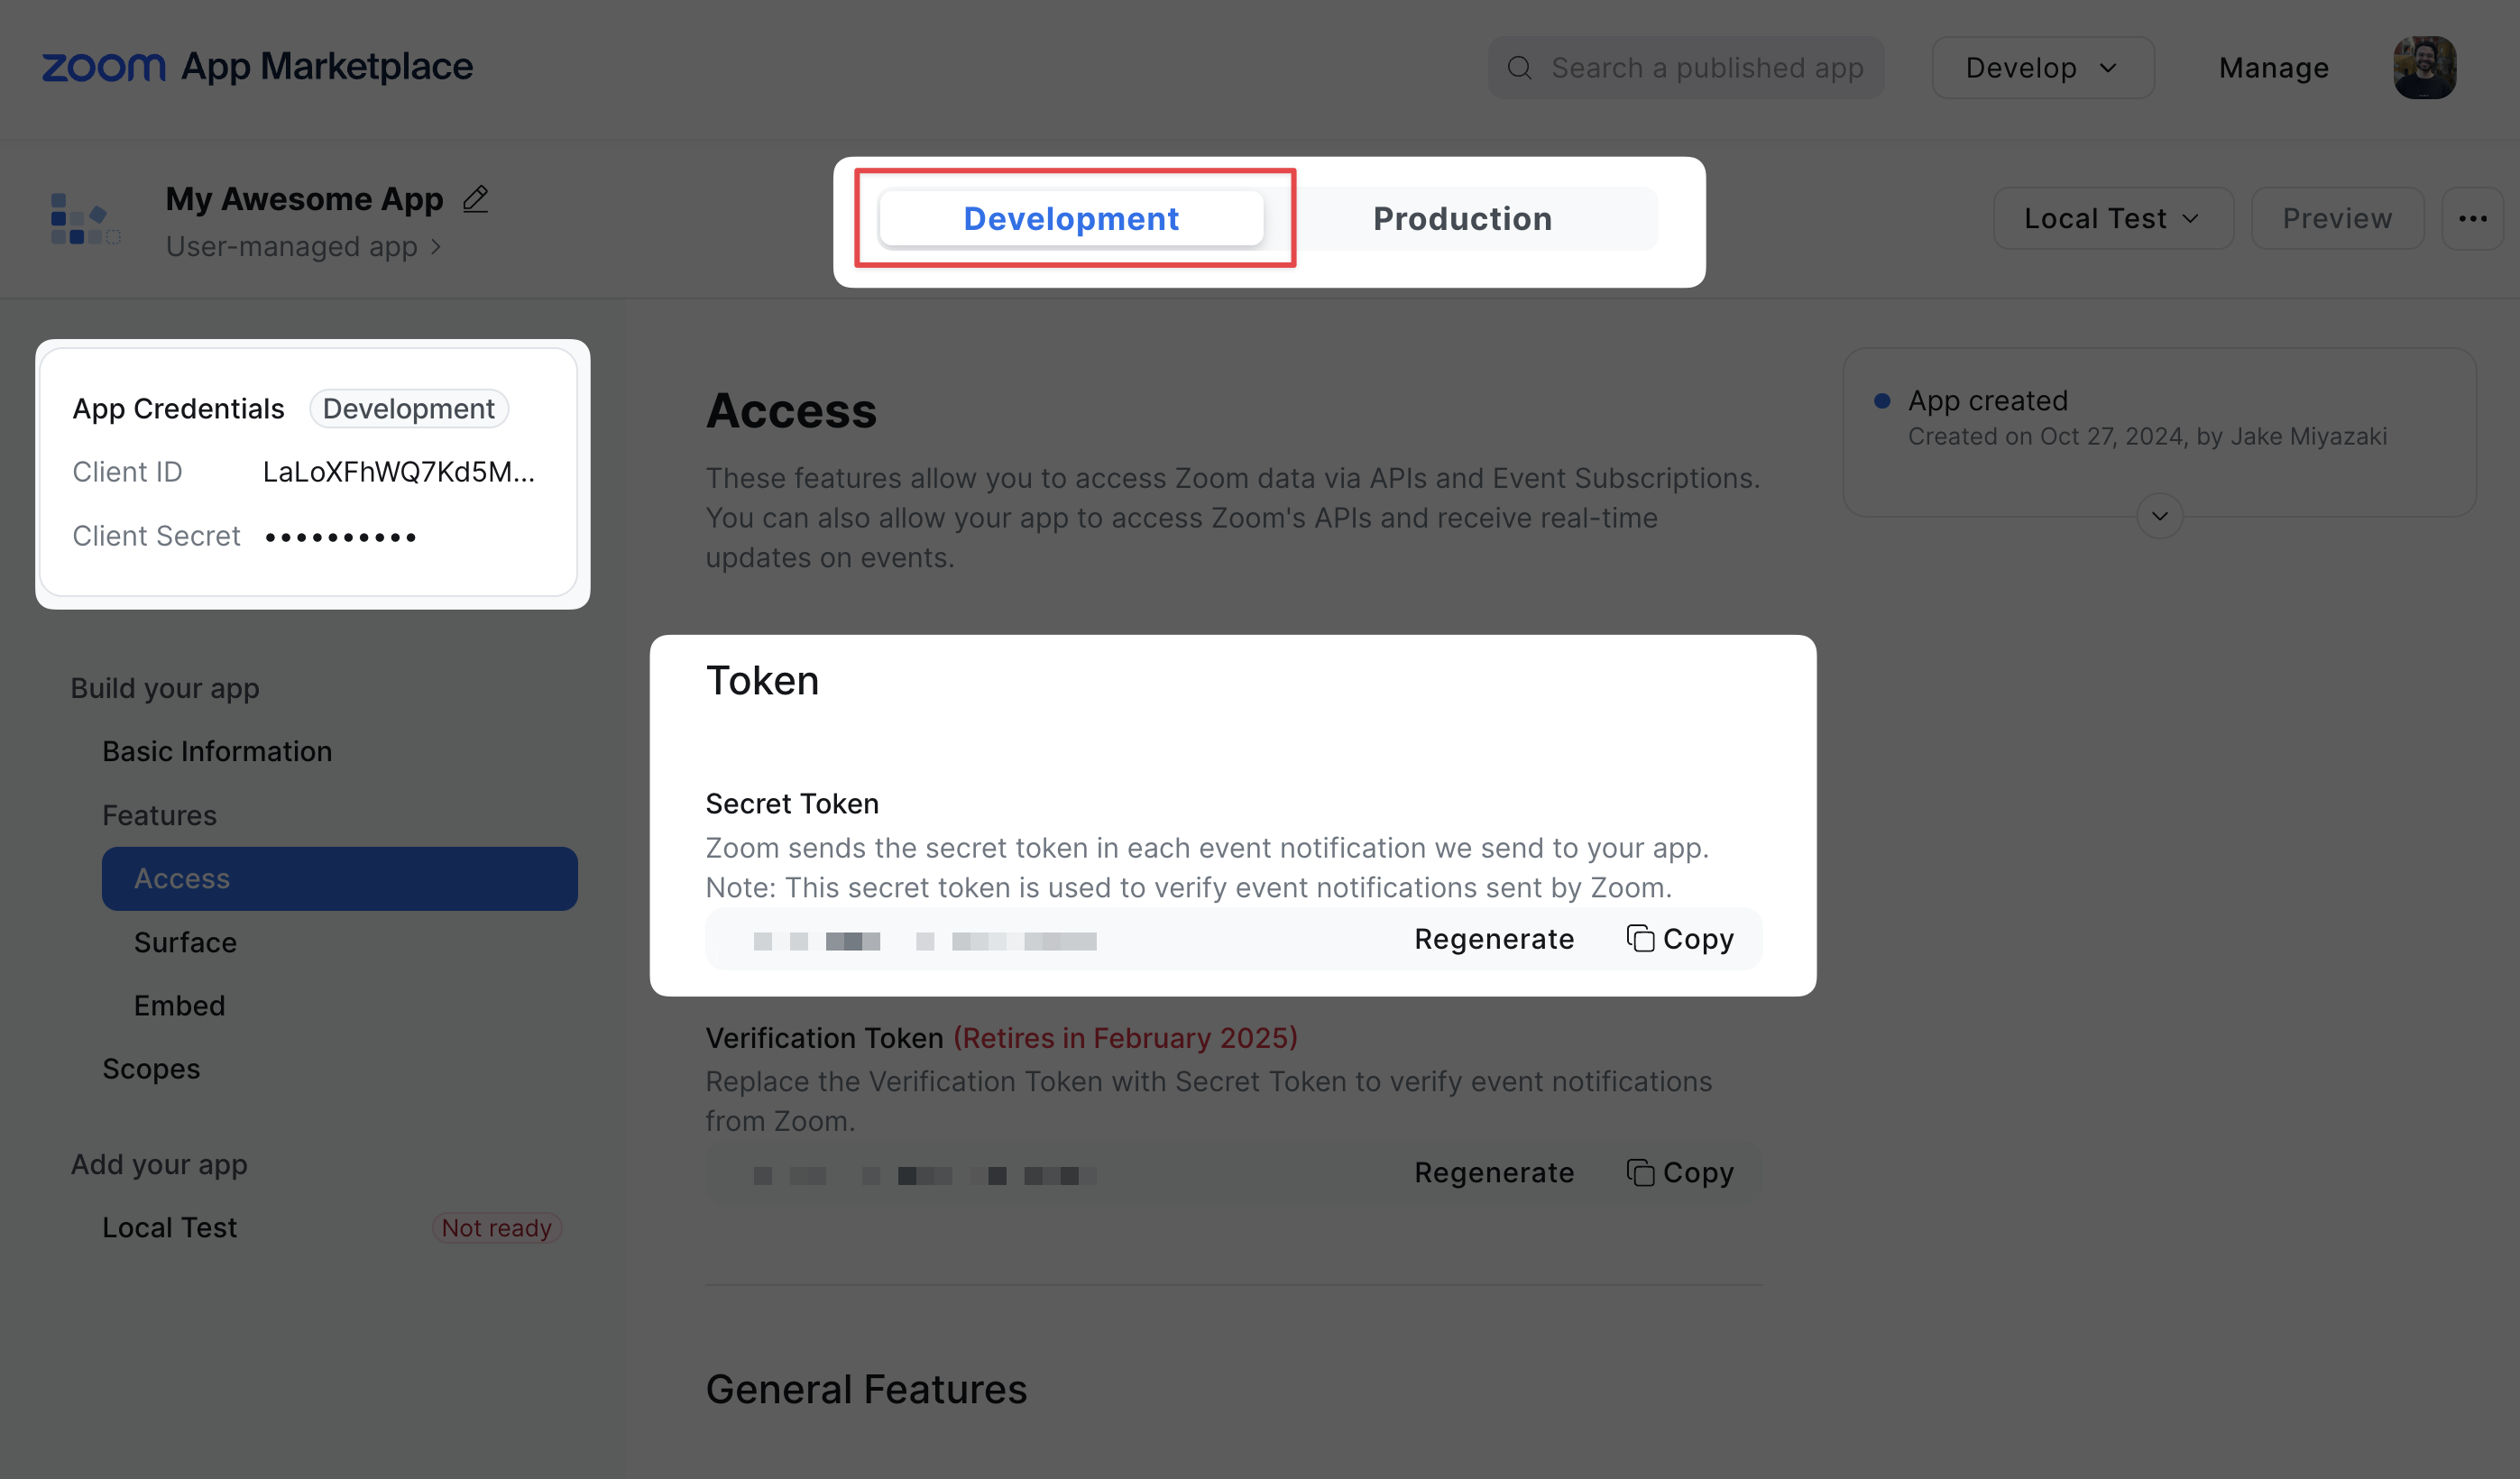
Once you've set up your Zoom app, you should save the following 3 pieces of information from your Development application:
- Client ID
- Client Secret
- Secret Token
Your client ID and client secret can be found under Build your app > Basic Information or in the Application Credentials card in the top left.
The Zoom App Secret Token can be found under Build your app > Features > Access
The client ID and secret are necessary to call's Zoom's API to get a Local Recording Token.
The Secret Token is used to verify incoming webhooks from Zoom.
We recommend storing these in a
.envfile for local development. This will make it simple to change these values to the corresponding production credentials when your Zoom app is approved.
2. Create the OAuth App in Recall
Create the app in the dashboard
Login to Recall and go to the API Explorer dashboard.
On the Zoom OAuth page, select Create App.
Fill out the details, copied from the last step, and make sure to select User-managed or Admin-managed depending on your app type.
Create the app via the API
You can alternatively create the Zoom OAuth App in Recall by using the Create Zoom OAuth App endpoint.
The body should include:
kind:user_leveloraccount_leveldepending on your appclient_id: The client ID from the previous stepclient_secret: The client secret from the previous stepwebhook_secret: The secret token from the previous step
Save the returned IDStore the id returned in the response somewhere easily accessible - you'll need this in the following steps.
This is your Recall Zoom OAuth App ID.
3. Configure webhooks
In order to automatically fetch tokens for a user's Zoom meetings, Recall needs a way to stay in sync with Zoom as new meetings are created.
To do this, we have to configure our Zoom app to send webhooks to a Recall endpoint - a webhook endpoint specific to the Zoom OAuth app you just created in the last step.
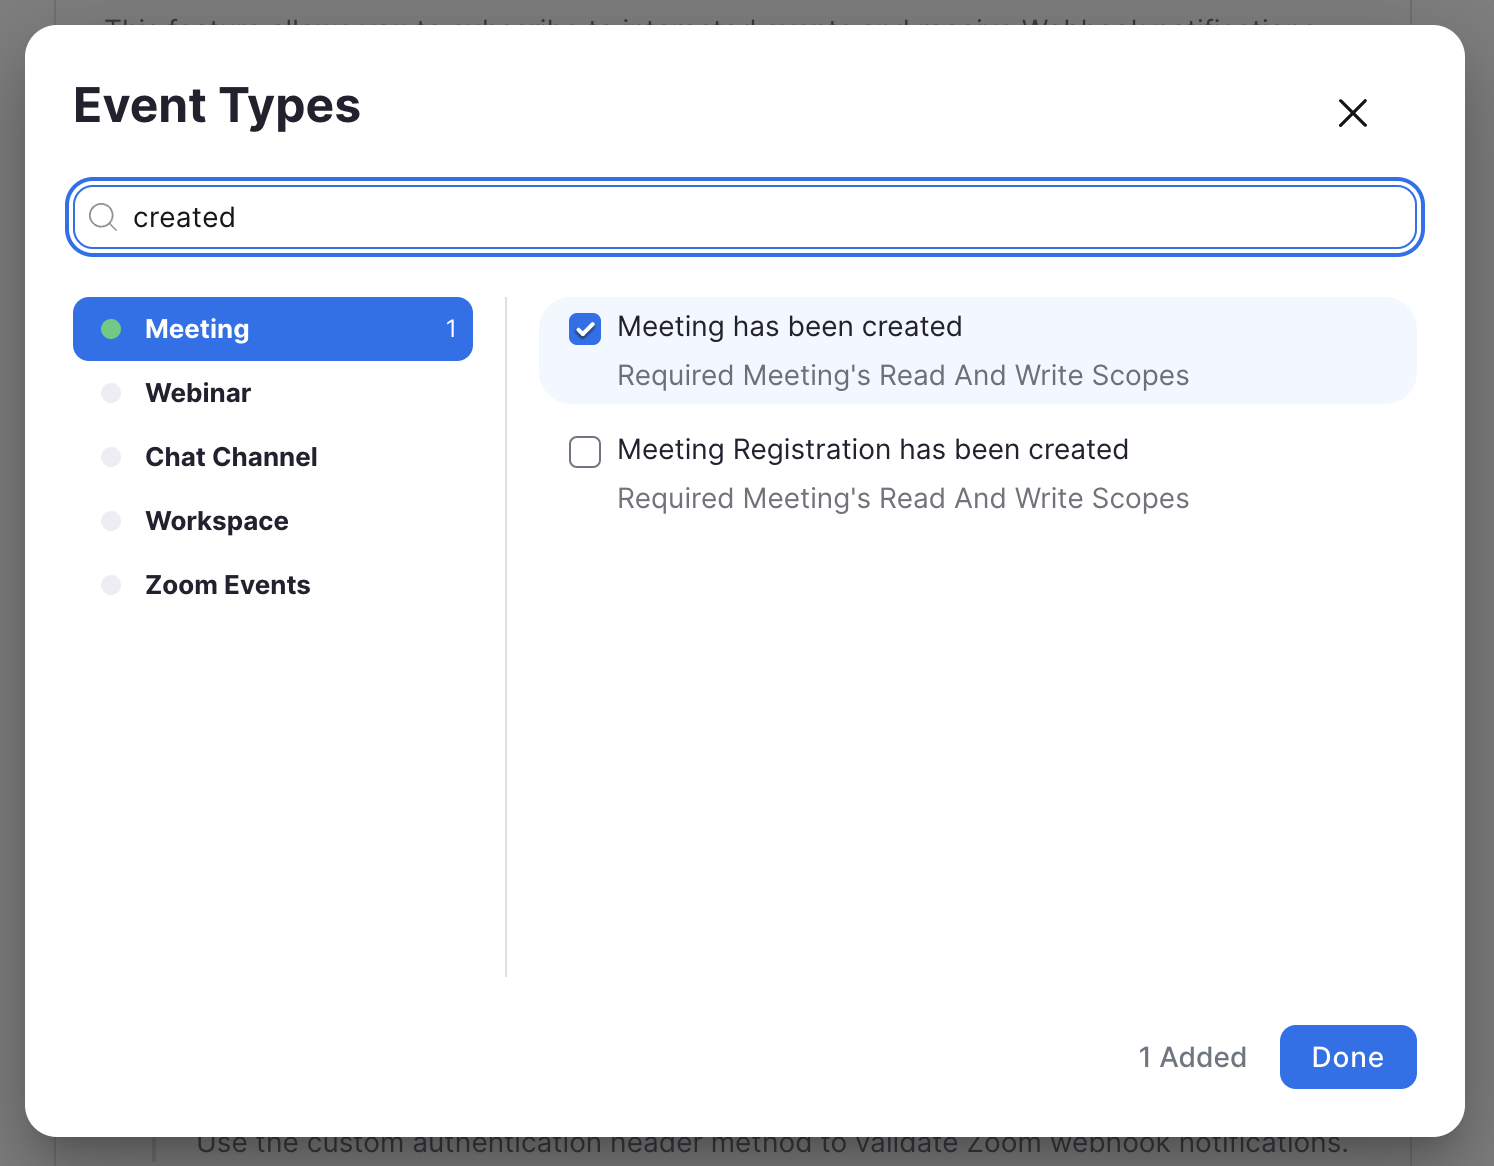
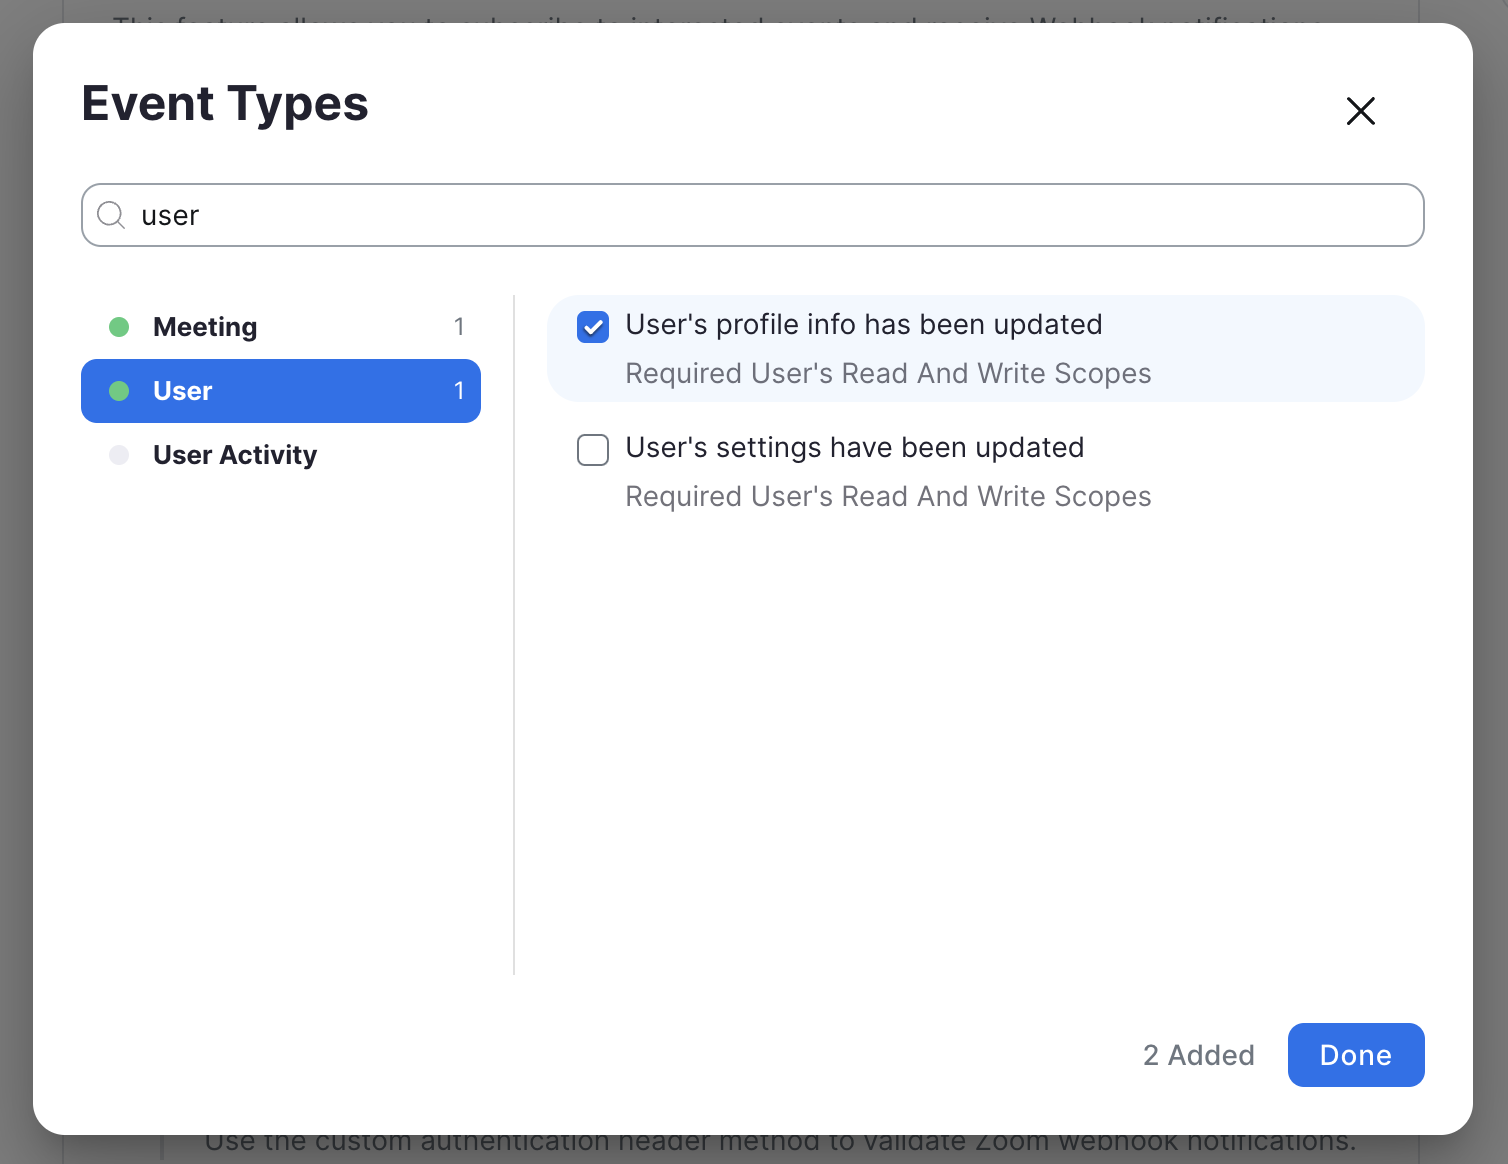
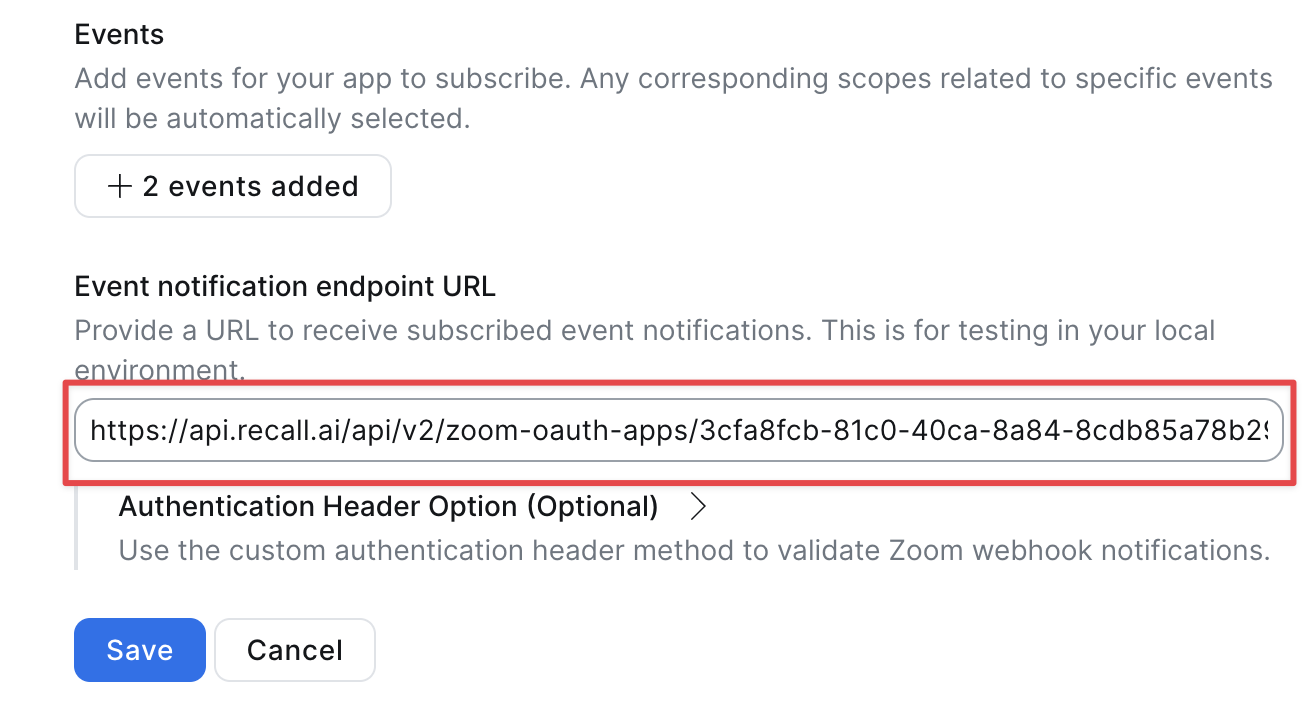
Add events
Navigate to the "Access" tab in the app dashboard. Toggle on "Event Subscription", click the "Add New Event Subscription" button, then the "Add Events" button, and select the following events:
Meeting > Meeting has been created
User > User's profile info has been updated
This is required to keep the personal meeting ID of the user in sync.
Add the event notification endpoint URL
Copy the webhook URL from your app in the dashboard:
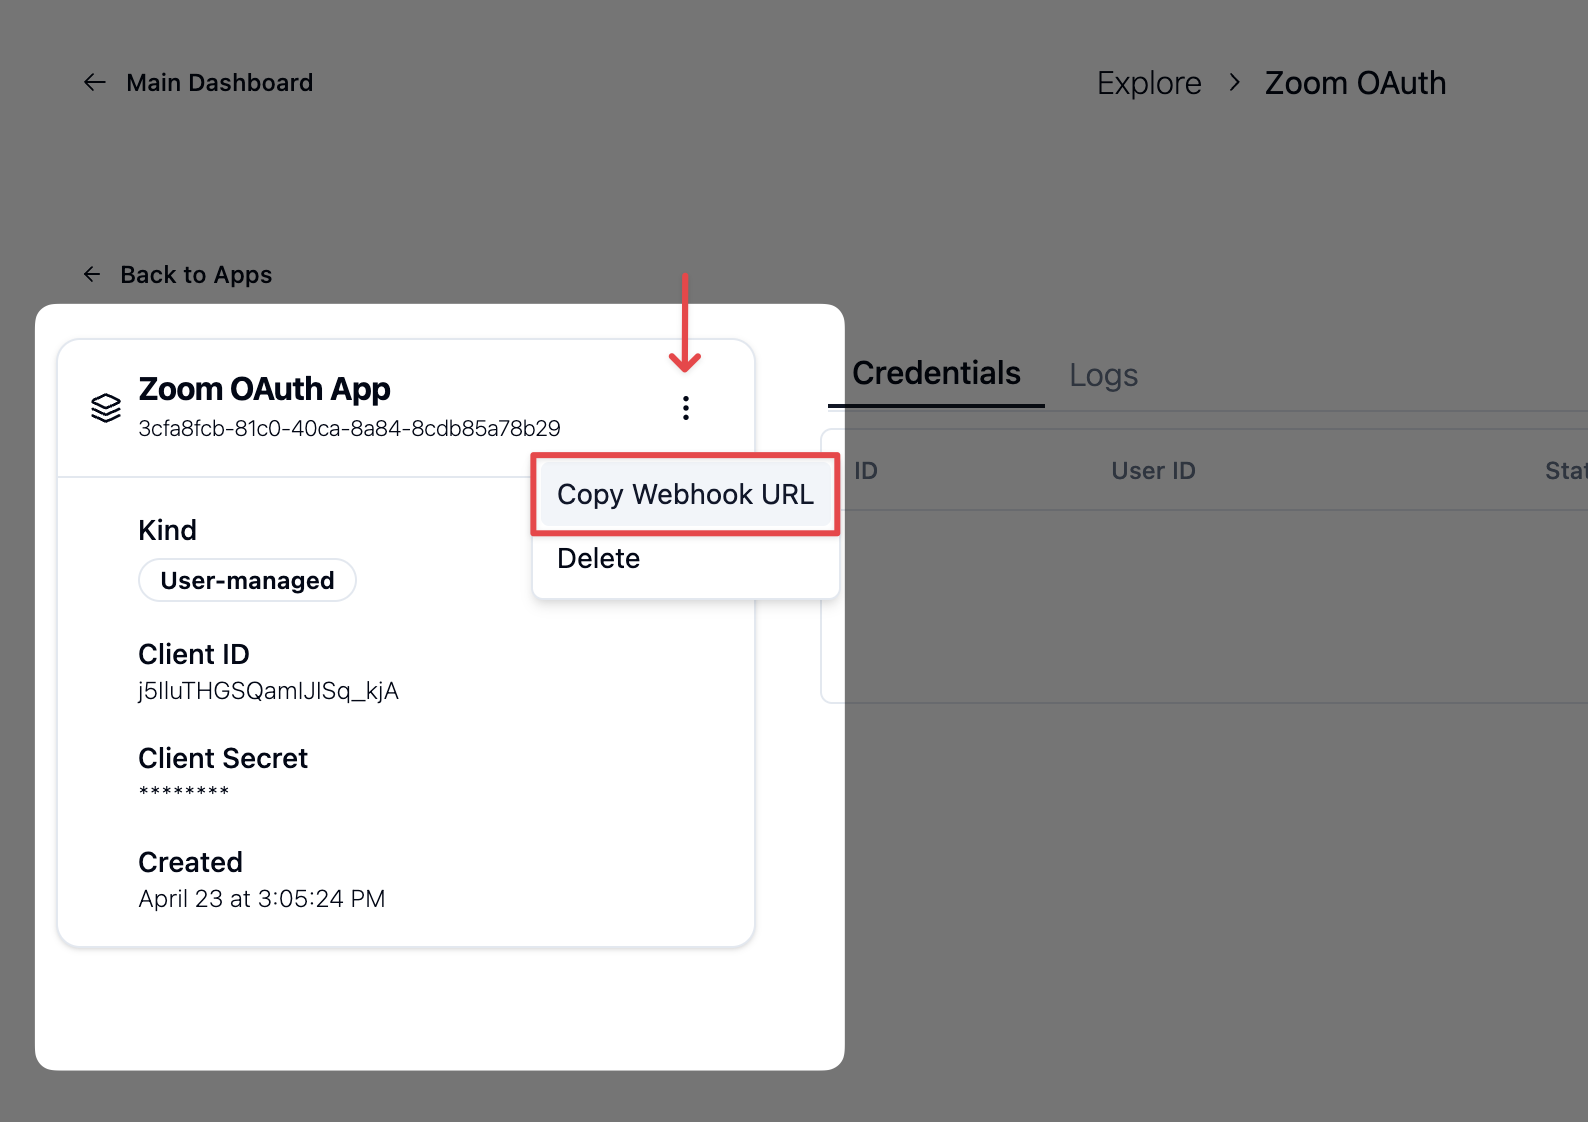
Enter this in the Event notification endpoint URL and save the event subscription.
Your Zoom app is now set up for the Recall OAuth integration. Almost there!
Recall vs customer managed OAuth
The next (and final) step is to implement the OAuth flow for your users in order to actually connect their Zoom accounts.
Once a user has gone through the OAuth flow, you can either manage access and refresh tokens on your end or have Recall manage these for you.
In general, we highly recommend using Recall-managed OAuth by default, unless:
- You already have an integration with the Zoom OAuth API.
- You need to call the Zoom API endpoints for other functionality in your app.
Before continuingMake sure you have these saved for the final step:
- Zoom App Client ID
- Zoom App Client Secret
- Zoom App Secret Token
- Recall Zoom OAuth App ID
Updated 3 days ago
Implement the OAuth Flow: Recall vs Customer-managed OAuth